Showing posts with label ASDM. Show all posts
How NOT to do an ASA failover pair upgrade successfully

How NOT to do an ASA failover pair upgrade successfully

Firstly let me say that I don't know what's up with me today. It's either down to not enough coffee, or just being plain tired. Either way this is a shameful post.

I have done ASA upgrades numerous times, both on single units and in failover pairs. They all went fine. Today though my brain just isn't engaging in order to make something that's second nature, a straight forward process.

So when you do an ASA upgrade the process is to copy the new files (the ASA bin file and ASDM bin file) to the firewalls disk.

I did this on the primary through ASDM, then went and changed the boot order and the ASDM image.
asa# configure terminal
asa(config)# boot system disk0:/asa915-smp-k8.bin
asa(config)# asdm image disk0:/asdm-716.bin
asa(config)#
I then found that I could not copy the files to the secondary ASA. FTP would not work, TFTP would not work, both had different errors, probably due to antivirus/firewall or something on the Windows box, and I could not get in to ASDM on the public IP or the inside address of the secondary.

I tried to fail over in the hope that if it was the primary I could get in again, but same issue.

Much cursing later I realised that if I changed the boot order back to the original settings then I could again access the secondary through ASDM.

Once the newer ASA and ASDM image were loaded onto the secondary, I set the boot order on the primary to the later version (9.1.5), and set the ASDM image version (7.1.6).

All is good, versions match. Let's failover.

After failover the secondary came up and the version was still at the same as before (9.1.3), and the ASDM was at 7.1.4.

I checked the boot order on the secondary, looked fine, all set as I wanted. Files were still present, so what was wrong? Checked running config - again all looked ok.

Stupidly I had not saved the config on the primary - so when the secondary booted up the startup config referenced the old versions, but once it was up the failover process sent the primary's running-config onto the standby, which is why it all looked fine.

After a bit more cursing and wanting to kick myself I saved the config, reloaded the standby, which then came up in the right version, failed over and reloaded the other ASA.

Both are now on the newer versions of ASA and ASDM, and I feel like a fool.

How to properly do an ASA failover pair upgrade

Copy the files to BOTH ASAs - its easy to do with ASDM - Tools > File Management and copy them over.

Set the boot system image and the asdm image (as above)
Then SAVE the config (copy run start)

Reload the standby unit:
asa#failover reload-standby
Make sure it all comes up ok, check failover looks fine
asa#sh failover | i Version"
Version: Ours 9.1(3), Mate 9.1(5)
Make the primary unit the standby, you can do this from the primary with the command:
asa#no failover active
And then reload the standby using the reload-standby command again.
Lastly check failover again:
asa#sh failover | i Version"
Version: Ours 9.1(5), Mate 9.1(5)
If all goes well it should be completed within about 15 minutes at the most! If you are using SSH then you might need to reconnect after the failover.

If you need me I'll be standing in the corner...

Freeradius and Cisco ASAs - Proper separation of roles!

I wrote some time ago about separating read-only access from admin access to Cisco ASAs using Microsoft NPS. It worked in theory, but a problem was found that an AD user who was not a member of either OU could still authenticate to the ASA using ASDM at level 15. Clearly this was less than ideal. Check out the link though as it shows how to set up the ASA to use Radius and we'll need that in a while.

I bounced around some more ideas, tested things out using Microsoft NPS, and even tried TACACS using Tac-plus. Still no dice. I went back to the idea of using Radius, mainly because of the fact that I didn't want to have to run two systems to do the same thing, NPS got us most of the way there, TACACS would probably have finished the job, but requires a lot more investment in time, knowledge and money. Coupled with the fact that the IPS modules in our ASAs only support RADIUS I knew it was time to head back to the RADIUS idea and try and put this to bed.

Microsoft NPS doesn't cut the mustard though. Yes it's a good product, but clearly not the right product for this scenario.

Freeradius on the other hand offered something new, and I stumbled across the idea of using it from this very excellent post here. Our set up is slightly different though, as we are using Microsoft AD as the LDAP backend, and require the use of AD groups as well as nesting of access control.

To explain, we have two users; npstest is a read-only account. It should have access to the ASA through SSH and through ASDM, but only at a maximum of level 3. It is a member of the AD group "sec-fw-readonly". My own account should have full access on both SSH and ASDM and is a member of "sec-fw-administrator".

We start with a Centos box and install freeradius using the command:
yum install freeradius*
Once free radius is installed we need to head to the folder /etc/raddb/ and from there into the modules directory (/etc/raddb/modules). The first file we neeed to edit is the ldap file (vi ldap) and set our details for connecting to the AD server:
server = "adserver.domain.local"
identity = "cn=ldapreadonly,ou=Service Accounts,dc=domain,dc=local"
password = passw0rd
basedn = "dc=domain,dc=local"
filter = "(&(objectclass=user)(objectcategory=user)(userPrincipalName=%{%{Stripped-User-Name}:-%{User-Name}}*))"
groupmembership_attribute = "memberOf"
The first line specifies the domain controller to connect to, and the next line specifies the account to use, the third line is the password for that account. The basedn is where freeradius should start searching for user accounts, and the filter does some funky mapping of AD attributes to freeradius attributes. The groupmembership_attribute will be needed for the reading of AD groups which we will need later on.

Lastly for this file is to uncomment these two lines:
chase_referrals = yes
rebind = yes
If you don't uncomment those then you will get an "operations error" message when trying to search.

Next we must go back a level and into the sites-available file (/etc/raddb/sites-available) and edit the file "inner-tunnel". In the authorize section comment out (using a #) the word "files", and uncomment the word "ldap". In the authenticate section again comment out the "files" line and uncomment the ldap section so it looks like this:
Auth-Type LDAP {
    ldap
}
Now we can edit the "default" file in the same folder, and make the exact same changes as the inner-tunnel file above.

Once this is done we can start defining our clients, this is in the file /etc/raddb/clients.conf and add your ASA in:
client 192.168.2.253 {
        secret = test123
        shortname = testasa
        nastype = cisco
}
With the secret being the shared secret you are going to use on your ASA.

In order to get both SSH and ASDM working as we need them to we need to uncomment one line in /usr/share/freeradius/dictionary, look for the following:
#
#        The Cisco VPN300 dictionary is the same as the altiga one.
#        You shouldn't use both at the same time.
#
#$INCLUDE dictionary.cisco.vpn3000
Just uncomment the $INCLUDE dictionary.cisco.vpn3000, and save the file.

Before we set up our ASA we are going to set up our group access in Radius, and to do that we go back into the default file. In the post-auth section I added the following:
if (LDAP-Group == "sec-fw-Administrator") {
        update reply {
                Service-Type = "Administrative-User",
                Cisco-AVPair = "shell:roles=network-admin",
                Cisco-AVPair += "shell:priv-lvl=15",
                CVPN3000-Privilege-Level = 15
                }
}
elsif (LDAP-Group == "sec-fw-readonly") {
        update reply {
                Service-Type = "Administrative-User",
                Cisco-AVPair = "shell:roles=network-operator",
                Cisco-AVPair += "shell:priv-lvl=1",
                CVPN3000-Privilege-Level = 3
                }
}
else {
                reject
}
Here we are specifying that a member of sec-fw-administrator should be an administrative user, with privilege level 15. The network-admin line is ready for when we switch our Nexus to use freeradius (as previously we set our Nexus to use Microsoft NPS as well). If our user is not a member of sec-fw-administrator then we need to see if they are a member of sec-fw-readonly, it they are then they should get into the ASA but only at a maximum of level 3. Finally if they are not a member of either the connection attempt should be rejected.

Finally we can switch our ASA to use freeradius, the config looks like this:
aaa-server FreeRadius protocol radius
aaa-server FreeRadius (Inside) host 192.168.3.121
 key test123
 authentication-port 1812
 accounting-port 1813
aaa authentication ssh console FreeRadius LOCAL
aaa authentication enable console FreeRadius LOCAL
aaa authentication http console FreeRadius LOCAL
aaa accounting enable console FreeRadius
aaa accounting ssh console FreeRadius
aaa authorization exec authentication-server
Now we can test. Firstly by logging in with my account:
login as: sfordham
sfordham@192.168.2.253's password:
Type help or '?' for a list of available commands.
testasa> sh curp
Username : sfordham
Current privilege level : 1
Current Mode/s : P_UNPR
testasa> en
Password: *********
testasa# sh curp
Username : sfordham
Current privilege level : 15
Current Mode/s : P_PRIV
testasa#
And with ASDM:

Next we test with a readonly level account:
login as: testnps
testnps@192.168.2.253's password:
Type help or '?' for a list of available commands.
testasa> sh curp
Username : testnps
Current privilege level : 1
Current Mode/s : P_UNPR
testasa> en
Password: ***********
testasa# sh curp
Username : testnps
Current privilege level : 3
Current Mode/s : P_PRIV
testasa#
And with ASDM:

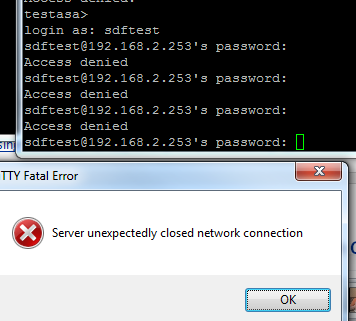
Lastly with an account that should be rejected:


Finally we have a working solution!

Why does ASDM access to active firewalls stop?

This really annoys me, and its a pretty common occurrence with ASAs set up in a failover pair. ASDM access will work to the standby member of the pair, but not to the primary. It has worked in the past, but it just stops working.

With the following setup - one PC with the lastest ASDM software installed and two ASA firewalls. Hardly a complex scenario. Well we start off with full ASDM access to both active and standby, but for some reason, after a while, ASDM access works to the standby in the pair, but not to the primary (active).

We can rule out a problem with ASDM, or with Java (because we can get to the standby). We can also rule out a problem with the http server and access rules for such, as the standby member gets its rule base from the primary - we can access the standby so we know that the rules to allow ASDM access are fine.

We can reload the standby, wait for it to come backup, for the configs to resync, and when the two show that all is healthy, perform a failover, and reboot the other (what was the primary but is now the secondary).

This usually works fine, but not always.

If we check the uptime:


We can see that the device uptime is at most 21 minutes, but still, no ASDM access to the active firewall:


SSH access works fine though, and trying to access through a web browser returns "Page cannot be displayed", whereas accessing the standby through a browser brings you into the correct page.

So what is the cause and what is the solution?

From what I have read on the various Google searches it does appear to be cause by uptime exceeding one year. You would have thought that this would apply to device uptime rather than cluster uptime, and I have ASAs in other locations, again in a failover cluster that also exceed cluster uptime of one year and they work fine AFTER doing a reload-standby, failover, reload-standby, but have exhibited the same issue.

It's not version specific as I have seen this in ASA 8.X and 9.X.

Interestingly, running "sh asp table socket" shows that the ASA is listening on the inside interface, and although connections cannot be made on the inside, ASDM from an outside address is still possible. So is it linked to an interface?


Where the full address is blanked out is an external address, where just an octet is blanked out is an internet address. So we can see https (i.e. ASDM) from an outside address still works!

I have tried removing the rules for ASDM access on the Inside and reapplying them, but this still does not work.

If anyone has encountered and fixed this I would love to hear back from you!

Running an ASA within GNS3

I am going to step away from IOU for a moment and head back to GNS3. In this post we are going to look at running a couple of ASAs within GNS3.

You will need:
  • asa842-initrd.gz
  • asa842-vmlinuz
  • GNS3
  • Qemu (latest)
I am using a Mac for this, but I have also got it working on a Windows 7 PC.

Download the latest GNS3 and Qemu install files from http://www.gns3.net/download/ and from http://www.gns3.net/qemu/.

Install as you normally would and make sure that the latest Qemu is installed by unzipping the Qemu package, then from terminal CD through to the folder and install it using the command "./Qinstall".

In GNS properties set the Qemu paths as instructed in the readme:


Qemu set up for GNS3

Click on the test button at the bottom to make sure that everything is working.


Qemu in GNS3

Still in the preferences window head over to the ASA tab under the Qemu option.

The settings we are using here are:


ASA GNS3 Qemu options

And the ASA specific settings are:


ASA GNS3 kernel cmd line

Lastly, save your settings

gns3


Start up a new GNS3 project and drag a couple of ASAs onto the workspace and connect them up:


ASAs running on GNS3
Then click on start and connect via the terminal:


ASAs on GNS3


From here we can even use ASDM to manage our ASAs, which I'll probably cover later on.

Separating Monitor only and Admin access to Cisco ASDM (ASA) for users authenticated via LDAP

Hopefully this will be the last topic about AAA authentication and Cisco, not because its either unimportant or irrelevant to the CCIE, just because I have spent ages delving into AAA with setting up AAA access to IPS modules on ASA, or catalyst switches, or Nexus switches, and finally I have worked out how to separate admin and read-only access to Cisco ASDM for ASA's via AAA using LDAP.
Continuing the general network security implementation my role centres around, I need to keep a distinct separation of duties as part of our PCI compliance, so when the ticket came in to set up read-only ASDM access to our ASA firewalls for our network operators, I thought, fine, no problem. We already had them authenticate via LDAP both for administration and for AnyConnect VPN access, so it should not be too hard, and as we already have radius set up for the IPS modules and for the Nexus and Catalyst switches, I have two potential methods of implementation available to get this working.

Well, actually it took me longer than I had expected. Through testing I used my own account, and a test account called testnps. My account is a member of sec-fw-admin, and the test account is a member of sec-fw-ro.

Radius as we have seen in previous posts offers the Cisco-AV-Pair which we have successfully used, but try as I might, no matter how successful with getting it to work as required on the CLI, ASDM would always drop the user straight into level 15 access (full rights), or sometimes, no access at all.

So I turned back to LDAP, as I want to avoid implementing TACACS+ for this sole purpose. LDAP has already been working successfully so far, but then its just looking at one security group, an the expected result is either permit or deny, based on whether the user is found in that group. Extending this should therefore not be too hard.

The issues arose from the fact that we have differing levels that need to be addressed, so lets have a look at these.

IETF-Radius-Service-Type

The IETF-Radius-Service-Type can be one of a three values, either 6 which is Administrative and allows full access, 7, which is NAS-Prompt, whereby the user cannot access privileged EXEC mode through the enable command, or 5 which is "Outbound" - meaning no administrative access at all. This page from Cisco's website gives some more information.

ASDM defined user roles

These can be either be 15, offering full access, 5, which is read-only, and 3 which is Monitor Only and only allows access to the monitoring section. To set up the predefined roles from within ASDM click on the button labelled "Set ASDM Defined User Roles" under Configuration > Device Management > Users/AAA > AAA Access > Authorization.

So at the moment I had, in my LDAP attribute map, the IEFT-Radius-Service-Type which was mapped to memberOf, and in turn this references either the sec-fw-admin group at level 7, or the sec-fw-ro at level 6.

TestASA# sh run ldap attribute-map test4
map-name  memberOf IETF-Radius-Service-Type
map-value memberOf "cn=sec-FW-Admin,OU=Security Groups,DC=802101,DC=local" 6
map-value memberOf "cn=sec-fw-ro,OU=Security Groups,DC=802101,DC=local" 5

But this still lets a member of sec-fw-ro in at level 15 on ASDM and the CLI. If you try to re-map memberOf to another value, which would have been the obvious and easy choice, then you quickly find that you can't map it twice to two different attributes.


ASDM attribute mapping


Eventually I found this article on the Cisco website, which pointed me in the right direction. Now the solution in the article is this:


ciscoasa# sh run ldap attribute-map LDAPreadonly
map-name memberOf IETF-Radius-Service-Type
map-value memberOf "CN=Account Operators,CN=Builtin,DC=MCS55,DC=com" 6
map-name sAMAccountName Privilege-Level
map-value sAMAccountName "ashishv" 5
ciscoasa#

There are two issues with this.

One: Members not explicitly stated will be denied access
Two: It does not scale well

So lets solve the second part first.

The method above would mean that for every user with admin access, or with monitor access a seperate entry needs to be explicitly set within the attribute map. This is fine if you only have maybe one, or two, of each and only one firewall, but when you organization scales this means that with every staff change (staff leaving, new staff starting etc) you have to change the attribute map, and potentially with a large number of firewalls this could take some time.

I found a list of AD attribute fields to use, and found one that would usually be unused, and therefore fit for purpose. Hidden away within AD is a comment field. We can find this under Attribute Editor  after enabling Advanced view in ADUC. 


Enable advanced view in ADUC


I added the comment fw-ro for the testnps account.


AD comment field


So now we can, for the appropriate users add this comment in for use in the attribute map.

So implementing this with a slight change to:

TestASA# sh run ldap attribute-map test4
map-name  comment Privilege-Level
map-value comment fw-ro 5
map-name  memberOf IETF-Radius-Service-Type
map-value memberOf "cn=sec-FW-Admin,OU=Security Groups,DC=802101,DC=local" 6
map-value memberOf "cn=sec-fw-ro,OU=Security Groups,DC=802101,DC=local" 5

Results in the testnps account being able to log into ASDM, at the correct level (5), but my own account is denied access:


ASDM privilege level denied


So this takes us back to the first issue, and we must therefore add a second attribute:

TestASA# sh run ldap attribute-map test4
map-name  comment Privilege-Level
map-value comment fw-ro 5
map-value comment fw-rw 15
map-name  memberOf IETF-Radius-Service-Type
map-value memberOf "cn=sec-FW-Admin,OU=Security Groups,DC=802101,DC=local" 6
map-value memberOf "cn=sec-fw-ro,OU=Security Groups,DC=802101,DC=local" 5

I added the comment "fw-rw" to my account, and this works in the desired way, the testnps account has level 5 access and my own account has full admin access at level 15.

So now we have a method to separate admin and monitor only access to the firewall, and it is also scalable within the enterprise environment.