Showing posts with label RADIUS. Show all posts

Running ZeroShell in UNetLab

Props to my man Courtney for turning me onto this nice little linux distro. It's called ZeroShell and it does a tonne of cool stuff. Ideal for the CCIE Security lab, if resources are an issue. It will run happily on a 5GB harddisk, and hardly uses any resources when resting.

So, do you want a full list of ZeroShell's capabilities? Of course you do. It will do:
  • Load balancing & failover over multiple internet connections
  • RADIUS server (802.1x, EAP-TLS, EAP-TTLS, PEAP
  • Captive portal for wired and wireless clients
  • QoS
  • HTTP proxy
  • VPN
  • RIPv2
  • STP
  • 802.1Q
  • NAT
  • Multi-zone DNS
  • DHCP
  • LDAP integration
It's got a lot of cool features. Check it out over at http://www.zeroshell.org/.

So anyway, Courtney said he was going to document how to get it running on GNS3, and I thought it would be cool to try it out on UNetLab.

I started by creating a folder called win-zeroshell under /opt/unetlab/addons/qemu/ - it's got to be called win- at the moment, until a linux- template is fixed up. I then copied the latest ISO there. Then I created a 5G disk, and ran the wrapper.
root@unl01:~# cd /opt/
root@unl01:/opt# cd unetlab/
root@unl01:/opt/unetlab# cd addons/
root@unl01:/opt/unetlab/addons# cd qemu/
root@unl01:/opt/unetlab/addons/qemu# cd win-zeroshell/
root@unl01:/opt/unetlab/addons/qemu/win-zeroshell# ls
ZeroShell-3.3.2.iso
root@unl01:/opt/unetlab/addons/qemu/win-zeroshell# mv ZeroShell-3.3.2.iso cdrom.iso
root@unl01:/opt/unetlab/addons/qemu/win-zeroshell# /opt/qemu/bin/qemu-img create -f qcow hda.qcow2 5G
Formatting 'hda.qcow2', fmt=qcow size=5368709120 encryption=off
root@unl01:/opt/unetlab/addons/qemu/win-zeroshell# ls
cdrom.iso  hda.qcow2
root@unl01:/opt/unetlab/addons/qemu/win-zeroshell# /opt/unetlab/wrappers/unl_wrapper -a fixpermissions
root@unl01:/opt/unetlab/addons/qemu/win-zeroshell#
I then added a new node to a test lab I had on the go, and fired it up. Once connected via VNC, you can then install it to the harddrive, by selecting option A from the menu:

Running ZeroShell in UNetLab

The install is straight forward, pretty much just accept all the defaults.

Once the install is done, shut it down, and then rename the cdrom.iso file to something else - otherwise it'll boot from the cdrom.

Once done, fire it up again. I created a 5GB disk for it, and it is only using a fraction of that:

Running ZeroShell in UNetLab

The actual topology is very simple:

Running ZeroShell in UNetLab
Once the Windows box is on the same subnet, we can access the web gui. Forgive the crappy colors:

Running ZeroShell in UNetLab

There you go, really quick to set up and loads of features. It'll do X.509 certificates, a little easier than setting this up on a Windows server, and whilst the GUI certainly wont win any prizes for the most attractive interface, who want's style over substance?

This certainly has all the ingredients.

Edit: Here is a link to Courtney's video. Please check it out. Or view the video here:


Freeradius and Cisco ASAs - Proper separation of roles!

I wrote some time ago about separating read-only access from admin access to Cisco ASAs using Microsoft NPS. It worked in theory, but a problem was found that an AD user who was not a member of either OU could still authenticate to the ASA using ASDM at level 15. Clearly this was less than ideal. Check out the link though as it shows how to set up the ASA to use Radius and we'll need that in a while.

I bounced around some more ideas, tested things out using Microsoft NPS, and even tried TACACS using Tac-plus. Still no dice. I went back to the idea of using Radius, mainly because of the fact that I didn't want to have to run two systems to do the same thing, NPS got us most of the way there, TACACS would probably have finished the job, but requires a lot more investment in time, knowledge and money. Coupled with the fact that the IPS modules in our ASAs only support RADIUS I knew it was time to head back to the RADIUS idea and try and put this to bed.

Microsoft NPS doesn't cut the mustard though. Yes it's a good product, but clearly not the right product for this scenario.

Freeradius on the other hand offered something new, and I stumbled across the idea of using it from this very excellent post here. Our set up is slightly different though, as we are using Microsoft AD as the LDAP backend, and require the use of AD groups as well as nesting of access control.

To explain, we have two users; npstest is a read-only account. It should have access to the ASA through SSH and through ASDM, but only at a maximum of level 3. It is a member of the AD group "sec-fw-readonly". My own account should have full access on both SSH and ASDM and is a member of "sec-fw-administrator".

We start with a Centos box and install freeradius using the command:
yum install freeradius*
Once free radius is installed we need to head to the folder /etc/raddb/ and from there into the modules directory (/etc/raddb/modules). The first file we neeed to edit is the ldap file (vi ldap) and set our details for connecting to the AD server:
server = "adserver.domain.local"
identity = "cn=ldapreadonly,ou=Service Accounts,dc=domain,dc=local"
password = passw0rd
basedn = "dc=domain,dc=local"
filter = "(&(objectclass=user)(objectcategory=user)(userPrincipalName=%{%{Stripped-User-Name}:-%{User-Name}}*))"
groupmembership_attribute = "memberOf"
The first line specifies the domain controller to connect to, and the next line specifies the account to use, the third line is the password for that account. The basedn is where freeradius should start searching for user accounts, and the filter does some funky mapping of AD attributes to freeradius attributes. The groupmembership_attribute will be needed for the reading of AD groups which we will need later on.

Lastly for this file is to uncomment these two lines:
chase_referrals = yes
rebind = yes
If you don't uncomment those then you will get an "operations error" message when trying to search.

Next we must go back a level and into the sites-available file (/etc/raddb/sites-available) and edit the file "inner-tunnel". In the authorize section comment out (using a #) the word "files", and uncomment the word "ldap". In the authenticate section again comment out the "files" line and uncomment the ldap section so it looks like this:
Auth-Type LDAP {
    ldap
}
Now we can edit the "default" file in the same folder, and make the exact same changes as the inner-tunnel file above.

Once this is done we can start defining our clients, this is in the file /etc/raddb/clients.conf and add your ASA in:
client 192.168.2.253 {
        secret = test123
        shortname = testasa
        nastype = cisco
}
With the secret being the shared secret you are going to use on your ASA.

In order to get both SSH and ASDM working as we need them to we need to uncomment one line in /usr/share/freeradius/dictionary, look for the following:
#
#        The Cisco VPN300 dictionary is the same as the altiga one.
#        You shouldn't use both at the same time.
#
#$INCLUDE dictionary.cisco.vpn3000
Just uncomment the $INCLUDE dictionary.cisco.vpn3000, and save the file.

Before we set up our ASA we are going to set up our group access in Radius, and to do that we go back into the default file. In the post-auth section I added the following:
if (LDAP-Group == "sec-fw-Administrator") {
        update reply {
                Service-Type = "Administrative-User",
                Cisco-AVPair = "shell:roles=network-admin",
                Cisco-AVPair += "shell:priv-lvl=15",
                CVPN3000-Privilege-Level = 15
                }
}
elsif (LDAP-Group == "sec-fw-readonly") {
        update reply {
                Service-Type = "Administrative-User",
                Cisco-AVPair = "shell:roles=network-operator",
                Cisco-AVPair += "shell:priv-lvl=1",
                CVPN3000-Privilege-Level = 3
                }
}
else {
                reject
}
Here we are specifying that a member of sec-fw-administrator should be an administrative user, with privilege level 15. The network-admin line is ready for when we switch our Nexus to use freeradius (as previously we set our Nexus to use Microsoft NPS as well). If our user is not a member of sec-fw-administrator then we need to see if they are a member of sec-fw-readonly, it they are then they should get into the ASA but only at a maximum of level 3. Finally if they are not a member of either the connection attempt should be rejected.

Finally we can switch our ASA to use freeradius, the config looks like this:
aaa-server FreeRadius protocol radius
aaa-server FreeRadius (Inside) host 192.168.3.121
 key test123
 authentication-port 1812
 accounting-port 1813
aaa authentication ssh console FreeRadius LOCAL
aaa authentication enable console FreeRadius LOCAL
aaa authentication http console FreeRadius LOCAL
aaa accounting enable console FreeRadius
aaa accounting ssh console FreeRadius
aaa authorization exec authentication-server
Now we can test. Firstly by logging in with my account:
login as: sfordham
sfordham@192.168.2.253's password:
Type help or '?' for a list of available commands.
testasa> sh curp
Username : sfordham
Current privilege level : 1
Current Mode/s : P_UNPR
testasa> en
Password: *********
testasa# sh curp
Username : sfordham
Current privilege level : 15
Current Mode/s : P_PRIV
testasa#
And with ASDM:

Next we test with a readonly level account:
login as: testnps
testnps@192.168.2.253's password:
Type help or '?' for a list of available commands.
testasa> sh curp
Username : testnps
Current privilege level : 1
Current Mode/s : P_UNPR
testasa> en
Password: ***********
testasa# sh curp
Username : testnps
Current privilege level : 3
Current Mode/s : P_PRIV
testasa#
And with ASDM:

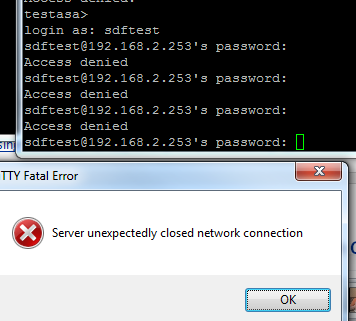
Lastly with an account that should be rejected:


Finally we have a working solution!

Separating Monitor only and Admin access to Cisco ASDM (ASA) for users authenticated via LDAP

Hopefully this will be the last topic about AAA authentication and Cisco, not because its either unimportant or irrelevant to the CCIE, just because I have spent ages delving into AAA with setting up AAA access to IPS modules on ASA, or catalyst switches, or Nexus switches, and finally I have worked out how to separate admin and read-only access to Cisco ASDM for ASA's via AAA using LDAP.
Continuing the general network security implementation my role centres around, I need to keep a distinct separation of duties as part of our PCI compliance, so when the ticket came in to set up read-only ASDM access to our ASA firewalls for our network operators, I thought, fine, no problem. We already had them authenticate via LDAP both for administration and for AnyConnect VPN access, so it should not be too hard, and as we already have radius set up for the IPS modules and for the Nexus and Catalyst switches, I have two potential methods of implementation available to get this working.

Well, actually it took me longer than I had expected. Through testing I used my own account, and a test account called testnps. My account is a member of sec-fw-admin, and the test account is a member of sec-fw-ro.

Radius as we have seen in previous posts offers the Cisco-AV-Pair which we have successfully used, but try as I might, no matter how successful with getting it to work as required on the CLI, ASDM would always drop the user straight into level 15 access (full rights), or sometimes, no access at all.

So I turned back to LDAP, as I want to avoid implementing TACACS+ for this sole purpose. LDAP has already been working successfully so far, but then its just looking at one security group, an the expected result is either permit or deny, based on whether the user is found in that group. Extending this should therefore not be too hard.

The issues arose from the fact that we have differing levels that need to be addressed, so lets have a look at these.

IETF-Radius-Service-Type

The IETF-Radius-Service-Type can be one of a three values, either 6 which is Administrative and allows full access, 7, which is NAS-Prompt, whereby the user cannot access privileged EXEC mode through the enable command, or 5 which is "Outbound" - meaning no administrative access at all. This page from Cisco's website gives some more information.

ASDM defined user roles

These can be either be 15, offering full access, 5, which is read-only, and 3 which is Monitor Only and only allows access to the monitoring section. To set up the predefined roles from within ASDM click on the button labelled "Set ASDM Defined User Roles" under Configuration > Device Management > Users/AAA > AAA Access > Authorization.

So at the moment I had, in my LDAP attribute map, the IEFT-Radius-Service-Type which was mapped to memberOf, and in turn this references either the sec-fw-admin group at level 7, or the sec-fw-ro at level 6.

TestASA# sh run ldap attribute-map test4
map-name  memberOf IETF-Radius-Service-Type
map-value memberOf "cn=sec-FW-Admin,OU=Security Groups,DC=802101,DC=local" 6
map-value memberOf "cn=sec-fw-ro,OU=Security Groups,DC=802101,DC=local" 5

But this still lets a member of sec-fw-ro in at level 15 on ASDM and the CLI. If you try to re-map memberOf to another value, which would have been the obvious and easy choice, then you quickly find that you can't map it twice to two different attributes.


ASDM attribute mapping


Eventually I found this article on the Cisco website, which pointed me in the right direction. Now the solution in the article is this:


ciscoasa# sh run ldap attribute-map LDAPreadonly
map-name memberOf IETF-Radius-Service-Type
map-value memberOf "CN=Account Operators,CN=Builtin,DC=MCS55,DC=com" 6
map-name sAMAccountName Privilege-Level
map-value sAMAccountName "ashishv" 5
ciscoasa#

There are two issues with this.

One: Members not explicitly stated will be denied access
Two: It does not scale well

So lets solve the second part first.

The method above would mean that for every user with admin access, or with monitor access a seperate entry needs to be explicitly set within the attribute map. This is fine if you only have maybe one, or two, of each and only one firewall, but when you organization scales this means that with every staff change (staff leaving, new staff starting etc) you have to change the attribute map, and potentially with a large number of firewalls this could take some time.

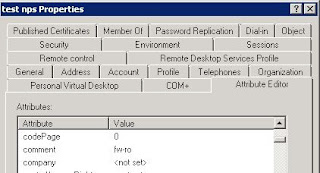
I found a list of AD attribute fields to use, and found one that would usually be unused, and therefore fit for purpose. Hidden away within AD is a comment field. We can find this under Attribute Editor  after enabling Advanced view in ADUC. 


Enable advanced view in ADUC


I added the comment fw-ro for the testnps account.


AD comment field


So now we can, for the appropriate users add this comment in for use in the attribute map.

So implementing this with a slight change to:

TestASA# sh run ldap attribute-map test4
map-name  comment Privilege-Level
map-value comment fw-ro 5
map-name  memberOf IETF-Radius-Service-Type
map-value memberOf "cn=sec-FW-Admin,OU=Security Groups,DC=802101,DC=local" 6
map-value memberOf "cn=sec-fw-ro,OU=Security Groups,DC=802101,DC=local" 5

Results in the testnps account being able to log into ASDM, at the correct level (5), but my own account is denied access:


ASDM privilege level denied


So this takes us back to the first issue, and we must therefore add a second attribute:

TestASA# sh run ldap attribute-map test4
map-name  comment Privilege-Level
map-value comment fw-ro 5
map-value comment fw-rw 15
map-name  memberOf IETF-Radius-Service-Type
map-value memberOf "cn=sec-FW-Admin,OU=Security Groups,DC=802101,DC=local" 6
map-value memberOf "cn=sec-fw-ro,OU=Security Groups,DC=802101,DC=local" 5

I added the comment "fw-rw" to my account, and this works in the desired way, the testnps account has level 5 access and my own account has full admin access at level 15.

So now we have a method to separate admin and monitor only access to the firewall, and it is also scalable within the enterprise environment.


Cisco Nexus and AAA authentication using Radius on Microsoft 2008 NPS

In a previous post I wrote about how to integrate Cisco IPS modules with Microsoft 2008 NPS server, for Radius authentication.

Now we are going to cover how to integrate Cisco Nexus with radius. The format is very similar to the IPS setup, so it may be worth having a read of the first post to get an idea.

We start with some basic assumptions, and one caveat:

Your basic Nexus switch configuration is already in place and can ping your NPS server (via the management vrf)
You already have an NPS server in place serving clients.

I am using the Cisco Titanium Nexus 7000 emulator (but the same process should apply to the NX5000 series, I need to do this on real Nexus 5000's so if there are any differences I will update this post).

Nexus client and profile settings on Microsoft 2008 NPS

We start by adding a client onto the NPS, we give it a friendly name, specify the IP address and set the radius secret (here I am using nxnps123). I have also set the vendor name to Cisco.


Cisco NPS as a Radius client

Cisco NPS as a Radius client

And now we have a client set up:


Cisco NPS as a Radius client

Now we create a policy to map access to the client. I have called this "TestNexus Admin", and the plan will be to have a read only policy added later on.


Nexus Radius policy in NPS

In the next window I start to specify the conditions, and will use the security group "sec-FW-admin", so click on Add to add a condition and select "Windows Groups"


Specifying windows groups for NPS

Now you can add your specific groups.
Next I add the Client Friendly Name, and use the same name I called the client:


Specifying client friendly name in NPS

We keep the default of Access granted and move on till we see the "Configure Authentication Methods", here we select just PAP and SPAP:

Cisco Radius authentication PAP

We can skip the "Configure Restraints" window and move on to "Configure Settings". Here we remove the two options under "Standard"

AAA radius properties

And now we can add a Vendor Specific entry:


Cisco AV pair Nexus radius

And for this entry we will use "shell-roles=*admin" (before anyone says this is wrong, please read the rest of the post to see why I havn't corrected this yet...)


Cisco av-pair NPS Nexus

And that's all the configuration on the Microsoft side (for the moment at least).

Nexus Radius setup and AAA Authentication

Just in case you havn't set up the basics on the Nexus the screenshots below show how to set the management vrf IP, and default routing, as well as confirming reachability to the NPS server:

Nexus basic setup for management

Notice here that we have to specify vrf management in the ping command for it to work

Specifying routing in Cisco Nexus

Now we know that we can "talk" to the NPS box we can start setting up the radius parts.

We start by setting the radius key, it should match the key used to set up the client under NPS (again here we are using "nxnps123"). The 0 next to "key" means that its unencrypted.

Then we set the host (which we should have at least two of for redundancy), and create an aaa group and add the server to this. the last command tells the Nexus to use the management vrf to communicate with the server.


Cisco Nexus radius setup

Now we can tell the Nexus to use radius for authentication, and we also tell it to keep track of errors:


Cisco Nexus AAA authentication setup

Finally, just in case our Radius server is down for any reason, the Nexus should use its local database for login:


Cisco Nexus AAA authentication local fallback
Now we can test login!


Using radius for authentication on Cisco Nexus
It works!

But we can't stop here. Like I pointed out earlier there was an issue with the shell:roles command within the NPS setup.

With the existing configuration we try saving the config:


Cisco Nexus permission denied

So lets look at the privilege levels:


Cisco Nexus privilege levels

Well, -1 was never a good thing in my book. So I changed the AV-pair to "shell:roles=*"network-admin vdc-admin"", logged out, and back in again:


Cisco Nexus copy run start

Now although the displayed privilege level is still showing -1, we can save the config.

Lastly I copied the profile in NPS, changed the Windows Group to one that has people we want with just read only access in it, and changed the role to network operator:


Cisco Nexus radius read-only network-operator

And again we test, this time we are expecting the copy run start to fail


Cisco Nexus Network Operator privilege

Which it does, but they can still issue show commands, so the achieves exactly what is required.

Fallback on Nexus

Lastly we need to make sure that if the radius server is down, we can still get in. I stopped the NPS service and tried logging in. Login failed. I reconnected and tried logging in with the admin username and password, and got in:


Fallback to local authentication if Radius server is down

RADIUS authentication on Cisco IPS using Microsoft 2008 NPS

Radius allows us to use network credentials to access things like routers, switches and, in this case, the IPS modules. Perfect for limiting down the number of local accounts you have across the network.

This is coming as part of my job, so due to the nature of it the images have been edited (not very well I admit) to remove anything pertinent.  

Here are the steps for getting the IPS modules on a Cisco ASA, or router to use Microsoft 2008 NPS Server for RADIUS authentication.