In this final part of our BGP trilogy we are going to pick up on something from part two, and look at serval ways of resolving it, as well as looking at summarization, dampening and backdoors
Let's have a quick recap.

We have one router (R1) acting as a route reflector client for R2 and R3, within AS 100. R2 and R3 connect to R4 and R5 in AS 200. Now everything is working fine, but R1 is preferring the route to R3's AS 200 interface through R2, R4 and R5.

That's hardly the best route now really, is it? But with a little tweaking of BGP attributes we should be able to modify the routes used by R1 around the network. The other alternative is to reboot R2 unti we get the preferred route in the the routing table, but let's face it, this isn't really the way we would be able to do it in a production environment.
1. R1 must prefer the route to 14.1.1.1 through R3 with R2 acting as a backup route. You are not alloed to make any changes on R2 or R3
2. R1 must prefer the route to 14.1.1.1 through R3 with R2 acting as a backup route. You are not allowed to make any changes on R1 or R2
3. R1 must prefer the route to 14.1.1.1 through R3 with R2 acting as a backup route. You are not allowed to make any changes on R1 or R3
So here we can see that in task 1 we are allowed to make changes on R1, in task 2 we can only change R3, and in task 3 we can only change R2.
So following these we can start to see what we can change, and where:
Task 1 - Weight, local preference
Task 2 - MED
Task 3 - BGP Router-ID
As we can see from the below screen shot, we are just using the defaults for our topology at the moment:

On R1 we can either use the weight command in conjunction with the neighbor command to influence all routes (here we would use "neighbor 13.1.1.1 weight 200"), but we only want to affect the 14.1.1.0/24 network, and we can do this through an access-list (or an ip prefix-list) and a route-map:

We start with an access list, reference this in the route-map and then assign route-map to neighbor for R3:

Lastly we need to clear the BGP process using the "clear ip bgp 100" command.
Then we can take another look at our bgp table and see that now that route is favoured due to the higher weight:

And the router's routing table confirms this:


Now we can tune the local preference. which can range from 0 to 4294967295 (it's a 32 bit number). The default, as we can see from the pictures above, is 100. The highest local preference is preferred.
Let's create an ip prefix-list this time to go along with our route-map:

And we implement it in our BGP configuration in the same manner as before:

Lastly we need to reload BGP using the clear ip bgp command again, and we can see that the new route has taken effect:

And if we check out the bgp tables:

We can see that the local pref now shows 200 instead of 100.

And the effect? It looks good:


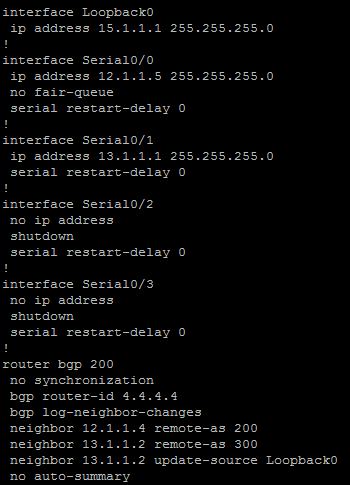
But we do have the router-id still, so lets change that and see what happens;
Firstly we change the router-id on R3:

Notice that changing the router-id drops all the BGP adjacencies, and we must wait for about a minute for it to rebuild all the adjacencies, but once everything is back up and running we can see on R1:

That the path on R1 to 14.1.1.1 will be through R3 and not through R2, but annoyingly, so is everything else. We could combine some of the methods we have used earlier and make R3 less preferred for some of the other routes.
We can create a summary address for 10.1.0.0/24 10.1.1.0/24, 10.1.2.0/24 and 10.1.3.0/24 by using the aggregate-address command:
aggregate-address 10.1.0.0 255.255.252.0
The default for BGP is to send both the aggregate address as well as the specific routes, we can modify this behaviour by adding the summary-only statement:
aggregate-address 10.1.0.0 255.255.252.0 summary-only
We can also choose to summarize specific routes (known as suppressing):
access-list 5 permit 10.1.2.0 0.0.0.255
access-list 5 permit 10.1.3.0 0.0.0.255
route-map SUPPRESSION permit 10
match ip address 5
router bgp 100
aggregate-address 10.1.0.0 255.255.252.0 summary-only suppress-map SUPRESSION
Lastly we can allow the summarized routes to retain their AS-Path informations by appending as-set:
aggregate-address 10.1.0.0 255.255.252.0 summary-only suppress-map SUPRESSION as-set
Dampening can be tweaked as follows:
ip prefix-list DAMPLIST seq 10 permit 10.1.2.0/24
ip prefix-list DAMPLIST seq 20 permit 10.1.3.0/24
route-map DAMPMAP permit 10
match ip address prefix-list DAMPLIST
set dampening 15 750 2000 60
router bgp 100
bgp dampening route-map DAMPMAP
We have a number of figures for dampening:
15 (minutes) - half-life timer, if a penalty has been assigned to a route then half the penalty will decay after this timer expires
750 (penalty measurement) - bottom threshold, once a penalized route falls below this threshold with will no longer be suppressed.
2000 (penalty measurement) - top threshold - if a flapping route's penalties exceed this threshold then it will be suppressed
60 (minutes) maximum amount of time a route can be suppressed.
Changing default AD values is not recommended, so we can use option B.
Using the network backdoor command adjusts the AD for a specific eBGP route from 20 to 200, forcong rhe IGP route to be preferred:
router bgp 100
network 10.1.5.0 mask 255.255.255.0 backdoor
We have covered the basics, reflection, confederation, peer groups, changing attributes to tune routing, summarization, supression, and backdoors. I hope you have found it useful.
Let's have a quick recap.

We have one router (R1) acting as a route reflector client for R2 and R3, within AS 100. R2 and R3 connect to R4 and R5 in AS 200. Now everything is working fine, but R1 is preferring the route to R3's AS 200 interface through R2, R4 and R5.

That's hardly the best route now really, is it? But with a little tweaking of BGP attributes we should be able to modify the routes used by R1 around the network. The other alternative is to reboot R2 unti we get the preferred route in the the routing table, but let's face it, this isn't really the way we would be able to do it in a production environment.
BGP attributes
BGP uses a number of attributes in the way it determines the best path to a destination, and within these attributes are sub categories, namely well-known and optional.- Well-known mandatory - supported by all BGP implementations, and are always included in every BGP update.
- Well-known discretionary - supported by all BGP implementations, but are optionally included in BGP updates.
- Optional Transitive - May not be supported by all implementations of BGP. Transitive means that a non-compliant BGP router will forward the unsupported attribute unchanged, when sending updates to peers
- Optional Non-Transitive - As above, but the router will strip out the unsupported attribute when sending updates to peers.
- AS-Path (Code 2, well-known, mandatory) - The path of traversed AS's to reach a destination
- Next-hop (Code 3, well-known, mandatory) - next-hop ip address to reach a destination
- Origin (Code 1, well-known, mandatory) - Identifies the originator of the route
- Local Preference (Code 5, well-known, discretionary) - provides a preference to determine a path for outbound traffic
- Atomic Aggregate (Code 6, well-known, discretionary) - identifies routes that have been summarized
- Aggregator (Code 7, optional transitive) - Identifies the BGP router that performed address summarization
- Community (Code 8, optional transitive) - tags routes that share common characteristics into a community
- Muti-Exit-Descriminator (MED) (Code 4, optional non-transitiive) - provides a preference to eBGP peers for a specific inbound router
- Weight (Cisco Proprietary) - similar to local preference, provides a local weight to determine the best path for outbound traffic
Best Path determination
We know what attributes can be sent within a BGP update, but the list above does not follow the order in which two routes to the same destination are actually compared:- Weight - applied to inbound routes to influence the best outbound path, highest wins
- Local preference - applied to inbound routes to influence the best outbound path, highest local preference wins
- Locally Originated - is the next hop 0.0.0.0?
- AS-Path - applied to outbound routes to influence the best inbound path, which route has the shortest AS-Path, this is between AS's
- Origin Code - IGP, EGP or ? (unknown)
- MED - applied to outbound routes to influence the best inbound path, lowest wins
- BGP Router type - eBGP or iBGP? eBGP wins
- Age - oldest preferred
- BGP Router-ID lowest sending router id wins.
1. R1 must prefer the route to 14.1.1.1 through R3 with R2 acting as a backup route. You are not alloed to make any changes on R2 or R3
2. R1 must prefer the route to 14.1.1.1 through R3 with R2 acting as a backup route. You are not allowed to make any changes on R1 or R2
3. R1 must prefer the route to 14.1.1.1 through R3 with R2 acting as a backup route. You are not allowed to make any changes on R1 or R3
So here we can see that in task 1 we are allowed to make changes on R1, in task 2 we can only change R3, and in task 3 we can only change R2.
So following these we can start to see what we can change, and where:
Task 1 - Weight, local preference
Task 2 - MED
Task 3 - BGP Router-ID
Influencing BGP paths using the Weight attribute
With weight the highest number wins. By default the weight advertised in a BGP route from another router will be 0. Weight can be any number between 0 and 65535.As we can see from the below screen shot, we are just using the defaults for our topology at the moment:

On R1 we can either use the weight command in conjunction with the neighbor command to influence all routes (here we would use "neighbor 13.1.1.1 weight 200"), but we only want to affect the 14.1.1.0/24 network, and we can do this through an access-list (or an ip prefix-list) and a route-map:
We start with an access list, reference this in the route-map and then assign route-map to neighbor for R3:
Lastly we need to clear the BGP process using the "clear ip bgp 100" command.
Then we can take another look at our bgp table and see that now that route is favoured due to the higher weight:

And the router's routing table confirms this:
Influencing BGP paths using the local pref attribute
If we reset R1 and keep our fingers crossed, then thankfully it comes up as it was before, preferring the path through R2 to reach R3's far end.
Now we can tune the local preference. which can range from 0 to 4294967295 (it's a 32 bit number). The default, as we can see from the pictures above, is 100. The highest local preference is preferred.
Let's create an ip prefix-list this time to go along with our route-map:

And we implement it in our BGP configuration in the same manner as before:
Lastly we need to reload BGP using the clear ip bgp command again, and we can see that the new route has taken effect:

And if we check out the bgp tables:

We can see that the local pref now shows 200 instead of 100.
Influencing BGP paths using the MED attribute
With MED a lower value is preferred, so we could increase the MED on R2
And the effect? It looks good:


Influencing BGP paths using the BGP Router-ID
We have seen that we can control how a route is perceived as it comes into a router, and so far how to reduce it's preference as it leaves a router, but if we wanted to change how R3 is selected in R1's path choices, well, not much is actually left for us to change.But we do have the router-id still, so lets change that and see what happens;
Firstly we change the router-id on R3:

Notice that changing the router-id drops all the BGP adjacencies, and we must wait for about a minute for it to rebuild all the adjacencies, but once everything is back up and running we can see on R1:

That the path on R1 to 14.1.1.1 will be through R3 and not through R2, but annoyingly, so is everything else. We could combine some of the methods we have used earlier and make R3 less preferred for some of the other routes.
BGP Summarization
BGP summarizes redistributed routes by default. As with other routing protocols we can disable this by using the "no auto-summary" command.We can create a summary address for 10.1.0.0/24 10.1.1.0/24, 10.1.2.0/24 and 10.1.3.0/24 by using the aggregate-address command:
aggregate-address 10.1.0.0 255.255.252.0
The default for BGP is to send both the aggregate address as well as the specific routes, we can modify this behaviour by adding the summary-only statement:
aggregate-address 10.1.0.0 255.255.252.0 summary-only
We can also choose to summarize specific routes (known as suppressing):
access-list 5 permit 10.1.2.0 0.0.0.255
access-list 5 permit 10.1.3.0 0.0.0.255
route-map SUPPRESSION permit 10
match ip address 5
router bgp 100
aggregate-address 10.1.0.0 255.255.252.0 summary-only suppress-map SUPRESSION
Lastly we can allow the summarized routes to retain their AS-Path informations by appending as-set:
aggregate-address 10.1.0.0 255.255.252.0 summary-only suppress-map SUPRESSION as-set
BGP Dampening
Route dampening suppresses flapping routes. When a route flaps it is assigned a penalty, and upon reaching a penalty threshold the route is supressed, until the line stabilizes, the penalties decrease and the line is deemed usable again.Dampening can be tweaked as follows:
ip prefix-list DAMPLIST seq 10 permit 10.1.2.0/24
ip prefix-list DAMPLIST seq 20 permit 10.1.3.0/24
route-map DAMPMAP permit 10
match ip address prefix-list DAMPLIST
set dampening 15 750 2000 60
router bgp 100
bgp dampening route-map DAMPMAP
We have a number of figures for dampening:
15 (minutes) - half-life timer, if a penalty has been assigned to a route then half the penalty will decay after this timer expires
750 (penalty measurement) - bottom threshold, once a penalized route falls below this threshold with will no longer be suppressed.
2000 (penalty measurement) - top threshold - if a flapping route's penalties exceed this threshold then it will be suppressed
60 (minutes) maximum amount of time a route can be suppressed.
BGP Backdoors
If an IGP route and an eBGP route exist for the same network then we can find that we have sub-optimal routing where the eBGP route is preferred. We can change this in one of two ways, by changing BGPs default AD, or using the network backdoor command.Changing default AD values is not recommended, so we can use option B.
Using the network backdoor command adjusts the AD for a specific eBGP route from 20 to 200, forcong rhe IGP route to be preferred:
router bgp 100
network 10.1.5.0 mask 255.255.255.0 backdoor
Wrap-up
And there we are for BGP.We have covered the basics, reflection, confederation, peer groups, changing attributes to tune routing, summarization, supression, and backdoors. I hope you have found it useful.


