Continuing from the little lab I built up in the last post, where I looked at how to get Windows 7 running natively in UNetLab, I now am looking at how we can perform NAT inside of an IPSec tunnel.
I am using the following for this:
2x Windows 7 (Pro), with VLC, Putty, JRE and ASDM installed
2x IOSv Layer 2 switches (running 15.2)
2x ASAv (running 9.4(1))
1x IOSv (running 15.5) - AKA "Internet".
All of these are within UNetLab, which is, so far, coping nicely with just the 8GB ram that Fusion seems to allow, but I really should put it on my ESXi server. I have seen ways to get around the 8GB limit, but every time I try, Fusion says its unsupported, and drops it down to 32Kb. It's a challenge.
The topology looks like this (note not everything is started just yet):

The end goal is that we have a VPN between the two ASAs, with HQ performing NAT to mask the traffic inside the VPN tunnel. You may be asking "Why the hell would you ever need to do that?", and it's a very good question, really it's not something you'd have to do often, but there are those times when someone doesn't like RFC1918 addresses going across a VPN tunnel, or (more commonly) you need to VPN to another site that has overlapping internal subnets.
Basic IP addressing (all /24):
The set-up for the Client ASA is not much different, and similarly, on the Client switch we have one VLAN (200), and a VIF of 10.200.1.254:
So far we should be able to ping from our Windows PCs to our ASAs:

I did have to use the command "fixup protocol icmp" in order to get the ping to work. The ASA will convert this into the following command:

Let's go ahead and set up the other side, and make sure that they can also ping the "Internet":

Now we can begin to create our VPN between the two sides.

Traffic works the other way as well.

OK, so now that we have a working VPN, let's see if we can NAT on the HQ side.

Once we send some traffic between the two sites, our VPN should get established.

Quite nicely, it's preserving (or reserving) the final octet for us. However, we are now only good for being called into. Our pings from HQ to the Client fail:

OK, so how do we get both sides working, instead of this one-way traffic that we have? Well, let's try and work out what's happening.
In Phase 3 we check (and pass) out ACLs, and in Phase 4 we perform NAT, again we hit the first NAT rule, translating our 10.1.1.10/24 client address to itself.
In Phases 5, 6 and 7 we perform per-session NAT, check the IP-Options and any QoS - all of these pass.
Phases 8 and 9 are np-inspects, these pass.
Phase 10 is a RPF (Reverse Path Forwarding) check, and this passed, so then its on to the final flow-creation.
So all looks good there, we don't see any failures. However, we can see that the ACL we are hitting is the original one - before we implemented NAT within our VPN tunnel. Therefore the Client ASA will be seeing traffic come over the VPN with an incorrect endpoint address. So lets just pop over to ASDM (because it's much easier) and try moving the order of our NAT statements around.
Before:

After:

Now (thankfully), our DMZ-Client PC can access the Guest-PC:

As a final note, let's have a look at the packet tracer again and see the difference (I have truncated the output this time to make it a bit easier):
Hope you have enjoyed the post!
I am using the following for this:
2x Windows 7 (Pro), with VLC, Putty, JRE and ASDM installed
2x IOSv Layer 2 switches (running 15.2)
2x ASAv (running 9.4(1))
1x IOSv (running 15.5) - AKA "Internet".
All of these are within UNetLab, which is, so far, coping nicely with just the 8GB ram that Fusion seems to allow, but I really should put it on my ESXi server. I have seen ways to get around the 8GB limit, but every time I try, Fusion says its unsupported, and drops it down to 32Kb. It's a challenge.
The topology looks like this (note not everything is started just yet):
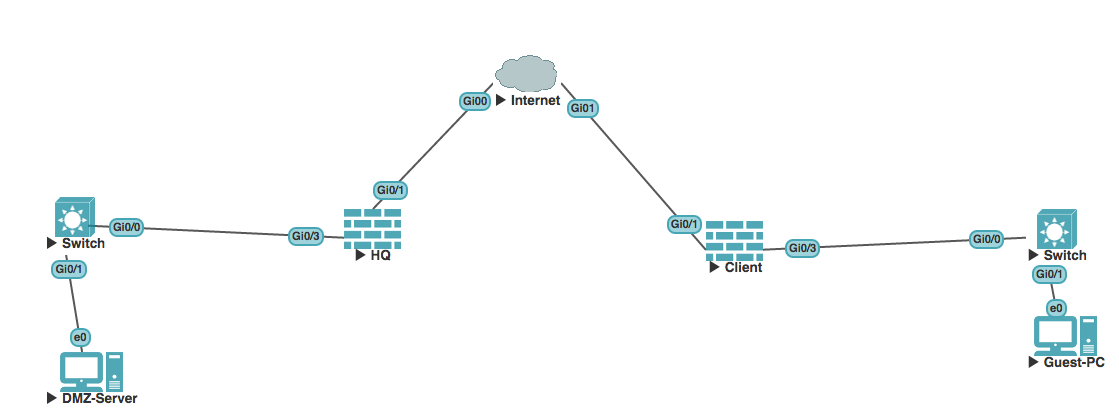
The end goal is that we have a VPN between the two ASAs, with HQ performing NAT to mask the traffic inside the VPN tunnel. You may be asking "Why the hell would you ever need to do that?", and it's a very good question, really it's not something you'd have to do often, but there are those times when someone doesn't like RFC1918 addresses going across a VPN tunnel, or (more commonly) you need to VPN to another site that has overlapping internal subnets.
Basic IP addressing (all /24):
| Interface | IP Address |
| DMZ-Server | 10.1.1.10 (default gateway 10.1.1.254) |
| HQ Gi0/3 | 10.1.1.1 |
| HQ Gi0/1 | 1.1.1.2 |
| Internet Gi0/0 | 1.1.1.1 |
| Internet Gi0/1 | 2.2.2.1 |
| Client Gi0/1 | 2.2.2.2 |
| Client Gi0/3 | 10.200.1.1 |
| Client-PC | 10.200.1.10 (default gateway 10.200.1.254) |
HQ Switch configuration
Very basic, just one vlan, and a VIF:Switch#sh vlan | i VLAN0011 11 VLAN0011 active Gi0/0, Gi0/1, Gi0/2, Gi0/3 Switch#sh ip int bri | e unas Interface IP-Address OK? Method Status Protocol Vlan11 10.1.1.254 YES manual up up Switch#
Basic (HQ) ASA setup.
Below is enough to get us started, and onto ASDM from our DMZ-Server:hostname HQ ! interface GigabitEthernet0/1 nameif Outside security-level 0 ip address 1.1.1.2 255.255.255.0 ! interface GigabitEthernet0/3 nameif DMZ security-level 50 ip address 10.1.1.1 255.255.255.0 ! same-security-traffic permit inter-interface same-security-traffic permit intra-interface ! route Outside 0.0.0.0 0.0.0.0 1.1.1.1 1 ! user-identity default-domain LOCAL aaa authentication enable console LOCAL aaa authentication http console LOCAL aaa authentication ssh console LOCAL http server enable http 10.1.1.0 255.255.255.0 DMZ ! ssh 1.1.1.1 255.255.255.255 Outside ssh 10.1.1.0 255.255.255.0 DMZ ssh timeout 5 ssh version 2 ssh key-exchange group dh-group1-sha1 ! username stuart password p60UDLdMNnbR8IQ. encrypted !
The set-up for the Client ASA is not much different, and similarly, on the Client switch we have one VLAN (200), and a VIF of 10.200.1.254:
Switch#sh vlan | i VLAN0200
200  VLAN0200                         active    Gi0/0, Gi0/1, Gi0/2, Gi0/3
Switch#sh ip int bri | e unas
Interface              IP-Address      OK? Method Status                Protocol
Vlan200                10.200.1.254    YES manual up                    up

Switch#
So far we should be able to ping from our Windows PCs to our ASAs:

Basic Internet access (our first NAT).
On the Internet router, we have a loopback interface with the IP address 8.8.8.8/32. We should be able to give ourselves access to this. It's working directly from the HQ ASA at the moment:HQ# ping 8.8.8.8 Type escape sequence to abort. Sending 5, 100-byte ICMP Echos to 8.8.8.8, timeout is 2 seconds: !!!!! Success rate is 100 percent (5/5), round-trip min/avg/max = 10/10/10 ms HQ#The first NAT rule "connects" the DMZ interface to the Outside interface:
HQ(config)# nat (DMZ,Outside) after-auto source dynamic any interface
HQ(config)#
If we follow it through, we can see that the rule will be placed last in the NAT rules table (after-auto). We match the DMZ and the Outside interfaces (our source network and the one we want to get to). We set a source of dynamic, meaning we can have more than one host behind this network, and we allow any source using the "any" keyword. Lastly we nat this through to the interface IP address given to our Outside interface.
I did have to use the command "fixup protocol icmp" in order to get the ping to work. The ASA will convert this into the following command:
HQ(config)# policy-map global_policy
HQ(config-pmap)# class inspection_default
HQ(config-pmap-c)# inspect icmp
HQ(config-pmap-c)#
So now we also have "Internet" access (to a loopback on the Internet router):

Let's go ahead and set up the other side, and make sure that they can also ping the "Internet":
Client# ping 8.8.8.8
Type escape sequence to abort.
Sending 5, 100-byte ICMP Echos to 8.8.8.8, timeout is 2 seconds:
!!!!!
Success rate is 100 percent (5/5), round-trip min/avg/max = 10/14/30 ms
Client#conf t
Client(config)# policy-map global_policy
Client(config-pmap)# class  inspection_default
Client(config-pmap-c)# inspect icmp
Client(config-pmap-c)# exit
Client(config-pmap)#exit
Client(config)# nat (Inside,Outside) source  dynamic any interf
Client(config)#
Great! Now the client should have access:

Now we can begin to create our VPN between the two sides.
Site-to-Site (L2L) IPSec VPN on Cisco ASAs
We start with a couple of network objects, and an access-list:Client(config)# object network MyInsideNetwork Client(config-network-object)# subnet 10.200.1.0 255.255.255.0 Client(config-network-object)# exit Client(config)# object network TheirRemoteNetwork Client(config-network-object)# subnet 10.1.1.0 255.255.255.0 Client(config-network-object)# exit Client(config)# access-list Outside_cryptomap extended permit ip object MyInsideNetwork object TheirRemoteNetworkNow we can start to define how we are going to talk to other peers:
Client(config)# nat (Inside,Outside) source static MyInsideNetwork MyInsideNetwork destination static TheirRemoteNetwork TheirRemoteNetwork no-proxy-arp route-lookup
Client(config)#crypto ipsec ikev1 transform-set ESP-AES-128-SHA esp-aes esp-sha-hmac
Client(config)# crypto ipsec ikev2 ipsec-proposal AES256
Client(config-ipsec-proposal)# protocol esp encryption aes-256
Client(config-ipsec-proposal)# protocol esp integrity sha-1 md5
Client(config-ipsec-proposal)# exi
Client(config)# crypto ikev2 policy 1
Client(config-ikev2-policy)# encryption aes-256
Client(config-ikev2-policy)# integrity sha
Client(config-ikev2-policy)# group 2
Client(config-ikev2-policy)# prf sha
Client(config-ikev2-policy)# lifetime seconds 86400
Client(config-ikev2-policy)# exi
Client(config)# crypto ikev1 policy 10
Client(config-ikev1-policy)# authentication pre-share
Client(config-ikev1-policy)# encryption aes-256
Client(config-ikev1-policy)# hash sha
Client(config-ikev1-policy)# group 2
Client(config-ikev1-policy)# lifetime 86400
Client(config-ikev1-policy)# exi
Client(config)# crypto ikev2 enable Outside
Client(config)# crypto ikev1 enable Outside
Client(config)#
Then we create the VPN, trying to keep it as generic as possible so that it is nice and easy to paste onto our other ASA:
Client(config)# crypto map Outside_map 1 match address Outside_cryptomap
Client(config)# crypto map Outside_map 1 set peer 1.1.1.2
Client(config)# crypto map Outside_map 1 set ikev1 transform-set ESP-AES-128-SHA
Client(config)# crypto map Outside_map 1 set ikev2 ipsec-proposal AES256
Client(config)# crypto map Outside_map interface Outside
Client(config)# group-policy MyPeer internal
Client(config)# group-policy MyPeer attributes
Client(config-group-policy)# vpn-tunnel-protocol ikev1 ikev2
Client(config-group-policy)# tunnel-group 1.1.1.2 type ipsec-l2l
Client(config)# tunnel-group 1.1.1.2 general-attributes
Client(config-tunnel-general)# default-group-policy MyPeer
Client(config-tunnel-general)# exi
Client(config)# tunnel-group 1.1.1.2 ipsec-attributes
Client(config-tunnel-ipsec)# ikev1 pre-shared-key MyKey
Client(config-tunnel-ipsec)# ikev2 remote-authentication pre-shared-key MyKey
INFO: You must configure ikev2 local-authentication pre-shared-key
      or certificate to complete authentication.
Client(config-tunnel-ipsec)# ikev2 local-authentication pre-shared-key MyKey
Client(config-tunnel-ipsec)#
Moving on to the other (HQ) ASA, we can (with a minor edit here and there) paste in the same config:
HQ(config)# object network MyInsideNetwork
HQ(config-network-object)# subnet 10.1.1.0 255.255.255.0
HQ(config-network-object)# exit
HQ(config)# object network TheirRemoteNetwork
HQ(config-network-object)# subnet 10.200.1.0 255.255.255.0
HQ(config-network-object)# exit
HQ(config)# access-list Outside_cryptomap extended permit ip object MyInsideNetwork object TheirRemoteNetwork
HQ(config)# nat (Inside,Outside) source static MyInsideNetwork MyInsideNetwork destination static TheirRemoteNetwork TheirRemoteNetwork no-proxy-arp route-lookup
HQ(config)# crypto ipsec ikev1 transform-set ESP-AES-128-SHA esp-aes esp-sha-hmac
HQ(config)# crypto ipsec ikev2 ipsec-proposal AES256
HQ(config-ipsec-proposal)# protocol esp encryption aes-256
HQ(config-ipsec-proposal)# protocol esp integrity sha-1 md5
HQ(config-ipsec-proposal)# exi
HQ(config)# crypto ikev2 policy 1
HQ(config-ikev2-policy)# encryption aes-256
HQ(config-ikev2-policy)# integrity sha
HQ(config-ikev2-policy)# group 2
HQ(config-ikev2-policy)# prf sha
HQ(config-ikev2-policy)#  lifetime seconds 86400
HQ(config-ikev2-policy)# exi
HQ(config)# crypto ikev1 policy 10
HQ(config-ikev1-policy)# authentication pre-share
HQ(config-ikev1-policy)# encryption aes-256
HQ(config-ikev1-policy)# hash sha
HQ(config-ikev1-policy)# group 2
HQ(config-ikev1-policy)# lifetime 86400
HQ(config-ikev1-policy)# exi
HQ(config)# crypto ikev2 enable Outside
HQ(config)# crypto ikev1 enable Outside
HQ(config)# crypto map Outside_map 1 match address Outside_cryptomap
HQ(config)# crypto map Outside_map 1 set peer 2.2.2.2
HQ(config)# crypto map Outside_map 1 set ikev1 transform-set ESP-AES-128-SHA
HQ(config)# crypto map Outside_map 1 set ikev2 ipsec-proposal AES256
HQ(config)# crypto map Outside_map interface Outside
HQ(config)# group-policy MyPeer internal
HQ(config)# group-policy MyPeer attributes
HQ(config-group-policy)# vpn-tunnel-protocol ikev1 ikev2
HQ(config-group-policy)# tunnel-group 2.2.2.2 type ipsec-l2l
HQ(config)# tunnel-group 2.2.2.2 general-attributes
HQ(config-tunnel-general)# default-group-policy MyPeer
HQ(config-tunnel-general)# exi
HQ(config)# tunnel-group 2.2.2.2 ipsec-attributes
HQ(config-tunnel-ipsec)#  ikev1 pre-shared-key MyKey
HQ(config-tunnel-ipsec)# ikev2 remote-authentication pre-shared-key MyKey
INFO: You must configure ikev2 local-authentication pre-shared-key
      or certificate to complete authentication.
HQ(config-tunnel-ipsec)# ikev2 local-authentication pre-shared-key MyKey
HQ(config-tunnel-ipsec)#
And boom! We have a working VPN:

Traffic works the other way as well.

OK, so now that we have a working VPN, let's see if we can NAT on the HQ side.
NAT and Site-to-Site VPNs
In order that we can hide our 10.1.1.0/24 network behind a new network (192.168.1.0/24), we need to add another network object to HQ, add a NAT rule, an access-list, and finally edit our crypto map to reference the access-list:HQ(config)# object network YouSeeMeAs HQ(config-network-object)# subnet 192.168.1.0 255.255.255.0 HQ(config-network-object)# exi HQ(config)#nat (DMZ,Outside) source static MyInsideNetwork YouSeeMeAs destination static TheirRemoteNetwork TheirRemoteNetwork HQ(config)#access-list Hidden_CryptoMap extended permit ip object YouSeeMeAs object TheirRemoteNetwork HQ(config)#crypto map Outside_map 1 match address Hidden_CryptoMapNow we need to change the other side to look towards the 192.168.1.0 traffic (instead of the 10.1.1.0/24 network):

Once we send some traffic between the two sites, our VPN should get established.

Quite nicely, it's preserving (or reserving) the final octet for us. However, we are now only good for being called into. Our pings from HQ to the Client fail:

OK, so how do we get both sides working, instead of this one-way traffic that we have? Well, let's try and work out what's happening.
HQ# sh nat detail
Manual NAT Policies (Section 1)
1 (DMZ) to (Outside) source static MyInsideNetwork MyInsideNetwork   destination static TheirRemoteNetwork TheirRemoteNetwork no-proxy-arp route-lookup
    translate_hits = 32, untranslate_hits = 32
    Source - Origin: 10.1.1.0/24, Translated: 10.1.1.0/24
    Destination - Origin: 10.200.1.0/24, Translated: 10.200.1.0/24
2 (DMZ) to (Outside) source static MyInsideNetwork YouSeeMeAs   destination static TheirRemoteNetwork TheirRemoteNetwork
    translate_hits = 7, untranslate_hits = 7
    Source - Origin: 10.1.1.0/24, Translated: 192.168.1.0/24
    Destination - Origin: 10.200.1.0/24, Translated: 10.200.1.0/24

Manual NAT Policies (Section 3)
1 (DMZ) to (Outside) source dynamic any interface
    translate_hits = 66, untranslate_hits = 59
    Source - Origin: 0.0.0.0/0, Translated: 1.1.1.2/24
HQ#
This is our NAT table. And here is a very long packet-tracer output:
HQ# packet-tracer input DMZ icmp 10.1.1.10 1 7 10.200.1.10 detailed

Phase: 1
Type: ROUTE-LOOKUP
Subtype: Resolve Egress Interface
Result: ALLOW
Config:
Additional Information:
found next-hop 1.1.1.1 using egress ifc  Outside

Phase: 2
Type: UN-NAT
Subtype: static
Result: ALLOW
Config:
nat (DMZ,Outside) source static MyInsideNetwork MyInsideNetwork destination static TheirRemoteNetwork TheirRemoteNetwork no-proxy-arp route-lookup
Additional Information:
NAT divert to egress interface Outside
Untranslate 10.200.1.10/0 to 10.200.1.10/0

Phase: 3
Type: ACCESS-LIST
Subtype: log
Result: ALLOW
Config:
access-group DMZ_access_in in interface DMZ
access-list DMZ_access_in extended permit object-group DM_INLINE_SERVICE_1 any any
object-group service DM_INLINE_SERVICE_1
 service-object ip
 service-object icmp
 service-object icmp echo
 service-object icmp echo-reply
Additional Information:
 Forward Flow based lookup yields rule:
 in  id=0x7fffcd5403e0, priority=13, domain=permit, deny=false
        hits=48, user_data=0x7fffd8e59d00, cs_id=0x0, use_real_addr, flags=0x0, protocol=0
        src ip/id=0.0.0.0, mask=0.0.0.0, port=0, tag=any
        dst ip/id=0.0.0.0, mask=0.0.0.0, port=0, tag=any, dscp=0x0
        input_ifc=DMZ, output_ifc=any

Phase: 4
Type: NAT
Subtype:
Result: ALLOW
Config:
nat (DMZ,Outside) source static MyInsideNetwork MyInsideNetwork destination static TheirRemoteNetwork TheirRemoteNetwork no-proxy-arp route-lookup
Additional Information:
Static translate 10.1.1.10/0 to 10.1.1.10/0
 Forward Flow based lookup yields rule:
 in  id=0x7fffce1821f0, priority=6, domain=nat, deny=false
        hits=29, user_data=0x7fffce14e060, cs_id=0x0, flags=0x0, protocol=0
        src ip/id=10.1.1.0, mask=255.255.255.0, port=0, tag=any
        dst ip/id=10.200.1.0, mask=255.255.255.0, port=0, tag=any, dscp=0x0
        input_ifc=DMZ, output_ifc=Outside

Phase: 5
Type: NAT
Subtype: per-session
Result: ALLOW
Config:
Additional Information:
 Forward Flow based lookup yields rule:
 in  id=0x7fffcd2d74f0, priority=0, domain=nat-per-session, deny=true
        hits=270, user_data=0x0, cs_id=0x0, reverse, use_real_addr, flags=0x0, protocol=0
        src ip/id=0.0.0.0, mask=0.0.0.0, port=0, tag=any
        dst ip/id=0.0.0.0, mask=0.0.0.0, port=0, tag=any, dscp=0x0
        input_ifc=any, output_ifc=any

Phase: 6
Type: IP-OPTIONS
Subtype:
Result: ALLOW
Config:
Additional Information:
 Forward Flow based lookup yields rule:
 in  id=0x7fffcdabbd30, priority=0, domain=inspect-ip-options, deny=true
        hits=522, user_data=0x0, cs_id=0x0, reverse, flags=0x0, protocol=0
        src ip/id=0.0.0.0, mask=0.0.0.0, port=0, tag=any
        dst ip/id=0.0.0.0, mask=0.0.0.0, port=0, tag=any, dscp=0x0
        input_ifc=DMZ, output_ifc=any

Phase: 7
Type: QOS
Subtype:
Result: ALLOW
Config:
Additional Information:
 Forward Flow based lookup yields rule:
 in  id=0x7fffcd9ecd50, priority=70, domain=qos-per-class, deny=false
        hits=191, user_data=0x7fffcd9eca20, cs_id=0x0, reverse, use_real_addr, flags=0x0, protocol=0
        src ip/id=0.0.0.0, mask=0.0.0.0, port=0, tag=any
        dst ip/id=0.0.0.0, mask=0.0.0.0, port=0, tag=any, dscp=0x0
        input_ifc=any, output_ifc=any

Phase: 8
Type: INSPECT
Subtype: np-inspect
Result: ALLOW
Config:
class-map inspection_default
 match default-inspection-traffic
policy-map global_policy
 class inspection_default
  inspect icmp
service-policy global_policy global
Additional Information:
 Forward Flow based lookup yields rule:
 in  id=0x7fffcda4d390, priority=70, domain=inspect-icmp, deny=false
        hits=44, user_data=0x7fffce13f110, cs_id=0x0, use_real_addr, flags=0x0, protocol=1
        src ip/id=0.0.0.0, mask=0.0.0.0, icmp-type=0, tag=any
        dst ip/id=0.0.0.0, mask=0.0.0.0, icmp-code=0, tag=any, dscp=0x0
        input_ifc=DMZ, output_ifc=any

Phase: 9
Type: INSPECT
Subtype: np-inspect
Result: ALLOW
Config:
Additional Information:
 Forward Flow based lookup yields rule:
 in  id=0x7fffcdabb5e0, priority=66, domain=inspect-icmp-error, deny=false
        hits=128, user_data=0x7fffcdabab40, cs_id=0x0, use_real_addr, flags=0x0, protocol=1
        src ip/id=0.0.0.0, mask=0.0.0.0, icmp-type=0, tag=any
        dst ip/id=0.0.0.0, mask=0.0.0.0, icmp-code=0, tag=any, dscp=0x0
        input_ifc=DMZ, output_ifc=any

Phase: 10
Type: NAT
Subtype: rpf-check
Result: ALLOW
Config:
nat (DMZ,Outside) source static MyInsideNetwork MyInsideNetwork destination static TheirRemoteNetwork TheirRemoteNetwork no-proxy-arp route-lookup
Additional Information:
 Forward Flow based lookup yields rule:
 out id=0x7fffce182df0, priority=6, domain=nat-reverse, deny=false
        hits=29, user_data=0x7fffce14e160, cs_id=0x0, use_real_addr, flags=0x0, protocol=0
        src ip/id=10.1.1.0, mask=255.255.255.0, port=0, tag=any
        dst ip/id=10.200.1.0, mask=255.255.255.0, port=0, tag=any, dscp=0x0
        input_ifc=DMZ, output_ifc=Outside

Phase: 11
Type: FLOW-CREATION
Subtype:
Result: ALLOW
Config:
Additional Information:
New flow created with id 376, packet dispatched to next module
Module information for forward flow ...
snp_fp_tracer_drop
snp_fp_inspect_ip_options
snp_fp_inspect_icmp
snp_fp_translate
snp_fp_adjacency
snp_fp_fragment
snp_ifc_stat

Module information for reverse flow ...

Result:
input-interface: DMZ
input-status: up
input-line-status: up
output-interface: Outside
output-status: up
output-line-status: up
Action: allow

HQ#
In Phase 1 we find out egress interface. We only have one, so it's no surprise. In Phase 2 we hit our first NAT rule - out 10.1.1.0/24 to their 10.200.1.0/24.In Phase 3 we check (and pass) out ACLs, and in Phase 4 we perform NAT, again we hit the first NAT rule, translating our 10.1.1.10/24 client address to itself.
In Phases 5, 6 and 7 we perform per-session NAT, check the IP-Options and any QoS - all of these pass.
Phases 8 and 9 are np-inspects, these pass.
Phase 10 is a RPF (Reverse Path Forwarding) check, and this passed, so then its on to the final flow-creation.
So all looks good there, we don't see any failures. However, we can see that the ACL we are hitting is the original one - before we implemented NAT within our VPN tunnel. Therefore the Client ASA will be seeing traffic come over the VPN with an incorrect endpoint address. So lets just pop over to ASDM (because it's much easier) and try moving the order of our NAT statements around.
Before:

After:


As a final note, let's have a look at the packet tracer again and see the difference (I have truncated the output this time to make it a bit easier):
HQ# sh nat detail
Manual NAT Policies (Section 1)
1 (DMZ) to (Outside) source static MyInsideNetwork YouSeeMeAs   destination static TheirRemoteNetwork TheirRemoteNetwork
    translate_hits = 15, untranslate_hits = 15
    Source - Origin: 10.1.1.0/24, Translated: 192.168.1.0/24
    Destination - Origin: 10.200.1.0/24, Translated: 10.200.1.0/24
2 (DMZ) to (Outside) source static MyInsideNetwork MyInsideNetwork   destination static TheirRemoteNetwork TheirRemoteNetwork no-proxy-arp route-lookup
    translate_hits = 0, untranslate_hits = 0
    Source - Origin: 10.1.1.0/24, Translated: 10.1.1.0/24
    Destination - Origin: 10.200.1.0/24, Translated: 10.200.1.0/24

Manual NAT Policies (Section 3)
1 (DMZ) to (Outside) source dynamic any interface
    translate_hits = 66, untranslate_hits = 59
    Source - Origin: 0.0.0.0/0, Translated: 1.1.1.2/24
HQ# packet-tracer input DMZ icmp 10.1.1.10 1 7 10.200.1.10 detailed

Phase: 1
Type: UN-NAT
Subtype: static
Result: ALLOW
Config:
nat (DMZ,Outside) source static MyInsideNetwork YouSeeMeAs destination static TheirRemoteNetwork TheirRemoteNetwork
Additional Information:
NAT divert to egress interface Outside
Untranslate 10.200.1.10/0 to 10.200.1.10/0

Phase: 2
Type: ACCESS-LIST
Subtype: log
Result: ALLOW
Config:
access-group DMZ_access_in in interface DMZ
access-list DMZ_access_in extended permit object-group DM_INLINE_SERVICE_1 any any
object-group service DM_INLINE_SERVICE_1
 service-object ip
 service-object icmp
 service-object icmp echo
 service-object icmp echo-reply

Phase: 3
Type: NAT
Subtype:
Result: ALLOW
Config:
nat (DMZ,Outside) source static MyInsideNetwork YouSeeMeAs destination static TheirRemoteNetwork TheirRemoteNetwork
Additional Information:
Static translate 10.1.1.10/0 to 192.168.1.10/0

Phase: 4
Type: NAT
Subtype: per-session
Result: ALLOW

Phase: 5
Type: IP-OPTIONS
Subtype:
Result: ALLOW

Phase: 6
Type: QOS
Subtype:
Result: ALLOW

Phase: 7
Type: INSPECT
Subtype: np-inspect
Result: ALLOW

Phase: 8
Type: INSPECT
Subtype: np-inspect
Result: ALLOW

Phase: 9
Type: VPN
Subtype: encrypt
Result: ALLOW

Phase: 10
Type: NAT
Subtype: rpf-check
Result: ALLOW
Config:
nat (DMZ,Outside) source static MyInsideNetwork YouSeeMeAs destination static TheirRemoteNetwork TheirRemoteNetwork

Phase: 11
Type: FLOW-CREATION
Subtype:
Result: ALLOW
Config:
Additional Information:
New flow created with id 392, packet dispatched to next module
Module information for forward flow ...
snp_fp_tracer_drop
snp_fp_inspect_ip_options
snp_fp_inspect_icmp
snp_fp_translate
snp_fp_adjacency
snp_fp_encrypt
snp_fp_fragment
snp_ifc_stat

Module information for reverse flow ...

Result:
input-interface: DMZ
input-status: up
input-line-status: up
output-interface: Outside
output-status: up
output-line-status: up
Action: allow

HQ#
So, here we can see that the order of NAT is extremely important.Hope you have enjoyed the post!


