A working WWW server for CCIE Security

I have been playing around with this for quite some time now, and finally got it working.

It's hardly a complicated requirement, just need a server to host two websites (www.good.com, and www.bad.com). However, I tried loads of different live CDs, tried fresh installs, lots of different qemu images, and all had issues of one sort or another - such not having Apache installed, the NIC not working, and so on and so forth.

I made some good headway yesterday when I found Suse Studio, this allows you to create an image, with as much or as little on it as you need. You can then download it as a qemu image, which works nicely with UNetLab.

So now I have a working setup.

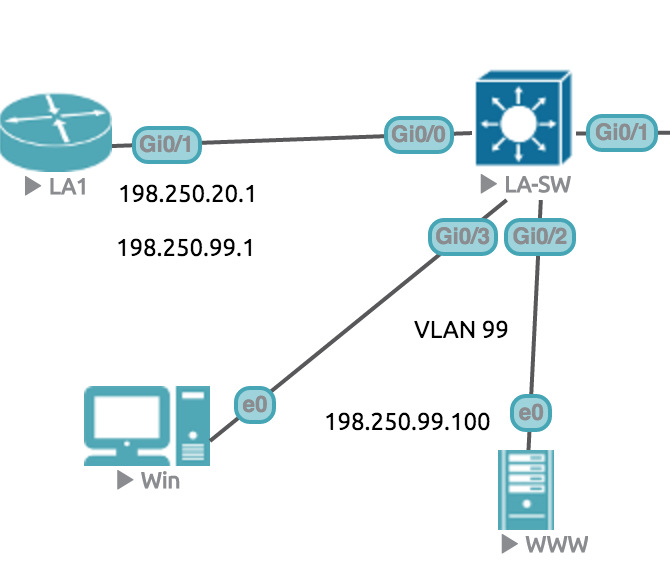
I won't be keeping the Win host there, that was just for testing as I have not sorted out the rest of the topology yet.

The Apache configuration is working and serving the two websites:


If you want to set this up at home then you will need to have apache running two virtual hosts. The conf files need to live under /etc/apache2/vhosts.d/ (for Suse at least). The configurations are below:

good.com.conf:

<VirtualHost *:80>
    ServerAdmin webmaster@www.good.com
    ServerName www.good.com
    DocumentRoot /srv/www/vhosts/www.good.com
    ErrorLog /var/log/apache2/www.good.com-error_log
    CustomLog /var/log/apache2/www.good.com-access_log combined
    HostnameLookups Off
    UseCanonicalName Off
    ServerSignature On
    ScriptAlias /cgi-bin/ "/srv/www/vhosts/www.good.com/cgi-bin/"
    <Directory "/srv/www/vhosts/www.good.com/cgi-bin">
        AllowOverride None
        Options +ExecCGI -Includes
        <IfModule !mod_access_compat.c>
            Require all granted
        </IfModule>
        <IfModule mod_access_compat.c>
            Order allow,deny
            Allow from all
        </IfModule>
    </Directory>
    <IfModule mod_userdir.c>
        UserDir public_html
        Include /etc/apache2/mod_userdir.conf
    </IfModule>
    <Directory "/srv/www/vhosts/www.good.com">
        Options Indexes FollowSymLinks
        AllowOverride None
        <IfModule !mod_access_compat.c>
            Require all granted
        </IfModule>
        <IfModule mod_access_compat.c>
            Order allow,deny
            Allow from all
        </IfModule>
    </Directory>
</VirtualHost>

bad.com.conf:

<VirtualHost *:80>
    ServerAdmin webmaster@www.bad.com
    ServerName www.bad.com
    DocumentRoot /srv/www/vhosts/www.bad.com
    ErrorLog /var/log/apache2/www.bad.com-error_log
    CustomLog /var/log/apache2/www.bad.com-access_log combined
    HostnameLookups Off
    UseCanonicalName Off
    ServerSignature On
    ScriptAlias /cgi-bin/ "/srv/www/vhosts/www.bad.com/cgi-bin/"
    <Directory "/srv/www/vhosts/www.bad.com/cgi-bin">
        AllowOverride None
        Options +ExecCGI -Includes
        <IfModule !mod_access_compat.c>
            Require all granted
        </IfModule>
        <IfModule mod_access_compat.c>
            Order allow,deny
            Allow from all
        </IfModule>
    </Directory>
    <IfModule mod_userdir.c>
        UserDir public_html
        Include /etc/apache2/mod_userdir.conf
    </IfModule>
    <Directory "/srv/www/vhosts/www.bad.com">
        Options Indexes FollowSymLinks
        AllowOverride None
        <IfModule !mod_access_compat.c>
            Require all granted
        </IfModule>
        <IfModule mod_access_compat.c>
            Order allow,deny
            Allow from all
        </IfModule>
    </Directory>
</VirtualHost>
Then all you need is a simple HTML page under /srv/www/vhosts/www.good.com/ and /srv/www/vhosts/www.bad.com/.

Apache can be started using the command "rcapache2 start", but you do need to switch to the root user, using "su -" and type in the root password, which is "linux".

The VM also has:
  • Bind (DNS)
  • NTP
  • FTP (Server)
This makes it a bit useful for future play!

If you want to download the VM, which is pre-IP'd and set up you can click the download link below. All you need to do is set up a hosts entry of DNS entry pointing to the VM's IP address (198.250.99.100). Note that the password for all accounts is "linux".

Scheduled certification will resume shortly - back to CCIE.Sec!

OK, so I have been a bit preoccupied recently, I am putting the finishing touches to CCNA and Beyond, which is currently in the hands of the previewers, and took a side step to get the Check Point Certified Security Administrator (CCSA) exam - which I passed today. And as I am in a good mood, it's time to crank up the volume and play music. So here is Ash performing "Burn Baby Burn":


Love that song. And now, here is Red Kite performing "Montreal":


Anyway, it's time to crack on with the CCIE Security. It'sMarch now and I want to sit the exam in December. So I best be getting on with it.

Despite losing the existing topology, I rebuilt most of it using REST calls, but need to finish quite a bit by hand. It's nearly done! I have had to change the LA-FW to ASA (8.4.2) if you are following along at home and need to use the same REST calls.

It's actually proving much harder to re-do all of this than I thought, which is my fault as I did not rename devices, or come up with a proper IP address scheme early on. But, like my lack of backing up, I only have myself to blame.

I will post the topology (as it is at the moment) at the end of this post, and it will have IP addressing and so on and so forth. Lots of people have asked for it, so i't about time I shared it - also it means that this post will be a new starting point, and be all IP'd up (or nearly all).

I will start with the multi-context firewalls first, then do the transparent firewalls, then the MPLS core. If I am luck y then I'll even be able to get the tabbed thing working as it should do...

Multi-context firewalls

The code for the firewalls is below:


hostname LA2
interface GigabitEthernet0/0
 ip address 20.5.5.254 255.255.255.0
 duplex auto
 speed auto
 media-type rj45
ip route 0.0.0.0 0.0.0.0 20.5.5.1
hostname LA3
interface GigabitEthernet0/0
 ip address 20.6.6.254 255.255.255.0
 duplex auto
 speed auto
 media-type rj45
ip route 0.0.0.0 0.0.0.0 20.6.6.1
hostname LA-FW
interface Ethernet0
!
interface Ethernet0.10
 vlan 10
!
interface Ethernet0.20
 vlan 20
!
interface Ethernet0.30
 vlan 30
!
admin-context admin
context admin
  config-url disk0:/admin.cfg
!
context C1
  allocate-interface Ethernet0.20 outsideC1 
  allocate-interface Ethernet2 insideC1 
  config-url disk0:/C1.cfg
!             
context C2
  allocate-interface Ethernet0.30 outsideC2 
  allocate-interface Ethernet3 insideC2 visible 
  config-url disk0:/C2.cfg
!
prompt hostname context
hostname C1
interface outsideC1
 nameif Outside
 security-level 0
 ip address 198.250.20.2 255.255.255.0 
!
interface insideC1
 nameif Inside
 security-level 100
 ip address 20.5.5.1 255.255.255.0 
!
hostname C2
interface outsideC2
 nameif Outside
 security-level 0
 ip address 198.250.30.2 255.255.255.0 
!
interface insideC2
 nameif Inside
 security-level 100
 ip address 20.6.6.1 255.255.255.0 
!
hostname LA-SW
interface GigabitEthernet0/0
 switchport trunk encapsulation dot1q
 switchport mode trunk
 media-type rj45
 negotiation auto
!
interface GigabitEthernet0/1
 switchport trunk encapsulation dot1q
 switchport mode trunk
 media-type rj45
 negotiation auto
Remember to recreate the VLANs! (10,20 and 30)
hostname LA1
interface Loopback0
 ip address 4.4.4.4 255.255.255.255
!
interface GigabitEthernet0/0
 ip address 198.240.5.1 255.255.255.0
 duplex auto
 speed auto
 media-type rj45
!
interface GigabitEthernet0/1
 no ip address
 duplex auto
 speed auto
 media-type rj45
!
interface GigabitEthernet0/1.10
 encapsulation dot1Q 10
!
interface GigabitEthernet0/1.20
 encapsulation dot1Q 20
 ip address 198.250.20.1 255.255.255.252
!
interface GigabitEthernet0/1.30
 encapsulation dot1Q 30
 ip address 198.250.30.1 255.255.255.0
!

Make sure that the interfaces are not shut off, and save the work!

Transparent ASA


hostname NY2
interface Loopback0
 ip address 3.3.3.0 255.255.255.255
!
interface Loopback1
 ip address 3.3.3.1 255.255.255.255
!
interface Loopback2
 ip address 3.3.3.2 255.255.255.255
!
interface GigabitEthernet0/0
 ip address 128.2.2.2 255.255.255.0
 duplex auto
 speed auto
 media-type rj45
!
firewall transparent
hostname NY-FW
interface GigabitEthernet0/0
 nameif Inside
 bridge-group 1
 security-level 100
!
interface GigabitEthernet0/1
 nameif Outside
 bridge-group 1
 security-level 0
!
interface BVI1
 ip address 128.2.2.254 255.255.255.0 
!
ftp mode passive
access-list outside->in extended permit eigrp any any 
access-list outside->in extended permit icmp any any 
access-list outside->in extended permit ip any any 
!
access-group outside->in in interface Inside
access-group outside->in in interface Outside
!
http server enable
http 0.0.0.0 0.0.0.0 Inside
hostname NY1
interface Loopback0
 ip address 2.2.2.2 255.255.255.255
!
interface GigabitEthernet0/0
 ip address 128.2.2.1 255.255.255.0
 duplex auto
 speed auto
 media-type rj45
!
interface GigabitEthernet0/1
 ip address 198.240.3.1 255.255.255.0
 duplex auto
 speed auto
 media-type rj45
!

MPLS Core


router ospf 1
router-id 2.2.2.2
network 198.240.3.1 0.0.0.0 a 0
network 2.2.2.2 0.0.0.0 a 0
mpls ldp autoconfig
mpls label protocol ldp
mpls ldp router-id lo0 force
router bgp 1
bgp router-id 2.2.2.2
no bgp def ipv4-unicast 
neigh 4.4.4.4 remote 1
neigh 3.3.3.3 remote 1
neigh 4.4.4.4 update lo0
neigh 3.3.3.3 update lo0
address-family vpnv4 
neigh 4.4.4.4 activate
neigh 3.3.3.3 activ
neigh 4.4.4.4 send-community extended 
neigh 3.3.3.3 send-community extended 
!
ip vrf 802101
rd 1:1
route-target bo 1:1
!
int gi0/0
ip vrf for 802101
ip add 128.2.2.1 255.255.255.0
!
router bgp 1
add ipv4 vrf 802101
hostname ISP
interface Loopback0
 ip address 1.1.1.1 255.255.255.255
!
interface GigabitEthernet0/0
 ip address 198.240.3.254 255.255.255.0
 duplex auto
 speed auto
 media-type rj45
!
interface GigabitEthernet0/1
 ip address 198.240.5.254 255.255.255.0
 duplex auto
 speed auto
 media-type rj45
!
interface GigabitEthernet0/2
 ip address 198.240.1.254 255.255.255.0
 duplex auto
 speed auto
 media-type rj45
!
router ospf 1
router-id 1.1.1.1
network 0.0.0.0 0.0.0.0 a 0
mpls ldp autoconfig
mpls label protocol ldp
mpls ldp router-id lo0 force

router ospf 1
router-id 4.4.4.4
network 198.240.5.1 0.0.0.0 a 0
network 4.4.4.4 0.0.0.0 a 0
mpls ldp autoconfig
mpls label protocol ldp
mpls ldp router-id lo0 force
router bgp 1
bgp router-id 4.4.4.4
no bgp def ipv4-unicast 
neigh 2.2.2.2 remote 1
neigh 3.3.3.3 remote 1
neigh 2.2.2.2 update lo0
neigh 3.3.3.3 update lo0
address-family vpnv4 
neigh 2.2.2.2 activate
neigh 3.3.3.3 activ
neigh 2.2.2.2 send-community extended 
neigh 3.3.3.3 send-community extended
!
ip vrf 802101
rd 1:1
route-target bo 1:1
!
int gi0/1.20
ip vrf for 802101
ip add 198.250.20.1 255.255.255.0
int gi 0/1.30 
ip vrf for 802101
ip add 198.250.30.1 255.255.255.0
!
router bgp 1
add ipv4 vrf 802101
hostname LON1
interface Loopback0
 ip address 3.3.3.3 255.255.255.255
!
interface GigabitEthernet0/0
 ip address 198.240.1.1 255.255.255.0
 duplex auto
 speed auto
 media-type rj45
!
router ospf 1
router-id 3.3.3.3
network 198.240.1.1 0.0.0.0 a 0
network 3.3.3.3 0.0.0.0 a 0
mpls ldp autoconfig
mpls label protocol ldp
mpls ldp router-id lo0 force
!
router bgp 1
bgp router-id 3.3.3.3
no bgp def ipv4-unicast 
neigh 2.2.2.2 remote 1
neigh 4.4.4.4 remote 1
neigh 2.2.2.2 update lo0
neigh 4.4.4.4 update lo0
address-family vpnv4 
neigh 2.2.2.2 activate
neigh 4.4.4.4 activ
neigh 2.2.2.2 send-community extended 
neigh 4.4.4.4 send-community extended
!
ip vrf 802101
rd 1:1
route-target bo 1:1
!
int gi 0/1
ip vrf for 802101
ip add 163.4.4.1 255.255.255.0
!
router bgp 1
add ipv4 vrf 802101

The last step is to do some redistribution, so that our end points (what we have so far) can all talk to each other.

IGPs and redistribution into MPLS


router eigrp 100
 network 3.3.3.0 0.0.0.0
 network 3.3.3.1 0.0.0.0
 network 3.3.3.2 0.0.0.0
 network 128.2.2.2 0.0.0.0
 eigrp router-id 3.3.3.0
router eigrp NY
 !
 address-family ipv4 unicast vrf 802101 autonomous-system 100
  !
  topology base
   redistribute bgp 1 metric 1000 10 100 1 1500
  exit-af-topology
  network 128.2.2.1 0.0.0.0
 exit-address-family
!
router bgp 1
 address-family ipv4 vrf 802101
  redistribute eigrp 100 metric 1
 exit-address-family
ip route vrf 802101 20.5.5.0 255.255.255.0 198.250.20.2
ip route vrf 802101 20.6.6.0 255.255.255.0 198.250.30.2
router eigrp LA
 !
 address-family ipv4 unicast vrf 802101 autonomous-system 300
  !
  topology base
   redistribute bgp 1 metric 1000 10 100 1 1500
  exit-af-topology
  network 198.250.20.0
  network 198.250.30.0
 exit-address-family
!
router bgp 1
 address-family ipv4 vrf 802101
  redistribute eigrp 300 metric 1
  red static metric 1
 exit-address-family
router eigrp LON
 !
 address-family ipv4 unicast vrf 802101 autonomous-system 200
  !
  topology base
   redistribute bgp 1 metric 1000 10 100 1 1500
  exit-af-topology
  network 163.4.4.0 0.0.0.255
 exit-address-family
!
router bgp 1
 address-family ipv4 vrf 802101
  redistribute eigrp 200 metric 1
 exit-address-family

We don't really need EIGRP on LA1. LA-FW (because it is running ASA 8.4 and in multiple-context mode) does not support routing protocols, so we can do with redistributing the static routes only. We really dont need these anyway, as they will be behind NAT. So take them or leave them!

Still missing a few bits, such as ACLs on the LA-FW. So, while we are on a good run, let's just save the work so far, and add those in. This is for the C1 context:
object-group network INSIDE-NAT-SUBNETS
network-object 20.5.5.0 255.255.255.0
network-object 20.5.10.0 255.255.255.0
network-object 20.5.20.0 255.255.255.0
access-list outside->in extended permit ip any any 
access-list outside->in extended permit icmp any any 
access-list outside->in extended permit icmp any any echo-reply 
access-group outside->in in interface Outside
nat (Inside,Outside) after-auto source dynamic INSIDE-NAT-SUBNETS interface
And this is for the C2 context:
object-group network INSIDE-NAT-SUBNETS
network-object 20.6.5.0 255.255.255.0
network-object 20.6.10.0 255.255.255.0
network-object 20.6.20.0 255.255.255.0
access-list outside->in extended permit ip any any 
access-list outside->in extended permit icmp any any 
access-list outside->in extended permit icmp any any echo-reply 
access-group outside->in in interface Outside
nat (Inside,Outside) after-auto source dynamic INSIDE-NAT-SUBNETS interface
We can test connectivity now:
LA2#ping 3.3.3.1
Type escape sequence to abort.
Sending 5, 100-byte ICMP Echos to 3.3.3.1, timeout is 2 seconds:
!!!!!
Success rate is 100 percent (5/5), round-trip min/avg/max = 10/17/32 ms
LA2#

LA3#ping 3.3.3.1
Type escape sequence to abort.
Sending 5, 100-byte ICMP Echos to 3.3.3.1, timeout is 2 seconds:
!!!!!
Success rate is 100 percent (5/5), round-trip min/avg/max = 12/16/20 ms
LA3#

NY2#ping 163.4.4.1
Type escape sequence to abort.
Sending 5, 100-byte ICMP Echos to 163.4.4.1, timeout is 2 seconds:
!!!!!
Success rate is 100 percent (5/5), round-trip min/avg/max = 7/9/13 ms
NY2#
Excellent, all seems to be working again.

This is what the lab looks like at the moment:


You can find the topology file under the Security link on the "Labs" drop down menu at the top.

A change is as good as a ReST - UNetLab and the API

Hit a bit of a hiccup with my CCIE Security lab topology. It got wiped. Not happy to be honest, but you have to take the rough with the smooth sometimes.

So, now I have to rebuild it. From scratch. It's a ball ache, but needs to be done. I like to think I am a positive person, so let's try and put a positive spin on this. Can I recreate it in a more interesting way?

Maybe.

Since UNetLab 0.8.6-1 we have a ReST API (Representative State Transfer). Now in the interest of full disclosure I should point out that I know fuck-all about ReST - apart from the fact that it's supported in ASAs, and mans that you can call functions via a URL - so, can I recreate some of the CCIE lab using ReST?

First of all, where is the api? It's a file under the html folder - which makes sense as we need to access it through a browser:
root@unl01:~# ls /opt/unetlab/html/
api.php  configs  favicon.ico  files  images  includes  templates  themes
root@unl01:~#
Looking through the api.php file (too much to reprint here), there are some quick wins to get us started. We can list our folders, using the URL: "http://<unetlab server>/api/folders/" (note that my IP is 192.168.0.16 and that I have moved the output around for ease of reading):
{"code":200,"status":"success","message":"Successfully listed path (60007).",
"data":{"folders":[
{"name":"802101","path":"\/802101"},
{"name":"CCNA","path":"\/CCNA"},
{"name":"CheckPoint","path":"\/CheckPoint"},
{"name":"RS","path":"\/RS"},
{"name":"Security LAB","path":"\/Security LAB"},
{"name":"SP LAB","path":"\/SP LAB"},
{"name":"Test","path":"\/Test"},
{"name":"Thunderhead","path":"\/Thunderhead"}]
,"labs":[
{"file":"11routers.unl","path":"\/11routers.unl"},
{"file":"Active_ASA_test.unl","path":"\/Active_ASA_test.unl"},
{"file":"DMVPN.unl","path":"\/DMVPN.unl"},
{"file":"sdf-test.unl","path":"\/sdf-test.unl"},
{"file":"sdf-Win10-UCS.unl","path":"\/sdf-Win10-UCS.unl"},
{"file":"Test Lab custom topology.unl","path":"\/Test Lab custom topology.unl"}]}}
I started to recreate the Security topology, so already have the .unl file created, and it's in the 802101 directory. We can look at the contents of this by changing the URL to "http://192.168.0.16/api/folders/802101":
{"code":200,"status":"success","message":"Successfully listed path (60007)."
,"data":
{"folders":[{"name":"..","path":"\/"}],"labs":[
{"file":"BGP for Cisco Networks.unl","path":"\/802101\/BGP for Cisco Networks.unl"},
{"file":"CCIE Security.unl","path":"\/802101\/CCIE Security.unl"},
{"file":"MPLS for Cisco Networks.unl","path":"\/802101\/MPLS for Cisco Networks.unl"},
{"file":"VPNs and NAT for Cisco Networks.unl","path":"\/802101\/VPNs and NAT for Cisco Networks.unl"}]}}
OK, getting nearer.

Now, what happens if we look at this file via the api, by calling the URL "http://192.168.0.16/api/labs/802101/CCIE%20Security.unl":
{"code":200,"status":"success","message":"Lab has been loaded (60020)."
,"data":{"author":"Stuart Fordham","description":"","body":"",
"filename":"CCIE Security.unl","id":"4dd7e0ac-cd86-4ab7-aab8-dfc8744afb7a",
"name":"CCIE Security","version":"1"}}
OK, we can drill down. can we see if we have any existing objects?

Using the API to configure UNetLab

Adding nodes isn't quite as easy as the above examples. From the api.php code, the important bit looks to be:
 
} else if (preg_match('/^\/[A-Za-z0-9_+\/\\s-]+\.unl\/nodes$/', $s)) {
if (isset($p['count'])) {
 // count cannot be set from API
  unset($p['count']);
 }
 $output = apiAddLabNode($lab, $p, $o);
So, we need to pass three variables, the lab, which should already be in the URL, p, and o. These then get passed to another php file (api_nodes.php). So, what are p and o?
 $event = json_decode($app -> request() -> getBody());
 $p = json_decode(json_encode($event), True); // Reading options from POST/PUT
 $s = '/'.implode('/', $path);
 $o = False;
So after a bit of playing around I had to have a rethink. This should all be done using CURL commands, it'll make it much more programmable. So I headed down that route. Because this entails leaving the browser, we lose the fact that we are logged in, so need to log in again. After a could of hours blindly bashing away at the keyboard, I found this excellent guide to ReST: https://docs.phalconphp.com/en/latest/reference/tutorial-rest.html. Give it a read, it's very good. This made life much easier, and I was able to log in. More importantly, I got a good idea of the syntax, which is, you know, kind of important:
Stuarts-MacBook-Pro:~ stuart$ curl -i -X POST -d '{"username":"admin","password":"unl"}' http://192.168.0.16/api/auth/login
HTTP/1.1 200 OK
Date: Sun, 13 Mar 2016 19:38:46 GMT
Server: Apache/2.4.7 (Ubuntu)
X-Powered-By: PHP/5.5.9-1ubuntu4.14
X-Powered-By: Unified Networking Lab API
Cache-Control: post-check=0, pre-check=0
Pragma: no-cache
Set-Cookie: unetlab_session=4ad092ad-6ec1-471a-a24f-a9fab738583c; domain=192.168.0.16; path=/api/; expires=Mon, 13-Mar-3600 19:38:46 UTC
Content-Length: 67
Content-Type: application/json

{"code":200,"status":"success","message":"User logged in (90013)."}Stuarts-MacBook-Pro:~ stuart$ 
Stuarts-MacBook-Pro:~ stuart$ 
The problem here is that subsequent commands all failed due to authentication. Back to the Googles...

ReST Authentication and how to stay authenticated

I then found this web page: https://www.drupal.org/node/1795770. We can push the authentication data into a text file, and then call it later on. This works nicely. Note though that I am on a different machine now:
[root@spoon ~]# curl -X POST -i -H "Content-type: application/json" -c cookies.txt -X POST http://192.168.3.239/api/auth/login -d '
> {
> "username":"admin",
> "password":"unl"
> }
> '
HTTP/1.1 200 OK
Date: Mon, 14 Mar 2016 10:35:15 GMT
Server: Apache/2.4.7 (Ubuntu)
X-Powered-By: PHP/5.5.9-1ubuntu4.11
X-Powered-By: Unified Networking Lab API
Cache-Control: post-check=0, pre-check=0
Pragma: no-cache
Set-Cookie: unetlab_session=916665da-cfcb-4230-b5df-01b5f0bf78a9; domain=192.168.3.239; path=/api/; expires=Tue, 14-Mar-3600 10:35:15 UTC
Content-Length: 67
Content-Type: application/json

{"code":200,"status":"success","message":"User logged in (90013)."}
[root@spoon ~]#
We get authenticated, and the information is stored in a file called cookies.txt. We then us the -b command to call this file, if we don't use the -i flag then we get cleaner output:
[root@spoon ~]# curl -b cookies.txt -X GET http://192.168.3.239/api/folders/
{"code":200,"status":"success","message":"Successfully listed path (60007).","data":{"folders":[{"name":"CCNA_and_Beyond","path":"\/CCNA_and_Beyond"},{"name":"Pedro","path":"\/Pedro"},{"name":"RS","path":"\/RS"},{"name":"SP","path":"\/SP"}],"labs":[]}}You have new mail in /var/spool/mail/root
[root@spoon ~]#
OK, so this is a different machine, so I need to start from scratch. Let's try and create a folder.

Creating folders in UNetLab using ReST

Making sure that we pass the authentication data to UNL, we should be able to create a folder by specifying the name and the path (leaving the path empty if you want it at the top level):
[root@spoon ~]#  curl -X POST  -H "Content-type: application/json" -b cookies.txt  http://192.168.3.239/api/folders -d '
> {
> "name":"802101",
> "path":""
> }
> '
{"code":200,"status":"success","message":"Folder has been created (60014)."}
[root@spoon ~]#
So, does this appear in the folder list? Yes, it does!
[root@spoon ~]# curl -b cookies.txt -X GET http://192.168.3.239/api/folders/
{"code":200,"status":"success","message":"Successfully listed path (60007).","data":{"folders":[{"name":"802101","path":"\/802101"},{"name":"CCNA_and_Beyond","path":"\/CCNA_and_Beyond"},{"name":"Pedro","path":"\/Pedro"},{"name":"RS","path":"\/RS"},{"name":"SP","path":"\/SP"}],"labs":[]}}
[root@spoon ~]#
Wonderful, now lets try and create the CCIE Security lab!

Creating labs in UNetLab using the API

I won't show the misses I have had in trying to gauge the correct commands, but eventually I got it. The key is to look at the GUI and work out whats needed:
[root@spoon ~]#  curl -X POST  -H "Content-type: application/json" -b cookies.txt  http://192.168.3.239/api/labs -d '
> {
> "path":"/802101",
> "name":"CCIE Security",
> "version":"1",
> "author":"Stuart",
> "description":"CCIE"
> }
> '
{"code":200,"status":"success","message":"Lab has been created (60019)."}
[root@spoon ~]#
We can confirm this from the GUI - but note that this will mean that we have to authenticate again (might be worthwhile setting up different accounts for the API use, and checking in the GUI to save time):


OK, so now we have the folder, and the lab created. Let's add an object!

Creating nodes in UNL using ReST

After a few trials I managed to come down to this:
curl -X POST  -H "Content-type: application/json" -b cookies.txt http://192.168.3.239/api/labs/802101/CCIE%20Security.unl/nodes -d '
 {
 "type":"iol",
 "template":"iol",
 "image":"L3-ADVENTERPRISEK9-M-15.5-2T.bin",
 "name":"R1",
 "icon":"Router.png",
 "nvram":"1024",
 "ram":"256",
 "ethernet":"1",
 "serial":"0",
 "delay":"0",
 "config":"Unconfigured"
 }
 '
Which got me this:
{"code":201,"status":"success","message":"Lab has been saved (60023)."}
We can even see it on the GUI:


OK, so now we can add nodes to our lab. let's add a network:

Creating Networks using ReST

[root@spoon ~]#  curl -X POST  -H "Content-type: application/json" -b cookies.txt http://192.168.3.239/api/labs/802101/CCIE%20Security.unl/networks -d '
 {
 "type":"bridge",
 "name":"Net1"
 }
 '
{"code":201,"status":"success","message":"Network has been added to the lab (60006)."}
[root@spoon ~]#
Now we can add the network to our interface:


So, with a bit of digging about, it's now pretty simple to create folders and labs, and to add nodes and networks to the labs.

It's taken me about half a day to get this far, but it opens up a world of possibilities. This means that it could be scripted, and maybe even be able to create a topology in something like Visio and then call a script to create the lab in UNetLab... at least that's the idea.

Hands on with UNetLab 1.0

UNetLab has just reached version 1.0 (stable). It's actually 1.0.0-4 to be exact, and a lot has changed.

Installing the new version is no different to doing any Linux upgrade, however, I did encounter a problem:
root@unl01:~# apt-get upgrade
Reading package lists... Done
Building dependency tree       
Reading state information... Done
You might want to run 'apt-get -f install' to correct these.
The following packages have unmet dependencies:
 linux-image-virtual : Depends: linux-image-3.13.0-79-generic but it is not installed
E: Unmet dependencies. Try using -f.
root@unl01:~# apt-get -f install
Reading package lists... Done
Building dependency tree       
Reading state information... Done
Correcting dependencies... Done
....
dpkg: error processing archive /var/cache/apt/archives/linux-image-3.13.0-79-generic_3.13.0-79.123_amd64.deb (--unpack):
 cannot copy extracted data for './boot/vmlinuz-3.13.0-79-generic' to '/boot/vmlinuz-3.13.0-79-generic.dpkg-new': failed to write (No space left on device)
Examining /etc/kernel/postrm.d .
run-parts: executing /etc/kernel/postrm.d/initramfs-tools 3.13.0-79-generic /boot/vmlinuz-3.13.0-79-generic
run-parts: executing /etc/kernel/postrm.d/zz-update-grub 3.13.0-79-generic /boot/vmlinuz-3.13.0-79-generic
Errors were encountered while processing:
 /var/cache/apt/archives/linux-image-3.13.0-79-generic_3.13.0-79.123_amd64.deb
E: Sub-process /usr/bin/dpkg returned an error code (1)
root@unl01:~#
It looks like /boot is a bit low on space:
root@unl01:~# df -h
Filesystem                  Size  Used Avail Use% Mounted on
/dev/mapper/rootvg-rootvol  185G  156G   22G  89% /
none                        4.0K     0  4.0K   0% /sys/fs/cgroup
udev                         20G  4.0K   20G   1% /dev
tmpfs                       4.0G  3.0M  4.0G   1% /run
none                        5.0M     0  5.0M   0% /run/lock
none                         20G     0   20G   0% /run/shm
none                        100M     0  100M   0% /run/user
/dev/sda1                   232M  218M     0 100% /boot
root@unl01:~#
Yep, no room left, so let's make some space:
root@unl01:~# cd /boot/
root@unl01:/boot# rm -f initrd.img-3.13.0-61-generic
root@unl01:/boot# rm -f initrd.img-3.13.0-62-generic
root@unl01:/boot# rm -f initrd.img-3.13.0-63-generic
root@unl01:/boot# rm -f initrd.img-3.13.0-65-generic
root@unl01:/boot# rm -f initrd.img-3.13.0-66-generic
root@unl01:/boot# rm -f vmlinuz-3.13.0-61-generic
root@unl01:/boot# rm -f vmlinuz-3.13.0-62-generic
root@unl01:/boot# rm -f vmlinuz-3.13.0-63-generic
root@unl01:/boot# rm -f vmlinuz-3.13.0-65-generic
root@unl01:/boot# rm -f vmlinuz-3.13.0-66-generic
root@unl01:/boot# df -f
df: invalid option -- 'f'
Try 'df --help' for more information.
root@unl01:/boot# df -h
Filesystem                  Size  Used Avail Use% Mounted on
/dev/mapper/rootvg-rootvol  185G  156G   22G  89% /
none                        4.0K     0  4.0K   0% /sys/fs/cgroup
udev                         20G   12K   20G   1% /dev
tmpfs                       4.0G  3.0M  4.0G   1% /run
none                        5.0M     0  5.0M   0% /run/lock
none                         20G     0   20G   0% /run/shm
none                        100M     0  100M   0% /run/user
/dev/sda1                   232M  137M   80M  64% /boot
root@unl01:/boot#
OK, thats better. Lets run the update:
root@unl01:/boot# apt-get install unetlab
Reading package lists... Done
Building dependency tree       
Reading state information... Done
...
Do you want to continue? [Y/n] Y
Get:1 http://www.unetlab.com/apt/ trusty/rrlabs unetlab amd64 1.0.0-4 [9,921 kB]
Get:2 http://us.archive.ubuntu.com/ubuntu/ trusty/main libaio1 amd64 0.3.109-4 [6,364 B]
Get:3 http://us.archive.ubuntu.com/ubuntu/ trusty/main telnet amd64 0.17-36build2 [67.1 kB]
Get:4 http://us.archive.ubuntu.com/ubuntu/ trusty-updates/main python3-pexpect all 3.1-1ubuntu0.1 [37.9 kB]
Fetched 10.0 MB in 5s (1,739 kB/s)         
...
Setting up python3-pexpect (3.1-1ubuntu0.1) ...
Setting up unetlab (1.0.0-4) ...
Processing triggers for libc-bin (2.19-0ubuntu6.6) ...
Processing triggers for initramfs-tools (0.103ubuntu4.2) ...
update-initramfs: Generating /boot/initrd.img-3.16.7-ckt8-unetlab
root@unl01:/boot#
I always like to reboot at this point, but you don't have to. So let's see what we have now!

The status page has a few changes, we now have a POD number (for multi-user), and we can see the UNetLab version and the Qemu version:


The usage indictors in the middle also update every few seconds, which is kind of useful.

If we look at the Users tab, we can see the default user, and what (if any) lab they are running:


Using the Actions menu, we can create a new user:


So, now you can have a pretty decent UNetLab server catering for a large number of users, and each can run their own lab. Pretty neat!

So, let's move onto the labs and see what's changed there.

It's all changed:


We have lost the menu at the top, and gained one at the side. From the top down we can add new things, such as networks, node, pictures, and now shapes and text:


Beneath this we have the lab details, and then an icon for the nodes:


If you have ever used Web-IOU then you'll be familiar with the icons at the right hand side to stop, start and reload devices.

We then have the networks icon, and then one for startup configs:


We then have icons for configuring pictures and text objects, and then one for "more actions":


We then can refresh the topology, and then there is an icon for free select. The major change is that we can now edit the topology and use it from within the same page, no more switching modes, which is so much better. However, if you do click on the free select icon, then you will need to click on it again to de-select it if you want to do anything with the nodes.

Speaking of the nodes, the right click menu has changed here as well:

Notice how the Manage menu minimises when we click on the Capture menu, this is a nice feature especially if you don't have the largest of displays.

Lastly we have a quick access button for the system status, we can close the lab, or log out completely.

It's much smoother, and configurable now. The addition of custom objects makes making labs much nicer (along with the fact that objects line up perfectly now! Now we can have nicely annotated labs:


It would be nice to be able to join objects (such as a square box and the text object within it), but this is a minor issue.

It is clear that a lot of thought has gone into this major release, it's fluid, sharp, and a pleasure to work with.