CCIE Security Lab: ASA to IOS IKEv2 tunnel - Part 2: A clean slate

In the previous post, I switched the IKEv1 tunnel to a PKI-based IKEv2 tunnel. I got the desired result in the end but spent too much time searching for the answer, and in the lab exam there won't be any access to Google, so I need to be able to get it working first time around.

In this post, I will try and break down some of the reasons it did not work and set it up from scratch. I will be keeping the existing IP configuration, along with the NTP config, but the VPN will be set up again from scratch.

There is actually a useful command on the ASA, allowing you to migrate IKEv1 to IKEv2; it's the "migrate" command. However, this is not available on the IOS and despite the similarities between the two, when it comes to IKEv2 the command set does have some big differences.

Let's start by having a look at some of the issues and "gotchas".

no crypto ikev2 http-url cert

This is a known issue, and pretty well documented:

Certificate lookup based on the HTTP URL avoids the fragmentation that results when large certificates are transferred. This feature is enabled on Cisco IOS software devices by default, so the cert req type 12 is used by Cisco IOS software.

If software versions that do not have the fix for Cisco bug ID CSCul48246 are used on the ASA, then the HTTP-URL-based lookup is not negotiated on the ASA, and Cisco IOS software causes the authorization attempt to fail.

On the ASA, if IKEv2 protocol debugs are enabled, these messages appear:

IKEv2-PROTO-1: (139): Auth exchange failed
IKEv2-PROTO-1: (140): Unsupported cert encoding found or Peer requested 
   HTTP URL but never sent
HTTP_LOOKUP_SUPPORTED Notification
In order to avoid this issue, use the no crypto ikev2 http-url cert command in order to disable this feature on the router when it peers with an ASA.

IKEv2 Peer validation

The second issue I faced was the peer validation. Thankfully, this and the issue above, are documented in this link. I won't copy and paste the entire thing, but the nutshell is:

During IKE AUTH stage Internet Security Association and Key Management Protocol (ISAKMP) negotiations, the peers must identify themselves to each other. However, there is a difference in the way routers and ASAs select their local identity.

Therefore, we need to specify how the ASA presents itself to the IOS router, and vice-versa:

By default, the router uses the address as the local identity.

By contrast:

By default, the command mode is set to auto, which means that the ASA determines ISAKMP negotiation by connection type:
IP address for pre-shared key.
Cert Distinguished Name for certificate authentication.


This means that we need to specify how the router and the ASA present themselves. Which can be done as follows:
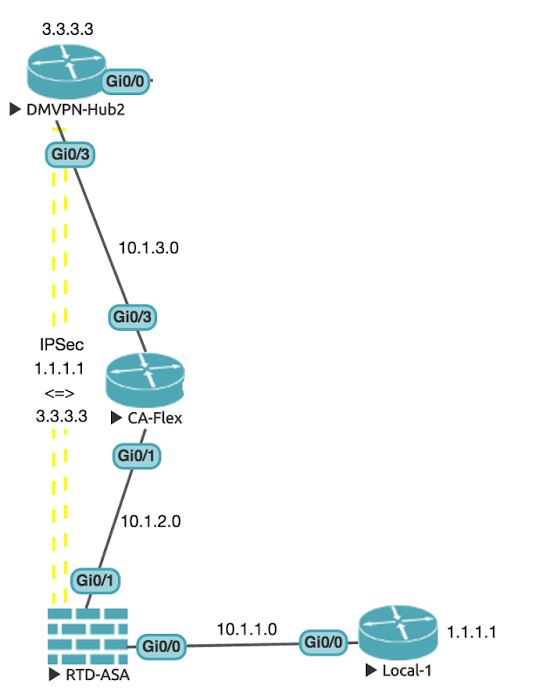
Router:

crypto ikev2 profile pro1
 match identity remote fqdn RTD-ASA.ccielab.local
 identity local fqdn dmvpn-hub2.ccielab.local

ASA:
crypto isakmp identity hostname 
Using this setting on the ASA (with the domain-name set to ccielab.local) seems to have worked.

On the ASA tunnel is the setting "peer-id-validate nocheck" which circumvents some of the issues, and this is, in part, because I chose not to include the IP address when creating the certificate:

Similarly, by default the ASA selects the local ID automatically so, when cert auth is used, it sends the Distinguished Name (DN) as the identity. If the router is configured to receive the address as the remote ID, the peer ID validation fails on the router. For this issue, either configure the router in order to validate the fully qualified domain name (FQDN) or configure the ASA in order to use address as the ISAKMP ID.

What seems to have been the final "fix" was to create the certificate map on the router. Again the document linked above does clarify this approach:

On the router, a certificate map that is attached to the IKEv2 profile must be configured in order to recognize the DN.

This was done with the following:
crypto pki certificate map CA-Flex-Map 10
 issuer-name co ca-flex
I think the final issue was with the leftovers from the IKEv1 setup. Lots or reading as part of troubleshooting was done, but then I spent a lot of time thinking "Maybe I needed this bit, but not another bit". The "fvrf" command (front-door VRF) is an example of this. Clearly not enough time spent reading and learning before implementing. Now I will start again from scratch and this time document all the steps!

Cisco ASA to IOS IKEv2 with PKI

The steps are:
  • Create certificates
  • Enroll in CA
  • Create interesting traffic ACL
  • Define crypto maps and proposals
  • Create tunnels
With a fresh start, the IOS router still takes ages to synchronize NTP, so again, in a lab exam, this is one of those things to set up and return to later, instead of expecting it to work immediately. You could spend ages troubleshooting this when actually, it's working fine.

I ran through this a couple of times. There was much cursing, googling and frustration, but I got it in the end.

Cisco ASA to IOS IKEv2

Clearly, before the exam, I will need to run through it a couple of times again so that it is firmly ingrained.

Below are the steps for the ASA, followed by the IOS router. I have inserted comments, hopefully, to make it easier to read:
RTD-ASA(config)# crypto key generate rsa label RTD-ASA mod 1024
INFO: The name for the keys will be: RTD-ASA
Keypair generation process begin. Please wait...
!
! Keys are generated - lets set up the CA trustpoint:
!
RTD-ASA(config)# crypto ca trustpoint CA-Flex
RTD-ASA(config-ca-trustpoint)# enrollment url http://80.2.10.1
RTD-ASA(config-ca-trustpoint)# crl configure
RTD-ASA(config-ca-crl)# exit
RTD-ASA(config-ca-trustpoint)# fqdn RTD-ASA.ccielab.local
RTD-ASA(config-ca-trustpoint)# keypair RTD-ASA
RTD-ASA(config-ca-trustpoint)# exit
RTD-ASA(config)# 
RTD-ASA(config)# crypto ca authenticate CA-Flex

INFO: Certificate has the following attributes:
Fingerprint:     2a8252e6 eb4d9723 8f4e3480 1602cec3 
Do you accept this certificate? [yes/no]: yes

Trustpoint CA certificate accepted.
RTD-ASA(config)#   
RTD-ASA(config)# crypto ca enroll CA-Flex
%
% Start certificate enrollment .. 
% Create a challenge password. You will need to verbally provide this
   password to the CA Administrator in order to revoke your certificate.
   For security reasons your password will not be saved in the configuration.
   Please make a note of it.
Password: ********
Re-enter password: ********


% The fully-qualified domain name in the certificate will be: RTD-ASA.ccielab.local

% Include the device serial number in the subject name? [yes/no]: no

Request certificate from CA? [yes/no]: yes
% Certificate request sent to Certificate Authority
RTD-ASA(config)# 
RTD-ASA(config)# The certificate has been granted by CA!
RTD-ASA(config)#
!
! Great, now let's define the interesting traffic and set up NAT
!
RTD-ASA(config)# object network Nat-Networks
RTD-ASA(config-network-object)# subnet 10.1.1.0 255.255.255.0
RTD-ASA(config-network-object)# object network No-Nat-Networks
RTD-ASA(config-network-object)# host 1.1.1.1
RTD-ASA(config-network-object)# object network No-Nat-Destination
RTD-ASA(config-network-object)# host 3.3.3.3
RTD-ASA(config-network-object)# access-list IPSec-VPN-Traffic extended permit ip host 1.1.1.1 host 3.3.3.3
RTD-ASA(config)# access-list NONAT extended permit ip object No-Nat-Networks object No-Nat-Destination
RTD-ASA(config)# nat (Inside,Outside) source static No-Nat-Networks No-Nat-Networks destination static No-Nat-Destination No-Nat-Destination no-proxy-arp route-lookup
!
! Now we create the IKEv2 stuff, starting with the proposal
!
RTD-ASA(config)# crypto ipsec ikev2 ipsec-proposal IKEv2-Proposal
RTD-ASA(config-ipsec-proposal)# protocol esp encryption aes-256 3des
RTD-ASA(config-ipsec-proposal)# protocol esp integrity sha-1
RTD-ASA(config-ipsec-proposal)# exit
RTD-ASA(config)#
!
! Next come the policies - probably more than I actually need...
!
RTD-ASA(config)# crypto ikev2 policy 10
RTD-ASA(config-ikev2-policy)# encryption 3des
RTD-ASA(config-ikev2-policy)# integrity sha
RTD-ASA(config-ikev2-policy)# group 5
RTD-ASA(config-ikev2-policy)# prf sha
RTD-ASA(config-ikev2-policy)# exit
RTD-ASA(config)# crypto ikev2 policy 20
RTD-ASA(config-ikev2-policy)#  encryption aes-192
RTD-ASA(config-ikev2-policy)#  integrity sha256 sha
RTD-ASA(config-ikev2-policy)#  group 14 5 2
RTD-ASA(config-ikev2-policy)#  prf sha
RTD-ASA(config-ikev2-policy)#  lifetime seconds 86400
RTD-ASA(config-ikev2-policy)# exit
RTD-ASA(config)# crypto ikev2 policy 30
RTD-ASA(config-ikev2-policy)#  encryption 3des
RTD-ASA(config-ikev2-policy)#  integrity sha
RTD-ASA(config-ikev2-policy)#  group 5 2
RTD-ASA(config-ikev2-policy)#  prf sha
RTD-ASA(config-ikev2-policy)#  lifetime seconds 86400
RTD-ASA(config-ikev2-policy)# exit
RTD-ASA(config)# crypto ikev2 policy 40
RTD-ASA(config-ikev2-policy)#  encryption aes-256
RTD-ASA(config-ikev2-policy)#  integrity sha
RTD-ASA(config-ikev2-policy)#  group 14 5 2
RTD-ASA(config-ikev2-policy)#  prf sha
RTD-ASA(config-ikev2-policy)#  lifetime seconds 86400
RTD-ASA(config-ikev2-policy)#  exit
!
! We need to enable the Outside interface for IKEv2
!
RTD-ASA(config)# crypto ikev2 enable Outside
!
! Set the identity to be the hostname
!
RTD-ASA(config)# crypto isakmp identity hostname
RTD-ASA(config)#
!
! Now we create the tunnel, using a group policy to specify the protocol as IKEv2
!
RTD-ASA(config)# group-policy GroupPolicy2 internal
RTD-ASA(config)# group-policy GroupPolicy2 attributes
RTD-ASA(config-group-policy)# vpn-idle-timeout 30
RTD-ASA(config-group-policy)# vpn-tunnel-protocol ikev2
RTD-ASA(config-group-policy)# exit
RTD-ASA(config)# tunnel-group 10.1.3.3 type ipsec-l2l
RTD-ASA(config)# tunnel-group 10.1.3.3 general-attributes
RTD-ASA(config-tunnel-general)# default-group-policy GroupPolicy2
RTD-ASA(config-tunnel-general)# exit
!
! This is where we tell the tunnel that we are sending a certificate, 
! and expecting one in return.
!
RTD-ASA(config)# tunnel-group 10.1.3.3 ipsec-attributes
RTD-ASA(config-tunnel-ipsec)# ikev2 local-authentication certificate CA-Flex
RTD-ASA(config-tunnel-ipsec)# ikev2 remote-authentication certificate
RTD-ASA(config-tunnel-ipsec)# peer-id-validate nocheck                        
RTD-ASA(config-tunnel-ipsec)# exit
!
! This is our crypto map:
!
RTD-ASA(config)# crypto map VPN-Map 1 match address IPSec-VPN-Traffic
RTD-ASA(config)# crypto map VPN-Map 1 set pfs group5
RTD-ASA(config)# crypto map VPN-Map 1 set peer 10.1.3.3
RTD-ASA(config)# crypto map VPN-Map 1 set ikev2 ipsec-proposal IKEv2-Proposal
RTD-ASA(config)# crypto map VPN-Map 1 set reverse-route
RTD-ASA(config)# crypto map VPN-Map interface Outside
RTD-ASA(config)# 
Now the IOS router:
!
! Start by creating the crypto key
!
DMVPN-Hub2(config)#crypto key generate rsa mod 1024 label DMVPN-Hub2 exportable        
The name for the keys will be: DMVPN-Hub2

% The key modulus size is 1024 bits
% Generating 1024 bit RSA keys, keys will be exportable...
[OK] (elapsed time was 1 seconds)

DMVPN-Hub2(config)#
Jun 30: %SSH-5-ENABLED: SSH 1.99 has been enabled
DMVPN-Hub2(config)#
!
! Next we set up the PKI trustpoint. 
!
DMVPN-Hub2(config)#crypto pki trustpoint CA-Flex
DMVPN-Hub2(ca-trustpoint)#enrollment url http://80.2.10.1
DMVPN-Hub2(ca-trustpoint)#rsakeypair DMVPN-Hub2
DMVPN-Hub2(ca-trustpoint)#usage ike
DMVPN-Hub2(ca-trustpoint)#fqdn DMVPN-Hub2.ccielab.local
DMVPN-Hub2(ca-trustpoint)#revocation-check none
DMVPN-Hub2(ca-trustpoint)#eku request server-auth 
DMVPN-Hub2(ca-trustpoint)#exit
DMVPN-Hub2(config)#
!
! Authenticate to the trustpoint
!
DMVPN-Hub2(config)#crypto pki authenticate CA-Flex
Certificate has the following attributes:
       Fingerprint MD5: 2A8252E6 EB4D9723 8F4E3480 1602CEC3 
      Fingerprint SHA1: 0FB2B075 23BC42B6 54FEB918 0D384DD5 8AE6B8E1 

% Do you accept this certificate? [yes/no]: yes
Trustpoint CA certificate accepted.
DMVPN-Hub2(config)#
!
! Enroll in the trustpoint
!
DMVPN-Hub2(config)#crypto pki enroll CA-Flex
%
% Start certificate enrollment .. 
% Create a challenge password. You will need to verbally provide this
   password to the CA Administrator in order to revoke your certificate.
   For security reasons your password will not be saved in the configuration.
   Please make a note of it.

Password: 
Re-enter password: 

% The subject name in the certificate will include: DMVPN-Hub2.ccielab.local
% Include the router serial number in the subject name? [yes/no]: no
% Include an IP address in the subject name? [no]: no
Request certificate from CA? [yes/no]: yes
% Certificate request sent to Certificate Authority
% The 'show crypto pki certificate verbose CA-Flex' commandwill show the fingerprint.

DMVPN-Hub2(config)#
Jun 30: CRYPTO_PKI:  Certificate Request Fingerprint MD5: 67664772 0E859851 DFF2BA03 C9D727F4 
Jun 30: CRYPTO_PKI:  Certificate Request Fingerprint SHA1: 13767DB5 F17DA7D6 CD3E2043 A968155D 77959542 
Jun 30: %PKI-6-CERTRET: Certificate received from Certificate Authority
DMVPN-Hub2(config)#
!
! Define the interesting traffic
!
DMVPN-Hub2(config)#access-list 101 permit ip host 3.3.3.3 host 1.1.1.1
DMVPN-Hub2(config)#
!
! Create the IKEv2 proposal
!
DMVPN-Hub2(config)#crypto ikev2 proposal IKEv2-Proposal
IKEv2 proposal MUST either have a set of an encryption algorithm other than aes-gcm, an integrity algorithm and a DH group configured or 
 encryption algorithm aes-gcm, a prf algorithm and a DH group configured
DMVPN-Hub2(config-ikev2-proposal)#encryption aes-cbc-256
DMVPN-Hub2(config-ikev2-proposal)#integrity sha1
DMVPN-Hub2(config-ikev2-proposal)#group 5
DMVPN-Hub2(config-ikev2-proposal)#
DMVPN-Hub2(config-ikev2-proposal)#exit
DMVPN-Hub2(config)#
!
! Create a ikev2 policy
!
DMVPN-Hub2(config)#crypto ikev2 policy 10
IKEv2 policy MUST have atleast one complete proposal attached 
DMVPN-Hub2(config-ikev2-policy)#match fvrf any
DMVPN-Hub2(config-ikev2-policy)#proposal IKEv2-Proposal
DMVPN-Hub2(config-ikev2-policy)#exit
DMVPN-Hub2(config)#
!
! Create a keyring
!
DMVPN-Hub2(config)#crypto ikev2 keyring ASA-Key
DMVPN-Hub2(config-ikev2-keyring)#peer RTD-ASA
DMVPN-Hub2(config-ikev2-keyring-peer)#address 10.1.2.254
DMVPN-Hub2(config-ikev2-keyring-peer)#exit
DMVPN-Hub2(config-ikev2-keyring)#
DMVPN-Hub2(config-ikev2-keyring)#exit
DMVPN-Hub2(config)#
!
! Create an IKEv2 profile
!
DMVPN-Hub2(config)#crypto ikev2 profile IKEv2-Profile
IKEv2 profile MUST have:
   1. A local and a remote authentication method.
   2. A match identity or a match certificate or match any statement.
DMVPN-Hub2(config-ikev2-profile)#match fvrf any
DMVPN-Hub2(config-ikev2-profile)#match identity remote address 10.1.2.254 255.255.255.255        
DMVPN-Hub2(config-ikev2-profile)#match identity remote fqdn RTD-ASA.ccielab.local      
DMVPN-Hub2(config-ikev2-profile)#match certificate CA-Flex-Map
%No such certificate map CA-Flex-Map
DMVPN-Hub2(config-ikev2-profile)#identity local dn
DMVPN-Hub2(config-ikev2-profile)#authentication local rsa-sig
DMVPN-Hub2(config-ikev2-profile)#authentication remote rsa-sig
DMVPN-Hub2(config-ikev2-profile)#keyring local ASA-Key
DMVPN-Hub2(config-ikev2-profile)#pki trustpoint CA-Flex
DMVPN-Hub2(config-ikev2-profile)#exit
DMVPN-Hub2(config)#
!
! Create the transform set
!
DMVPN-Hub2(config)#crypto ipsec transform-set IKEv2-Transform esp-3des esp-sha-hmac    
DMVPN-Hub2(cfg-crypto-trans)#mode tunnel
DMVPN-Hub2(cfg-crypto-trans)#exit
DMVPN-Hub2(config)#
!
! Create the certificate map that should have been done before the profile...
!
DMVPN-Hub2(config)#crypto pki certificate map CA-Flex-Map 10
DMVPN-Hub2(ca-certificate-map)#issuer-name co CA-Flex
DMVPN-Hub2(ca-certificate-map)#exit
DMVPN-Hub2(config)#crypto ikev2 profile IKEv2-Profile
DMVPN-Hub2(config-ikev2-profile)#match certificate CA-Flex-Map
DMVPN-Hub2(config-ikev2-profile)#exit
DMVPN-Hub2(config)#
!
! Create the crypto map
!
DMVPN-Hub2(config)#crypto map VPN-Map 1 ipsec-isakmp
% NOTE: This new crypto map will remain disabled until a peer
        and a valid access list have been configured.
DMVPN-Hub2(config-crypto-map)#set peer 10.1.2.254
DMVPN-Hub2(config-crypto-map)#set transform-set IKEv2-Transform
DMVPN-Hub2(config-crypto-map)#set ikev2-profile IKEv2-Profile
DMVPN-Hub2(config-crypto-map)#match address 101
DMVPN-Hub2(config-crypto-map)#exit
!
! Enable the interface
!
DMVPN-Hub2(config)#int gi 0/3
DMVPN-Hub2(config-if)#crypto map VPN-Map
DMVPN-Hub2(config-if)#exit
Jun 30: %CRYPTO-6-ISAKMP_ON_OFF: ISAKMP is ON
DMVPN-Hub2(config)#
!
! Disable HTTP certificate lookups
!
DMVPN-Hub2(config)#no crypto ikev2 http-url cert
DMVPN-Hub2(config)#
There is a lot to remember here, and a lot to forget. I will need to run through this a couple of times! But the tunnel is up and working:
Local-1#ping 3.3.3.3 so lo0
Type escape sequence to abort.
Sending 5, 100-byte ICMP Echos to 3.3.3.3, timeout is 2 seconds:
Packet sent with a source address of 1.1.1.1 
.!!!!
Success rate is 80 percent (4/5), round-trip min/avg/max = 6/9/11 ms
Local-1#

RTD-ASA# sh crypto ikev2 sa

IKEv2 SAs:

Session-id:2, Status:UP-ACTIVE, IKE count:1, CHILD count:1

Tunnel-id                 Local                Remote     Status         Role
 46168045        10.1.2.254/500          10.1.3.3/500      READY    INITIATOR
      Encr: AES-CBC, keysize: 256, Hash: SHA96, DH Grp:5, Auth sign: RSA, Auth verify: RSA
      Life/Active Time: 86400/21 sec
Child sa: local selector  1.1.1.1/0 - 1.1.1.1/65535
          remote selector 3.3.3.3/0 - 3.3.3.3/65535
          ESP spi in/out: 0x33701b89/0xacbd1af8  
RTD-ASA# 

DMVPN-Hub2#sh crypto ikev2 sa
 IPv4 Crypto IKEv2  SA 

Tunnel-id Local                 Remote                fvrf/ivrf            Status 
1         10.1.3.3/500          10.1.2.254/500        none/none            READY  
      Encr: AES-CBC, keysize: 256, PRF: SHA1, Hash: SHA96, DH Grp:5, Auth sign: RSA, Auth verify: RSA
      Life/Active Time: 86400/48 sec

 IPv6 Crypto IKEv2  SA 

DMVPN-Hub2#
This one will get revisited, most likely in the form of a break-fix scenario. But now it's time to move on (mainly because I am annoyed that this is taking a while to get into my head).

Next-up will dual-hub DMVPN!

CCIE Security Lab: ASA to IOS IKEv2 tunnel - Part 1: Migration

In the previous post, I set up an IKEv1 tunnel between RTD-ASA and DMVPN-Hub2.


In this post, we'll change it to an IKEv2 tunnel. For this to work, we will need to have in place a certificate authority, and an NTP server. CA-Flex will perform both of these functions. The Cisco doc this is here: Cisco ASA to IOS Site-to-Site IKEv2 tunnel.

We start by adding a new loopback to CA-Flex and setting up the NTP service.

Configuring NTP on Cisco IOS

CA-Flex(config)#int lo100    
CA-Flex(config-if)#ip add 80.2.10.1 255.255.255.255
CA-Flex(config)#router ospf 1
CA-Flex(config-router)#network 80.2.10.1 0.0.0.0 area 0
CA-Flex(config-router)#exit
CA-Flex(config)#ntp master 1
CA-Flex(config)#ntp source lo100
CA-Flex(config)#ntp authentication-key 1 md5 cisco
CA-Flex(config)#ntp authenticate
CA-Flex(config)#ntp trusted-key 1
CA-Flex(config)#

DMVPN-Hub2(config)#ntp server 80.2.10.1 key 1
DMVPN-Hub2(config)#ntp authentication-key 1 md5 cisco
DMVPN-Hub2(config)#ntp trusted-key 1
DMVPN-Hub2(config)#

RTD-ASA(config)# ntp server 80.2.10.1 key 1 prefer
RTD-ASA(config)# ntp authentication-key 1 md5 cisco
RTD-ASA(config)# ntp authenticate
RTD-ASA(config)# ntp trusted-key 1
RTD-ASA(config)#
After a little time, the clock on the ASA synchronized:
RTD-ASA# sh ntp stat
Clock is synchronized, stratum 3, reference is 80.2.10.1
nominal freq is 99.9984 Hz, actual freq is 99.9984 Hz, precision is 2**6
reference time is db1cd4c0.b1a26267 (10:49:36.693 UTC Tue Jun 28 2016)
clock offset is -108.4542 msec, root delay is 4.82 msec
root dispersion is 15999.53 msec, peer dispersion is 15890.63 msec
RTD-ASA# 
The IOS router (DMVPN-Hub2) took a long time, probably around fifteen minutes or so. I checked and double-checked the settings, and then turned on logging, and debugged NTP (debug ntp all). Eventually, it got there:
DMVPN-Hub2#sh ntp sta  
Clock is unsynchronized, stratum 3, reference is 80.2.10.1      
nominal freq is 1000.0003 Hz, actual freq is 1000.0003 Hz, precision is 2**14
ntp uptime is 230800 (1/100 of seconds), resolution is 1000
reference time is DB1CD9B4.5E24EDF7 (11:10:44.367 UTC Tue Jun 28 2016)
clock offset is 127.6537 msec, root delay is 5.57 msec
root dispersion is 163.01 msec, peer dispersion is 1.10 msec
loopfilter state is 'FREQ' (Drift being measured), drift is 0.000000000 s/s
system poll interval is 64, last update was 7 sec ago.
DMVPN-Hub2#
*Jun 28: NTP message sent to 80.2.10.1, from interface 'GigabitEthernet0/3' (10.1.3.3).
*Jun 28: NTP message received from 80.2.10.1 on interface 'GigabitEthernet0/3' (10.1.3.3).
*Jun 28: NTP Core(DEBUG): ntp_receive: message received
*Jun 28: NTP Core(DEBUG): ntp_receive: peer is 0x0D6B0F68, next action is 1.
*Jun 28: NTP Core(NOTICE): ntpd  PPM
*Jun 28: NTP: step(0x00000000.26AAF451): local_offset = 0x00000000.00000000, curtime = 0xDB1CD9F8.5DF3AEBF
*Jun 28: NTP Core(NOTICE): time reset 0.151046 s
*Jun 28: NTP Core(NOTICE): trans state : 5 
*Jun 28: NTP Core(INFO): 0.0.0.0 C69C 0C clock_step
*Jun 28: NTP Core(INFO): 0.0.0.0 C0AC 0C clock_step
*Jun 28: NTP message sent to 80.2.10.1, from interface 'GigabitEthernet0/3' (10.1.3.3).
*Jun 28: NTP message received from 80.2.10.1 on interface 'GigabitEthernet0/3' (10.1.3.3).
*Jun 28: NTP Core(DEBUG): ntp_receive: message received
*Jun 28: NTP Core(DEBUG): ntp_receive: peer is 0x0D6B0F68, next action is 1.
*Jun 28: NTP Core(DEBUG): Peer becomes reachable, poll set to 6.
*Jun 28: NTP Core(INFO): 80.2.10.1 E054 84 reachable
*Jun 28: NTP Core(INFO): 80.2.10.1 F66A 8A sys_peer
*Jun 28: NTP Core(NOTICE): Clock is synchronized.
Jun 28 11:11:54.511: NTP: Calendar updated.
DMVPN-Hub2#sh ntp sta
Clock is synchronized, stratum 3, reference is 80.2.10.1      
nominal freq is 1000.0003 Hz, actual freq is 999.8436 Hz, precision is 2**14
ntp uptime is 237700 (1/100 of seconds), resolution is 1001
reference time is DB1CD9F9.83E971D3 (11:11:53.515 UTC Tue Jun 28 2016)
clock offset is 1.7506 msec, root delay is 4.75 msec
root dispersion is 7940.04 msec, peer dispersion is 7937.56 msec
loopfilter state is 'CTRL' (Normal Controlled Loop), drift is 0.000156686 s/s
system poll interval is 64, last update was 7 sec ago.
DMVPN-Hub2#
I did find this useful article though explaining why it can take a while for NTP to update. Now we can set up CA-Flex to be a Certificate Authority (CA).

Configuring a CA on Cisco IOS.

IKEv2 likes certificates, so let's create a certificate server. It also likes pre-shared-keys, but the CA should prove more interesting.
CA-Flex(config)#crypto key generate rsa label CA-Flex general-key mod 1024
The name for the keys will be: CA-Flex

% The key modulus size is 1024 bits
% Generating 1024 bit RSA keys, keys will be non-exportable... <== NOTICE THIS!!
[OK] (elapsed time was 1 seconds)

CA-Flex(config)#
Jun 28: %SSH-5-ENABLED: SSH 1.99 has been enabled
CA-Flex(config)#crypto key export rsa CA-Flex pem url nvram: 3des cisco123
% RSA keypair 'CA-Flex' is not exportable.
CA-Flex(config)#crypto key generate rsa label CA-Flex general-key mod 1024 ?
  exportable  Allow the key to be exported
  on          create key on specified device.
  storage     Store key on specified device
  

CA-Flex(config)#$generate rsa label CA-Flex general-key mod 1024 export      
% You already have RSA keys defined named CA-Flex.
% They will be replaced.

% The key modulus size is 1024 bits
% Generating 1024 bit RSA keys, keys will be exportable...
[OK] (elapsed time was 1 seconds)

CA-Flex(config)#
Jun 28: %SSH-5-DISABLED: SSH 1.99 has been disabled
Jun 28: %SSH-5-ENABLED: SSH 1.99 has been enabled
CA-Flex(config)#crypto key export rsa CA-Flex pem url nvram: 3des cisco123
% Key name: CA-Flex
   Usage: General Purpose Key
Exporting public key...
Destination filename [CA-Flex.pub]? 
Writing file to nvram:CA-Flex.pub
Exporting private key...
Destination filename [CA-Flex.prv]? 
Writing file to nvram:CA-Flex.prv
CA-Flex(config)#crypto pki server CA-Flex
CA-Flex(cs-server)#issuer-name CN=CA-Flex.ccielab.local
CA-Flex(cs-server)#grant auto
CA-Flex(cs-server)#
Jun 28: %PKI-6-CS_GRANT_AUTO: All enrollment requests will be automatically granted.
CA-Flex(cs-server)#lifetime certificate 10
CA-Flex(cs-server)#lifetime ca-certificate 10
CA-Flex(cs-server)#cdp-url http://80.2.10.1/ca-flex.crl
CA-Flex(cs-server)#eku server-auth ipsec-end-system ipsec-tunnel ipsec-user
CA-Flex(cs-server)#database archive pem password cisco123
CA-Flex(cs-server)#database url pem nvram:
CA-Flex(cs-server)#no shut
%Some server settings cannot be changed after CA certificate generation.
% Exporting Certificate Server signing certificate and keys...

% Certificate Server enabled.
CA-Flex(cs-server)#
Jun 28: %PKI-6-CS_ENABLED: Certificate server now enabled.
CA-Flex(cs-server)#do sh crypto pki server
Certificate Server CA-Flex:
    Status: enabled
    State: enabled
    Server's configuration is locked  (enter "shut" to unlock it)
    Issuer name: CN=CA-Flex.ccielab.local
    CA cert fingerprint: 2A8252E6 EB4D9723 8F4E3480 1602CEC3 
    Granting mode is: auto
    Last certificate issued serial number (hex): 1
    CA certificate expiration timer: 11:40:24 UTC Jul 8 2016
    CRL NextUpdate timer: 17:40:25 UTC Jun 28 2016
    Current primary storage dir: nvram:
    Current storage dir for .pem files: nvram:
    Database Level: Minimum - no cert data written to storage
CA-Flex(cs-server)#exit
CA-Flex(config)#ip http server
CA-Flex(config)#
Now we set up the routers for PKI. This bit was much harder than expected. I wrote this page twice while trying to get this to work, and in then end, I completely lost track of all the steps I took while troubleshooting, so please excuse the cut and paste job. I think part of the issue stems from trying to move from IKEv1 to IKEv2; the little remnants left behind made it messy. I think I'll do another post starting with a clean slate and see if it is smoother.

Below we have the configurations for the ASA and the router.

ASA to IOS IKEv2 tunnel with PKI


ASA config:

object network Nat-Networks
 subnet 10.1.1.0 255.255.255.0
object network No-Nat-Networks
 host 1.1.1.1
object network No-Nat-Destination
 host 3.3.3.3
access-list IPSec-VPN-Traffic extended permit ip host 1.1.1.1 host 3.3.3.3 
access-list NONAT extended permit ip object No-Nat-Networks object No-Nat-Destination 
!
nat (Inside,Outside) source static No-Nat-Networks No-Nat-Networks destination static No-Nat-Destination No-Nat-Destination no-proxy-arp route-lookup
!
crypto ipsec ikev1 transform-set VPN-transforms esp-3des esp-sha-hmac 
crypto ipsec ikev2 ipsec-proposal DES
 protocol esp encryption des
 protocol esp integrity sha-1 md5
crypto ipsec ikev2 ipsec-proposal AES256
 protocol esp encryption aes-256
 protocol esp integrity sha-1 md5
crypto ipsec ikev2 ipsec-proposal Prop1
 protocol esp encryption 3des
 protocol esp integrity sha-1
crypto ipsec security-association pmtu-aging infinite
crypto map VPN_Map 1 match address IPSec-VPN-Traffic
crypto map VPN_Map 1 set peer 10.1.3.3 
crypto map VPN_Map 1 set ikev1 transform-set VPN-transforms
crypto map VPN_Map 1 set ikev2 ipsec-proposal DES AES256
crypto map VPN_Map 1 set trustpoint CA-Flex
crypto map VPN_Map interface Outside
crypto ca trustpoint CA-Flex
 enrollment url http://80.2.10.1:80
 crl configure
crypto ca trustpool policy
!
crypto isakmp identity hostname 
crypto ikev2 policy 1
 encryption aes-256
 integrity sha
 group 14 5 2
 prf sha      
 lifetime seconds 86400
crypto ikev2 policy 10
 encryption aes-192
 integrity sha256 sha
 group 14 5 2
 prf sha
 lifetime seconds 86400
crypto ikev2 policy 30
 encryption 3des
 integrity sha
 group 5 2
 prf sha
 lifetime seconds 86400
crypto ikev2 enable Outside
crypto ikev1 enable Outside
crypto ikev1 policy 10
 authentication rsa-sig
 encryption 3des
 hash sha
 group 2
 lifetime 86400
!
group-policy GroupPolicy2 internal
group-policy GroupPolicy2 attributes
 vpn-idle-timeout 30
 vpn-tunnel-protocol ikev1 ikev2 
dynamic-access-policy-record DfltAccessPolicy
tunnel-group 10.1.3.3 type ipsec-l2l
tunnel-group 10.1.3.3 general-attributes
 default-group-policy GroupPolicy2
tunnel-group 10.1.3.3 ipsec-attributes
 peer-id-validate nocheck
 ikev2 remote-authentication certificate
 ikev2 local-authentication certificate CA-Flex
!             

IOS config:

crypto pki trustpoint CA-Flex
 enrollment url http://80.2.10.1:80
 usage ike
 fqdn dmvpn-hub2.ccielab.local
 revocation-check none
 rsakeypair DMVPN-Hub2
 eku request server-auth 
!
crypto pki certificate map CA-Flex-Map 10
 issuer-name co ca-flex
!
crypto ikev2 proposal AES256 
 encryption aes-cbc-256
 integrity sha1
 group 5 2 14
crypto ikev2 proposal aes-cbc-256-proposal 
 encryption aes-cbc-256
 integrity sha1
 group 5 2 14
!
crypto ikev2 policy 1 
 match fvrf any
 match address local 10.1.3.3
 proposal AES256
!
crypto ikev2 profile pro1
 match fvrf any
 match address local 10.1.3.3
 match identity remote fqdn RTD-ASA.ccielab.local
 match certificate CA-Flex-Map
 identity local fqdn dmvpn-hub2.ccielab.local
 authentication remote rsa-sig
 authentication local rsa-sig
 pki trustpoint CA-Flex
!
no crypto ikev2 http-url cert
!
crypto isakmp policy 10
 encr 3des
 group 5  
crypto isakmp invalid-spi-recovery
crypto isakmp profile VPN_Map
   keyring VPN_Keys
   match identity address 10.1.2.254 255.255.255.255 
!
crypto ipsec transform-set VPN-transforms esp-3des esp-sha-hmac 
 mode tunnel
crypto ipsec transform-set ESP-AES-SHA esp-aes 256 esp-sha-hmac 
 mode tunnel
!
crypto map VPN_Map 1 ipsec-isakmp 
 set peer 10.1.2.254
 set transform-set ESP-AES-SHA 
 set pfs group2
 set ikev2-profile pro1
 match address 101
!
access-list 101 permit ip host 3.3.3.3 host 1.1.1.1
So, there we have all the configs, we probably have more than we need, probably not using all of them, and it has not been a good learning experience. I would have certainly failed this bit in the lab exam. The next step is, therefore, to remove all the tunnel configs, and start from scratch. Repetition is good for the memory, and then I can properly lay out all the steps, along with explanations.

I got the desired result:
Local-1#ping 3.3.3.3 so lo0
Type escape sequence to abort.
Sending 5, 100-byte ICMP Echos to 3.3.3.3, timeout is 2 seconds:
Packet sent with a source address of 1.1.1.1 
!!!!!
Success rate is 100 percent (5/5), round-trip min/avg/max = 8/9/12 ms
Local-1#

RTD-ASA# sh crypto ikev2 sa

IKEv2 SAs:

Session-id:1, Status:UP-ACTIVE, IKE count:1, CHILD count:1

Tunnel-id                 Local                Remote     Status         Role
139751863        10.1.2.254/500          10.1.3.3/500      READY    INITIATOR
      Encr: AES-CBC, keysize: 256, Hash: SHA96, DH Grp:14, Auth sign: RSA, Auth verify: RSA
      Life/Active Time: 86400/1577 sec
Child sa: local selector  1.1.1.1/0 - 1.1.1.1/65535
          remote selector 3.3.3.3/0 - 3.3.3.3/65535
          ESP spi in/out: 0xea2c233e/0x30cdff43  
RTD-ASA# 
This is not enough, though, there is not enough time (or the help of Google) in the lab to blunder through. So, I will wipe the configs and start again. Until I get it right.

CCIE Security Lab: ASA to IOS IKEv1 tunnel

In the first part of the new VPN topology, I will be looking at connecting up the lower left-hand side routers, using a mix of static routes and OSPF to get them talking, and then setting up an IPSec VPN between the ASA and DMVPN-Hub2.

Cisco ASA to IOS IPSec VPNs

We will start with the basic connectivity. Using static routing to send all of Local-1's traffic to the ASA, and then OSPF to bridge the rest of the network.

You can find most of the steps in the link for ASA to IOS IKEv1.

Basic OSPF

The OSPf setup here is nothing special, everything is going into Area 0:
RTD-ASA# sh int ip bri | e unas
Interface                  IP-Address      OK? Method Status                Protocol
GigabitEthernet0/0         10.1.1.254      YES manual up                    up  
GigabitEthernet0/1         10.1.2.254      YES manual up                    up  
RTD-ASA#

Local-1#sh ip int bri | e unas
Interface                  IP-Address      OK? Method Status                Protocol
GigabitEthernet0/0         10.1.1.1        YES manual up                    up      
Loopback0                  1.1.1.1         YES manual up                    up      
Local-1#

Local-1(config)#ip route 0.0.0.0 0.0.0.0 10.1.1.254
Local-1(config)#


RTD-ASA(config)# route inside 1.1.1.1 255.255.255.255 10.1.1.1
RTD-ASA(config)#
RTD-ASA(config)# router ospf 1
RTD-ASA(config-router)# network 10.1.2.0 255.255.255.0 area 0
RTD-ASA(config-router)# red static subnets
RTD-ASA(config-router)# 

CA-Flex(config)#do sh ip int bri | e unas
Interface                  IP-Address      OK? Method Status                Protocol
GigabitEthernet0/1         10.1.2.2        YES manual up                    up      
GigabitEthernet0/3         10.1.3.2        YES manual up                    up      
Loopback0                  2.2.2.2         YES manual up                    up      

CA-Flex(config)#router ospf 1
CA-Flex(config-router)#router-id 2.2.2.2
CA-Flex(config-router)#network 10.1.2.0 0.255.255.255 area 0
CA-Flex(config-router)#                              
CA-Flex(config-router)#network 10.1.3.0 0.255.255.255 area 0
CA-Flex(config-router)#

DMVPN-Hub2(config)#do sh ip int bri | e unas
Interface                  IP-Address      OK? Method Status                Protocol
GigabitEthernet0/0         10.1.5.3        YES manual up                    up      
GigabitEthernet0/3         10.1.3.3        YES manual up                    up      
Loopback0                  3.3.3.3         YES manual up                    up      

DMVPN-Hub2(config)#router ospf 1
DMVPN-Hub2(config-router)#router-id 3.3.3.3
DMVPN-Hub2(config-router)#network 10.1.3.0 0.255.255.255 area 0
DMVPN-Hub2(config-router)#
%OSPF-5-ADJCHG: Process 1, Nbr 2.2.2.2 on GigabitEthernet0/3 from LOADING to FULL, Loading Done
DMVPN-Hub2(config-router)#
Now that we have this done, we can set up the VPN tunnel.

IKEv1 IPSec tunnel between ASA and IOS

Now we set up the VPN tunnel. It won't work straight away, and this is (partially) intentional. I need to be hot on the debugging of VPN failures for the exam, that said, I don't want to spend too much time troubleshooting in the lab!

The first step is to create the access lists to define our interesting traffic:
RTD-ASA(config)# access-list IPSec-VPN-Traffic extended permit ip host 1.1.1.1 host 3.3.3.3

DMVPN-Hub2(config)#access-list 101 permit ip host 3.3.3.3 host 1.1.1.1
DMVPN-Hub2(config)#
We then create the ISAKMP policy:
RTD-ASA(config)# crypto isakmp policy 10
RTD-ASA(config-ikev1-policy)# encryption 3des
RTD-ASA(config-ikev1-policy)# auth pre-share 
RTD-ASA(config-ikev1-policy)# group 2
RTD-ASA(config-ikev1-policy)# 

DMVPN-Hub2(config)#crypto isakmp policy 10
DMVPN-Hub2(config-isakmp)#encr 3des
DMVPN-Hub2(config-isakmp)#auth pre-share 
DMVPN-Hub2(config-isakmp)#group 2
DMVPN-Hub2(config-isakmp)#
Next we create the transform set
RTD-ASA(config)# crypto ipsec transform-set VPN-transforms esp-3des esp-sha-hmac
RTD-ASA(config)# 

DMVPN-Hub2(config)#crypto ipsec transform-set VPN-transforms esp-3des esp-sha-hmac     
DMVPN-Hub2(cfg-crypto-trans)#exit
DMVPN-Hub2(config)#
Then we create the crypto maps (defining our peers, and utilizing the transform set created earlier):
RTD-ASA(config)# crypto map VPN_Map 1 set peer 10.1.3.3
RTD-ASA(config)# crypto map VPN_Map 1 set ikev1 transform-set VPN-transforms
RTD-ASA(config)# crypto map VPN_Map 1 set ikev2 pre-shared-key cisco
RTD-ASA(config)# crypto map VPN_Map 1 match address IPSec-VPN-Traffic
RTD-ASA(config)# 
RTD-ASA(config)# crypto map VPN_Map interface Outside
RTD-ASA(config)# 
RTD-ASA(config)# tunnel-group 10.1.3.3 type ipsec-l2l 
RTD-ASA(config)# tunnel-group 10.1.3.3 ipsec-attributes 
RTD-ASA(config-tunnel-ipsec)# ikev1 pre-shared-key cisco
RTD-ASA(config-tunnel-ipsec)# 

DMVPN-Hub2(config)#crypto keyring VPN_Keys
DMVPN-Hub2(conf-keyring)#pre-shared-key address 10.1.2.254 key cisco
DMVPN-Hub2(conf-keyring)#exit
DMVPN-Hub2(config)#
DMVPN-Hub2(config)#crypto isakmp profile VPN_Map 
% A profile is deemed incomplete until it has match identity statements
DMVPN-Hub2(conf-isa-prof)#match identity address 10.1.2.254 255.255.255.255
DMVPN-Hub2(conf-isa-prof)#keyring VPN_Keys
DMVPN-Hub2(conf-isa-prof)#exit
DMVPN-Hub2(config)#
DMVPN-Hub2(config)#crypto map VPN_Map 1 ipsec-isakmp
% NOTE: This new crypto map will remain disabled until a peer
        and a valid access list have been configured.
DMVPN-Hub2(config-crypto-map)#set peer 10.1.2.254
DMVPN-Hub2(config-crypto-map)#set transform-set VPN-transforms
DMVPN-Hub2(config-crypto-map)#set isakmp-profile VPN_Map
DMVPN-Hub2(config-crypto-map)#match address 101
DMVPN-Hub2(config-crypto-map)#int gi 0/3
DMVPN-Hub2(config-if)#crypto map VPN_Map
DMVPN-Hub2(config-if)#
*Jun 26 07:59:10.158: %CRYPTO-6-ISAKMP_ON_OFF: ISAKMP is ON
DMVPN-Hub2(config-if)#
As it stands, we can bring up the tunnel by pinging 1.1.1.1 from DMVPN-Hub2 by setting the source as lo0:
DMVPN-Hub2#ping 1.1.1.1 so lo0
Type escape sequence to abort.
Sending 5, 100-byte ICMP Echos to 1.1.1.1, timeout is 2 seconds:
Packet sent with a source address of 3.3.3.3 
.....
Success rate is 0 percent (0/5)
DMVPN-Hub2#

RTD-ASA# sh crypto isakmp sa

IKEv1 SAs:

   Active SA: 1
    Rekey SA: 0 (A tunnel will report 1 Active and 1 Rekey SA during rekey)
Total IKE SA: 1

1   IKE Peer: 10.1.3.3
    Type    : L2L             Role    : responder 
    Rekey   : no              State   : MM_ACTIVE 

There are no IKEv2 SAs
RTD-ASA# 

DMVPN-Hub2#sh crypto isakmp sa
IPv4 Crypto ISAKMP SA
dst             src             state          conn-id status
10.1.2.254      10.1.3.3        QM_IDLE           1001 ACTIVE

IPv6 Crypto ISAKMP SA

DMVPN-Hub2#
We have the right details above. The ASA should show MM_ACTIVE, and the IOS route should show "QM_IDLE". We will not get a response yet as RTD-ASA is not set up yet. We still need to set up NAT, and a NAT exemption for the 1.1.1.1 address.

We do want to NAT the 10.1.1.1 subnet, but not the 1.1.1.1 subnet, so let's set that up as well.

We start by creating three objects, one for the network we will want to NAT (10.1.1.0/24), one for the host we do not want to NAT for internally (1.1.1.1) and one for the host we will not want to NAT for externally (3.3.3.3):
RTD-ASA(config)# object network Nat-Networks
RTD-ASA(config-network-object)# subnet 10.1.1.0 255.255.255.0
RTD-ASA(config-network-object)# exit
RTD-ASA(config)# object network No-Nat-Networks
RTD-ASA(config-network-object)# host 1.1.1.1
RTD-ASA(config-network-object)# exit
RTD-ASA(config)# object network No-Nat-Destination
RTD-ASA(config-network-object)# host 3.3.3.3
RTD-ASA(config-network-object)# exit
The we can use these objects in the NAT rule:
RTD-ASA(config)# terminal width 255
RTD-ASA(config)# nat (inside,outside) source static No-Nat-Networks No-Nat-Networks destination static No-Nat-Destination No-Nat-Destination no-proxy-arp route-lookup
RTD-ASA(config)# 
Does it work now?
Local-1#ping 3.3.3.3 so lo0
Type escape sequence to abort.
Sending 5, 100-byte ICMP Echos to 3.3.3.3, timeout is 2 seconds:
Packet sent with a source address of 1.1.1.1 
.....
Success rate is 0 percent (0/5)
Local-1#
Not so far. Let's dig in:
RTD-ASA# sh crypto ipsec sa
interface: Outside
    Crypto map tag: VPN_Map, seq num: 1, local addr: 10.1.2.254

      access-list IPSec-VPN-Traffic extended permit ip host 1.1.1.1 host 3.3.3.3 
      local ident (addr/mask/prot/port): (1.1.1.1/255.255.255.255/0/0)
      remote ident (addr/mask/prot/port): (3.3.3.3/255.255.255.255/0/0)
      current_peer: 10.1.3.3


      #pkts encaps: 0, #pkts encrypt: 0, #pkts digest: 0 <== Nothing being transmitted!
      #pkts decaps: 14, #pkts decrypt: 14, #pkts verify: 14
      #pkts compressed: 0, #pkts decompressed: 0
      #pkts not compressed: 0, #pkts comp failed: 0, #pkts decomp failed: 0
      #pre-frag successes: 0, #pre-frag failures: 0, #fragments created: 0
      #PMTUs sent: 0, #PMTUs rcvd: 0, #decapsulated frgs needing reassembly: 0
      #TFC rcvd: 0, #TFC sent: 0
      #Valid ICMP Errors rcvd: 0, #Invalid ICMP Errors rcvd: 0
      #send errors: 0, #recv errors: 0

      local crypto endpt.: 10.1.2.254/0, remote crypto endpt.: 10.1.3.3/0
      path mtu 1500, ipsec overhead 58(36), media mtu 1500
      PMTU time remaining (sec): 0, DF policy: copy-df
      ICMP error validation: disabled, TFC packets: disabled
      current outbound spi: 45623476
      current inbound spi : 26AD8AD7

    inbound esp sas:
      spi: 0x26AD8AD7 (648907479)
         transform: esp-3des esp-sha-hmac no compression 
         in use settings ={L2L, Tunnel, IKEv1, }
         slot: 0, conn_id: 8192, crypto-map: VPN_Map
         sa timing: remaining key lifetime (kB/sec): (3914998/2623)
         IV size: 8 bytes
         replay detection support: Y
         Anti replay bitmap: 
          0x00000000 0x00007FFF
    outbound esp sas:
      spi: 0x45623476 (1164063862)
         transform: esp-3des esp-sha-hmac no compression 
         in use settings ={L2L, Tunnel, IKEv1, }
         slot: 0, conn_id: 8192, crypto-map: VPN_Map
         sa timing: remaining key lifetime (kB/sec): (3915000/2622)
         IV size: 8 bytes
         replay detection support: Y
         Anti replay bitmap: 
          0x00000000 0x00000001

RTD-ASA#
We are not transmitting any packets. Why is this?
RTD-ASA(config)# logging console 7
RTD-ASA(config)# logging on
%ASA-5-111008: User 'enable_15' executed the 'logging on' command.
RTD-ASA(config)# 
%ASA-5-111010: User 'enable_15', running 'CLI' from IP 0.0.0.0, executed 'logging on'
%ASA-7-609001: Built local-host Outside:3.3.3.3
%ASA-7-609001: Built local-host Inside:1.1.1.1
%ASA-6-302020: Built inbound ICMP connection for faddr 3.3.3.3/4 gaddr 1.1.1.1/0 laddr 1.1.1.1/0
%ASA-6-110002: Failed to locate egress interface for ICMP from Inside:1.1.1.1/0 to 3.3.3.3/4
%ASA-6-302021: Teardown ICMP connection for faddr 3.3.3.3/4 gaddr 1.1.1.1/0 laddr 1.1.1.1/0
%ASA-7-609002: Teardown local-host Outside:3.3.3.3 duration 0:00:10
%ASA-7-609002: Teardown local-host Inside:1.1.1.1 duration 0:00:10
The clue here is "Failed to locate egress interface", meaning we do not have a route to the destination. Let's add one, and see if this solves the issue:
DMVPN-Hub2(config)#router ospf 1
DMVPN-Hub2(config-router)#network 3.3.3.3 0.0.0.0 area 1 
DMVPN-Hub2(config-router)#
Does it work now?
Local-1#ping 3.3.3.3 so lo0
Type escape sequence to abort.
Sending 5, 100-byte ICMP Echos to 3.3.3.3, timeout is 2 seconds:
Packet sent with a source address of 1.1.1.1 
.!!!!
Success rate is 80 percent (4/5), round-trip min/avg/max = 9/10/12 ms
Local-1#
It does. We are also encrypting as much traffic as we are decrypting:
RTD-ASA# sh vpn-sessiondb detail l2l 

Session Type: LAN-to-LAN Detailed

Connection   : 10.1.3.3
Index        : 3                      IP Addr      : 10.1.3.3
Protocol     : IKEv1 IPsec
Encryption   : IKEv1: (1)3DES  IPsec: (1)3DES
Hashing      : IKEv1: (1)SHA1  IPsec: (1)SHA1
Bytes Tx     : 400                    Bytes Rx     : 400
Login Time   : 21:51:24 UTC Mon Jun 27 2016
Duration     : 0h:01m:27s

IKEv1 Tunnels: 1
IPsec Tunnels: 1

IKEv1:
  Tunnel ID    : 3.1
  UDP Src Port : 500                    UDP Dst Port : 500
  IKE Neg Mode : Main                   Auth Mode    : preSharedKeys
  Encryption   : 3DES                   Hashing      : SHA1
  Rekey Int (T): 86400 Seconds          Rekey Left(T): 86313 Seconds
  D/H Group    : 2
  Filter Name  : 

IPsec:        
  Tunnel ID    : 3.2
  Local Addr   : 1.1.1.1/255.255.255.255/0/0
  Remote Addr  : 3.3.3.3/255.255.255.255/0/0
  Encryption   : 3DES                   Hashing      : SHA1                   
  Encapsulation: Tunnel                 
  Rekey Int (T): 3600 Seconds           Rekey Left(T): 3513 Seconds           
  Rekey Int (D): 4608000 K-Bytes        Rekey Left(D): 4608000 K-Bytes        
  Idle Time Out: 30 Minutes             Idle TO Left : 28 Minutes             
  Bytes Tx     : 400                    Bytes Rx     : 400                    
  Pkts Tx      : 4                      Pkts Rx      : 4                      
  
RTD-ASA#
Perfect! Logging everything on the console probably isn't the best idea, though. On a small-scale like this it's fine, but in a busy production environment, it would be easy to miss important information. In a lab exam, it's fine, just so long as you remember to remove the logging commands that were added. So, do we have a neater method?

Let's remove the route and find out
DMVPN-Hub2(config)#router ospf 1
DMVPN-Hub2(config-router)#no network 3.3.3.3 0.0.0.0 area 1
DMVPN-Hub2(config-router)#

RTD-ASA# sh route | b Gate
Gateway of last resort is not set

S        1.1.1.1 255.255.255.255 [1/0] via 10.1.1.1, Inside
C        10.1.1.0 255.255.255.0 is directly connected, Inside
L        10.1.1.254 255.255.255.255 is directly connected, Inside
C        10.1.2.0 255.255.255.0 is directly connected, Outside
L        10.1.2.254 255.255.255.255 is directly connected, Outside
O        10.1.3.0 255.255.255.0 [110/11] via 10.1.2.2, 1d14h, Outside
O        10.1.5.0 255.255.255.0 [110/12] via 10.1.2.2, 1d14h, Outside

RTD-ASA# 
Now, using the packet-tracer command, we can see the error:
RTD-ASA# packet-tracer input Inside icmp 1.1.1.1 8 0 3.3.3.3         

Phase: 1
Type: ACCESS-LIST
Subtype: 
Result: ALLOW
Config:
Implicit Rule
Additional Information:
MAC Access list

Result:
input-interface: Inside
input-status: up
input-line-status: up
Action: drop
Drop-reason: (no-route) No route to host

RTD-ASA# 
We can also append the "detailed" keyword to get more information, but in this case, we just get a more succint output:
RTD-ASA# packet-tracer input Inside icmp 1.1.1.1 8 0 3.3.3.3 detailed

Result:
input-interface: Inside
input-status: up
input-line-status: up
Action: drop
Drop-reason: (no-route) No route to host

RTD-ASA# 
So, we can use this command, instead of enabling logging. For the moment, though, we'll just add the route back, and get the connectivity back:
DMVPN-Hub2(config)#router ospf 1
DMVPN-Hub2(config-router)#network 3.3.3.3 0.0.0.0 area 1
DMVPN-Hub2(config-router)#

Local-1#ping 3.3.3.3 so lo0
Type escape sequence to abort.
Sending 5, 100-byte ICMP Echos to 3.3.3.3, timeout is 2 seconds:
Packet sent with a source address of 1.1.1.1 
.!!!!
Success rate is 80 percent (4/5), round-trip min/avg/max = 9/9/10 ms
Local-1#
Throughout this post, when we have looked at the output of "show crypto isakmp sa" we have been told that "There are no IKEv2 SAs". In the next post we will set up IKEv2.

CCIE Security Lab: Multicontext Active/Standby ASA

It's time for a topology change!

CCIE Security lab - VPNs topology


The other topology was not suited to running the VPNs over it, so I created a new one. We don't have any of the fun stuff like IPS, ACS, ISE, Wifi, or even the ability to run a GUI. It is just going to be CLI only.

I have just done the basic IP addressing so far. The ASAs all get an IP address of .254 for the respective subnet. The routers get an IP, which matches their loopback interface, so Local-1 gets the address 10.1.1.1 on its Gi0/0 interface, and DMVPN-Hub1 has the address 10.1.4.4, and so on.

I have not quite worked out the routing protocols yet; I'll mull it over this weekend. For the moment we will get the ASAs up, mainly the Multicontext Failover ASA and the Transparent ASA.

Transparent ASA

I have already covered transparent ASA's here, so here is just the config
ciscoasa(config)# firewall transparent 
ciscoasa(config)# hostname Transparent
Transparent(config)# int gi0/0
Transparent(config-if)# nameif Inside
INFO: Security level for "Inside" set to 100 by default.
Transparent(config-if)# bridge-group 1
Transparent(config-if)# no shut
Transparent(config-if)# int gi0/1
Transparent(config-if)# nameif Outside
INFO: Security level for "Outside" set to 0 by default.
Transparent(config-if)# bridge-group 1
Transparent(config-if)# no shut
Transparent(config-if)# exit
Transparent(config)# 
Transparent(config)# int bvi 1
Transparent(config-if)# ip add 10.1.7.254 255.255.255.0
Transparent(config-if)# 
Transparent(config-if)# end
Transparent# sh int ip bri
Interface                  IP-Address      OK? Method Status                Protocol
GigabitEthernet0/0         10.1.7.254      YES unset  up                    up  
GigabitEthernet0/1         10.1.7.254      YES unset  up                    up  
GigabitEthernet0/2         unassigned      YES unset  administratively down up  
GigabitEthernet0/3         unassigned      YES unset  administratively down up  
GigabitEthernet0/4         unassigned      YES unset  administratively down up  
GigabitEthernet0/5         unassigned      YES unset  administratively down up  
GigabitEthernet0/6         unassigned      YES unset  administratively down up  
Management0/0              unassigned      YES unset  administratively down up  
BVI1                       10.1.7.254      YES manual up                    up  
Transparent# 
Transparent# ping 10.1.7.1        
Type escape sequence to abort.
Sending 5, 100-byte ICMP Echos to 10.1.7.1, timeout is 2 seconds:
!!!!!
Success rate is 100 percent (5/5), round-trip min/avg/max = 1/2/10 ms
Transparent# ping outside 10.1.7.2
Type escape sequence to abort.
Sending 5, 100-byte ICMP Echos to 10.1.7.2, timeout is 2 seconds:
!!!!!
Success rate is 100 percent (5/5), round-trip min/avg/max = 1/2/10 ms
Transparent# 
Moving swiftly on...

Multicontext Active/Standby ASAs

I haven't looked at Active/Standby ASAs in Multicontext mode before, but let's start with the failover stuff, then work out the rest.
ciscoasa(config)# hostname FO-ASA
FO-ASA(config)# failover
FO-ASA(config)# failover lan unit primary
FO-ASA(config)# failover lan interface fover eth3
INFO: Non-failover interface config is cleared on Ethernet3 and its sub-interfaces
FO-ASA(config)# failover key *****
FO-ASA(config)# failover replication http
FO-ASA(config)# failover link fover eth3
FO-ASA(config)# failover interface ip fover 10.1.250.254 255.255.255.0 standbFO-ASA(config)# 
Now we just copy this, with a minor edit to the second ASA:
FO-ASA# sh run | i fail
failover
failover lan unit secondary
failover lan interface fover eth3
failover key *****
failover replication http
failover link fover eth3
failover interface ip fover 10.1.250.254 255.255.255.0 standby 10.1.250.252
FO-ASA# 
Setting up failover first makes life a little easier.
FO-ASA(config)# mode noconfirm multiple
WARNING: This command will change the behavior of the device
WARNING: This command will initiate a Reboot
!
The old running configuration file will be written to flash

Converting the configuration - this may take several minutes for a large configuration

The admin context configuration will be written to flash

The new running configuration file was written to flash
Security context mode: multiple 


***
*** --- SHUTDOWN NOW ---
***
*** Message to all terminals:
***
***   change mode
Process shutdown finished
The primary ASA will then restart, and the secondary will take over:
FO-ASA#       
        Switching to Active

FO-ASA# 
This does not mean that the secondary will have it's mode changed, though:
FO-ASA> Mate's operating mode (Single) is not compatible with my mode (Multi). Failover will be disabled.

FO-ASA> 

FO-ASA# Mate's operating mode (Multi) is not compatible with my mode (Single). Failover will be disabled.
Let's switch the secondary to multiple-context mode and then failover should work again:
FO-ASA(config)# mode noconfirm multiple
WARNING: This command will change the behavior of the device
WARNING: This command will initiate a Reboot
!
We still need to reenable failover, though (notice that in the second line failover says "off"):
FO-ASA# sh fail
Failover Off 
Failover unit Primary
Failover LAN Interface: fover Ethernet3 (up)
Unit Poll frequency 1 seconds, holdtime 15 seconds
Interface Poll frequency 5 seconds, holdtime 25 seconds
Interface Policy 1
Monitored Interfaces 0 of 60 maximum
failover replication http
FO-ASA# conf t
FO-ASA(config)# failover 
FO-ASA(config)# end
FO-ASA# sh failover
Failover On 
Failover unit Primary
Failover LAN Interface: fover Ethernet3 (up)
Unit Poll frequency 1 seconds, holdtime 15 seconds
Interface Poll frequency 5 seconds, holdtime 25 seconds
Interface Policy 1
Monitored Interfaces 0 of 60 maximum
failover replication http
Version: Ours 9.1(5)16, Mate 9.1(5)16
Last Failover at: 19:17:10 UTC Jun 24 2016
        This host: Primary - Negotiation 
                Active time: 0 (sec)
        Other host: Secondary - Not Detected 
                Active time: 0 (sec)
       
FO-ASA#  
We need to do this on the mate as well:
FO-ASA# conf t
FO-ASA(config)# failover
FO-ASA(config)# exit
FO-ASA# .

        Detected an Active mate

FO-ASA# Beginning configuration replication from mate.

FO-ASA# 
FO-ASA# ERROR: Password recovery was not changed, unable to access 
the configuration register.
Removing context 'admin' (1)... Done
INFO: Admin context is required to get the interfaces
Creating context 'admin'... Done. (2)

WARNING: Skip fetching the URL disk0:/admin.cfg
INFO: Admin context will take some time to come up .... please wait.
Crashinfo is NOT enabled on Full Distribution Environment

FO-ASA# End configuration replication from mate.

FO-ASA# 
All in all, it is probably quicker to set up the mode then set up the failover. Nevertheless, we got there in the end. Let's crack on and build the multi-context part. We will need to use sub-interfaces and trunk the switch.
FO-ASA(config)# failover group 1
ERROR: Failover group can only be created or removed when failover is disabled
FO-ASA(config)# no failover
FO-ASA(config)# failover group 1
FO-ASA(config-fover-group)# primary
FO-ASA(config-fover-group)# preempt
FO-ASA(config-fover-group)# exit
FO-ASA(config)# failover group 2
FO-ASA(config-fover-group)# primary
FO-ASA(config-fover-group)# preempt
FO-ASA(config-fover-group)# exit
FO-ASA(config)# failover
FO-ASA(config)# context C1
FO-ASA(config-ctx)# join-failover-group 1
FO-ASA(config-ctx)# exit
FO-ASA(config)# context C2
FO-ASA(config-ctx)# 
FO-ASA(config-ctx)# join-failover-group 2
FO-ASA(config-ctx)# exit
FO-ASA(config)# context C1
FO-ASA(config-ctx)# config-url disk0:/C1.cfg
FO-ASA(config-ctx)# allocate-interface e1
FO-ASA(config-ctx)# allocate-interface e0.1
FO-ASA(config-ctx)# exit
FO-ASA(config)# context C2
FO-ASA(config-ctx)# config-url disk0:/C2.cfg
FO-ASA(config-ctx)# allocate-interface e2
FO-ASA(config-ctx)# allocate-interface e0.2
FO-ASA(config-ctx)# exit
FO-ASA(config)#
We will have to make a slight change to the main interface to account for the sub-interfaces, by way of setting the VLAN information:.
FO-ASA(config)# int e0.1
FO-ASA(config-subif)# vlan 16
FO-ASA(config-subif)# exit
FO-ASA(config)# 
FO-ASA(config)# int e0.2
FO-ASA(config-subif)# vlan 26
FO-ASA(config-subif)# exit
FO-ASA(config)#
FO-ASA(config)# changeto con C1
FO-ASA/C1(config)# interface ethernet 1 
FO-ASA/C1(config-if)# nameif Inside
FO-ASA/C1(config-if)# ip add 10.1.4.254 255.255.255.0 stand 10.1.4.252
FO-ASA/C1(config-if)# no shut
FO-ASA/C1(config-if)# int e0.1
FO-ASA/C1(config-if)# nameif outside
FO-ASA/C1(config-if)# ip add 10.1.16.254 255.255.255.0 stand 10.1.16.252
FO-ASA/C1(config-if)# no shut
FO-ASA/C1(config-if)# exit
FO-ASA/C1(config)# changeto con C2
FO-ASA/C2(config)# int e2
FO-ASA/C2(config-if)# nameif inside
FO-ASA/C2(config-if)# ip add 10.1.5.254 255.255.255.0 stand 10.1.5.252
FO-ASA/C2(config-if)# no shut
FO-ASA/C2(config-if)# int e0.2
FO-ASA/C2(config-if)# nameif outside
FO-ASA/C2(config-if)# ip add 10.1.26.254 255.255.255.0 stand 10.1.26.252
FO-ASA/C2(config-if)# no shut
FO-ASA/C2(config-if)# end
FO-ASA/C2# 
Let's make sure the interfaces are up:
FO-ASA# conf t
FO-ASA(config)# int e0
FO-ASA(config-if)# no shut
FO-ASA(config-if)# int e1
FO-ASA(config-if)# no shut
FO-ASA(config-if)# int e2
FO-ASA(config-if)# no shut
FO-ASA(config-if)# end
FO-ASA# wr mem
Building configuration...
Cryptochecksum: 6d25f26b f839667a 12e15d7c 54dff20a 

2017 bytes copied in 0.230 secs
[OK]
FO-ASA# 
Now a little testing:
FO-ASA/C1# ping 10.1.4.4
Type escape sequence to abort.
Sending 5, 100-byte ICMP Echos to 10.1.4.4, timeout is 2 seconds:
!!!!!
Success rate is 100 percent (5/5), round-trip min/avg/max = 1/2/10 ms
FO-ASA/C1# 

FO-ASA/C2# ping 10.1.5.3
Type escape sequence to abort.
Sending 5, 100-byte ICMP Echos to 10.1.5.3, timeout is 2 seconds:
!!!!!
Success rate is 100 percent (5/5), round-trip min/avg/max = 1/2/10 ms
FO-ASA/C2# 
Next, we need to set up ISP-1, and add the VLANs to the intermediate switch, and then test from the ASA:
ISP-1(config)#int gi0/0
ISP-1(config-if)#no ip add
ISP-1(config-if)#exit
ISP-1(config)#int gi0/0.1
ISP-1(config-subif)#encap dot 16
ISP-1(config-subif)#no sh
ISP-1(config-subif)#ip add 10.1.16.1 255.255.255.0
ISP-1(config)#int gi 0/0.2
ISP-1(config-subif)#no sh
ISP-1(config-subif)#enc dot 26
ISP-1(config-subif)#ip add 10.1.26.1 255.255.255.0
ISP-1(config-subif)#exit
ISP-1(config)#end
ISP-1#
ISP-1#sh ip int bri
Interface                  IP-Address      OK? Method Status                Protocol
GigabitEthernet0/0         unassigned      YES manual up                    up      
GigabitEthernet0/0.1       10.1.16.1       YES manual up                    up      
GigabitEthernet0/0.2       10.1.26.1       YES manual up                    up      
GigabitEthernet0/1         10.1.7.1        YES manual up                    up      
GigabitEthernet0/2         unassigned      YES NVRAM  administratively down down    
GigabitEthernet0/3         unassigned      YES NVRAM  administratively down down    
ISP-1#

SW1(config)#vlan 16,26
SW1(config-vlan)#exit
SW1(config)#do sh vlan bri

VLAN Name                             Status    Ports
---- -------------------------------- --------- -------------------------------
1    default                          active    Gi0/0, Gi0/1, Gi0/2, Gi0/3
16   VLAN0016                         active    
26   VLAN0026                         active    
1002 fddi-default                     act/unsup 
1003 token-ring-default               act/unsup 
1004 fddinet-default                  act/unsup 
1005 trnet-default                    act/unsup 
SW1(config)#int gi0/0
SW1(config-if)#swi trun enc dot
SW1(config-if)#swi mo tru
SW1(config-if)#no sh
SW1(config-if)#
SW1(config-if)#int gi0/1
SW1(config-if)#swi trun enc dot
SW1(config-if)#swi mo tru
SW1(config-if)#no sh
SW1(config-if)#int gi0/2
SW1(config-if)#swi trun enc dot
SW1(config-if)#swi mo tru
SW1(config-if)#no sh

FO-ASA/C1# ping outside 10.1.16.1
Type escape sequence to abort.
Sending 5, 100-byte ICMP Echos to 10.1.16.1, timeout is 2 seconds:
!!!!!
Success rate is 100 percent (5/5), round-trip min/avg/max = 1/1/1 ms
FO-ASA/C1# 

FO-ASA/C2# ping 10.1.26.1
Type escape sequence to abort.
Sending 5, 100-byte ICMP Echos to 10.1.26.1, timeout is 2 seconds:
!!!!!
Success rate is 100 percent (5/5), round-trip min/avg/max = 1/2/10 ms
FO-ASA/C2# 

ISP-1#ping 10.1.16.254
Type escape sequence to abort.
Sending 5, 100-byte ICMP Echos to 10.1.16.254, timeout is 2 seconds:
!!!!!
Success rate is 100 percent (5/5), round-trip min/avg/max = 4/6/8 ms
ISP-1#ping 10.1.26.254
Type escape sequence to abort.
Sending 5, 100-byte ICMP Echos to 10.1.26.254, timeout is 2 seconds:
!!!!!
Success rate is 100 percent (5/5), round-trip min/avg/max = 4/8/17 ms
ISP-1#
This is pretty much the very basics done. I won't be overly permissive with the ASA access-lists this time around. Instead, we will be making use of the default deny, and being very strict by allowing just the source and destination IP addresses and relevant ports.

All the IGPs (when I figure out what I will be using and where) will be using authentication, but at least I am in good stead to get started learning the different VPNs.

We will start by getting Local-1 connected to RTD-ASA, which in turn will be connected to CA-Flex, which connects to DMVPN-Hub2. This will use OSPF to propagate the routes, and join RTD-ASA and DMVPN-Hub2 by way of secured OSPF. Once this is done, we'll set up an IPSec VPN between the ASA and DMVPN-Hub1.

But that won't be until next week, because I am taking the kids and wife away for the weekend.

Have a good weekend.

CCIE Security Lab: IPS and WLC - shun lists

I am not feeling great today, the British public has just shown what a bunch of idiots they are and have voted to leave the EU. Absolutely crazy. But, despite feeling despondent, I need to finish off the IPS.

Today will be pretty quick. The goal is to get the WLC talking to the IPS. Why are we doing this, apart from "just because we can"?

The idea is that we will have traffic that may not be going through the IPS, predominantly Wifi traffic. The IPS is a clever thing and can use the signature-definition rules to create lists of IP addresses we "shun". So we get the benefits of the IPS, even when on the Wifi network.

Creating a shun list looks a bit like this:
IPS(config)# service signature-definition sig1

Editing new instance sig1.
IPS(config-sig)#   
IPS(config-sig)# signatures 64999 0
IPS(config-sig-sig)# alert-severity high 
IPS(config-sig-sig)# engine atomic-ip
IPS(config-sig-sig-ato)# event-action ?
produce-alert                         
produce-verbose-alert                 
deny-attacker-inline                  
deny-connection-inline                
deny-packet-inline                    
log-attacker-packets                  
log-pair-packets                      
log-victim-packets                    
request-block-connection              request NAC to shun this connection
request-block-host                    request NAC to shun this attacker host
request-snmp-trap                     
reset-tcp-connection                  
deny-attacker-victim-pair-inline      
deny-attacker-service-pair-inline     
IPS(config-sig-sig-ato)# event-action request-block-host
IPS(config-sig-sig-ato)# 
I won't be using this one, though, I will be editing the existing signature we set up in the previous post.
IPS(config)# service signature-definition sig0

IPS(config-sig)# signatures 60101 0
IPS(config-sig-sig)# engine atomic-ip
IPS(config-sig-sig-ato)# event-action produce-verbose-alert
IPS(config-sig-sig-ato)# event-action request-block-host
IPS(config-sig-sig-ato)# exit
IPS(config-sig-sig)# show settings 
   sig-id: 60101
   subsig-id: 0
   -----------------------------------------------
      alert-severity: high default: medium
      sig-fidelity-rating: 75 
      promisc-delta: 0 
      sig-description
      -----------------------------------------------
         sig-name: My Sig 
         sig-string-info: My Sig Info 
         sig-comment: Sig Comment 
         alert-traits: 0 
         release: custom 
         sig-creation-date: 20000101 
         sig-type: Other 
      -----------------------------------------------
      engine
      -----------------------------------------------
         atomic-ip
         -----------------------------------------------
            event-action: request-block-host default: produce-alert
            fragment-status: any 
            specify-l4-protocol
            -----------------------------------------------
               yes

IPS(config-sig-sig)# exit
IPS(config-sig)# exit
Apply Changes?[yes]: yes 
IPS(config)#
The rest of the settings are the same as the previous post, so I have truncated the output.

The next step is to set up a user for the WLC on the IPS. I am cribbing from this Cisco doc by the way!
IPS(config)# service network-access 
IPS(config-net)# user-profile vWLC
IPS(config-net-use)# username vWLC
IPS(config-net-use)# password
Enter password[]: *****
Re-enter password: *****
IPS(config-net-use)# enable-password
Enter enable-password[]: *****
Re-enter enable-password: *****
IPS(config-net-use)# show settings
   profile-name: vWLC
   -----------------------------------------------
      enable-password: 
      password: 
      username: vWLC default: 
   -----------------------------------------------
IPS(config-net-use)# exit
IPS(config-net)# exit
Apply Changes?[yes]: yes 
IPS(config)# 
Moving on to the WLC, we head to Security > Advanced > CIDS.

WLC - CIDS

Click on "New" in the top right-hand corner and enter the details:

integrate IPS with WLC

If you are wondering how to get the SHA fingerprint, that comes from the IPS:
IPS# sh tls fingerprint

MD5: 34:F0:0A:8B:F5:4F:E0:89:2A:99:0C:8F:A1:22:64:CF
SHA1: 8F:4E:BF:26:8C:62:8E:5E:C3:80:F4:FD:D4:15:FC:1C:1A:46:80:DF
IPS# 
This then goes on our list:

CIDS Sensor list

We should be able to pull data from the IPS now - if it worked:
(Cisco Controller) >debug wps cids enable 
(Cisco Controller) >*osapiBsnTimer: Jun 24 13:06:27.592: cidsSdeeCallback is called
*cids-cl Task: Jun 24 13:06:27.592: cidsProcessSdeeQuery: ip=10.1.4.155,port=443 state=1 interval=60
*cids-cl Task: Jun 24 13:06:27.592: cidsQuerySend: https://10.1.4.155:443/cgi-bin/transaction-server?command=getShunEntryList
*cids-cl Task: Jun 24 13:06:27.592: curlHandle is 0xe44db58
*cids-cl Task: Jun 24 13:06:27.592: Perform on curlHandle 0xe44db58 ... 
*cids-cl Task: Jun 24 13:06:27.624: Response code is 7: 
*cids-cl Task: Jun 24 13:06:27.624: Curl Error! Response 7:couldn't connect to host 
This is going to cause issues with IDM, but let's try anyway:
IPS# conf t
IPS(config)# service web-server 
IPS(config-web)# enable-tls true
IPS(config-web)# port 443
IPS(config-web)# exit
Apply Changes?[yes]: yes
IPS(config)# exit
IPS#


(Cisco Controller) >debug wps cids enable 
(Cisco Controller) >*osapiBsnTimer: Jun 24 13:13:32.405: cidsSdeeCallback is called
*cids-cl Task: Jun 24 13:13:32.410: cidsProcessSdeeQuery: ip=10.1.4.155,port=443 state=1 interval=60
*cids-cl Task: Jun 24 13:13:32.410: cidsQuerySend: https://10.1.4.155:443/cgi-bin/transaction-server?command=getShunEntryList
*cids-cl Task: Jun 24 13:13:32.410: curlHandle is 0xe44db58
*cids-cl Task: Jun 24 13:13:32.410: Perform on curlHandle 0xe44db58 ... 
*cids-cl Task: Jun 24 13:13:32.538: ssl_sensor_verify_callback: verifying cert from sensor
*cids-cl Task: Jun 24 13:13:32.538: Cert fingerprint verified
*cids-cl Task: Jun 24 13:13:32.831: Response code is 0: 
*cids-cl Task: Jun 24 13:13:32.831: Add 123.123.123.123 from local sensor 10.1.4.155 to shun-list
*cids-cl Task: Jun 24 13:13:32.831: xmlDoc buffer freed
*cids-cl Task: Jun 24 13:13:32.831: Parser cleaned
*cids-cl Task: Jun 24 13:13:32.831: 0 cids-update groupcast messages sent
Looks better. We can even see a manually created entry I made earlier on the IPS:

IPS host blocks


CIDS shun list

Of course, this is only as good as the stability of the IPS, so it quickly craps out:

IPS craps out

The point has been proven, though.

The IPS is kind of pissing me off. It keeps needing to be reset, which is just wasting time. But I think we can leave it there.

It's time to move on and look at VPNs.

CCIE Security Lab: IPS - CLI to GUI and back again

I started on the IPS a little while ago, in this post, and then in this post. Then went and rebuilt the lab using Arista switches, and now the stability is much improved. In doing so I moved from the IPS and into ISE, but there is much left to do with the IPS.

Options with the IPS seems to be limited, for me at least. I can't get IDM to work over HTTPS, but HTTP works:
IPS(config)# service web
IPS(config-web)# enable-tls false
IPS(config-web)# port 80 
IPS(config-web)# exit
Apply Changes?[yes]: yes 
IPS(config)# 
Temporarily.

Java sucks ass.

Fucking Java.

So, let's do this from the CLI instead:

Rachel Riley says use the CLI

Gives me another excuse to post pictures of Rachel Riley.

So, what do we need to achieve?

I want an interface pair, and I'll take Gi0/1 and Gi0/2 for these, and a VLAN pair, using Gi0/3, then we'll set up some custom signatures.

Let's go!

IPS interface pairs

We start in the "service interface" section:
IPS(config)# service interface 
IPS(config-int)# ?
bypass-mode                 
cdp-mode                    
default                     
exit                        
inline-interfaces           
interface-notifications     
no                          
physical-interfaces         
show                        
IPS(config-int)# 
I have removed the descriptions because they were long...
IPS(config-int)# inline-interfaces Inline-VS 
IPS(config-int-inl)# interface1 ?
GigabitEthernet0/0     GigabitEthernet0/0 physical interface.
GigabitEthernet0/1     GigabitEthernet0/1 physical interface.
GigabitEthernet0/2     GigabitEthernet0/2 physical interface.
GigabitEthernet0/3     GigabitEthernet0/3 physical interface.
Management0/0          Management0/0 physical interface.
IPS(config-int-inl)# interface1 GigabitEthernet0/1
IPS(config-int-inl)# interface2 GigabitEthernet0/2
IPS(config-int-inl)# exit
IPS(config-int)# exit
Apply Changes?[yes]: yes 
IPS(config)# 
That's the first part of the interface pair, let's do the VLAN pair:
IPS(config)# service interface 
IPS(config-int)# physical-interfaces GigabitEthernet0/3  
IPS(config-int-phy)# subinterface-type inline-vlan-pair 
IPS(config-int-phy-inl)# subinterface 1 
IPS(config-int-phy-inl-sub)# vlan1 4
IPS(config-int-phy-inl-sub)# vlan2 90
IPS(config-int-phy-inl-sub)# exit
IPS(config-int-phy-inl)# exit
IPS(config-int-phy)# exit
IPS(config-int)# exit
Apply Changes?[yes]: yes 
IPS(config)# exit
IPS# 
I can't see where to name this, though, so hopefully the config should show us. Well, this is the relevant part of the config, but there is no name, maybe we don't need it:
service interface
physical-interfaces GigabitEthernet0/3 
subinterface-type inline-vlan-pair
subinterface 1 
vlan1 4
vlan2 90
exit
exit
exit
inline-interfaces Inline-VS 
interface1 GigabitEthernet0/1
interface2 GigabitEthernet0/2
exit
exit
The next step is to create the virtual sensors and assign the interfaces to them (or maybe it's the other way around).

It is important to make sure that all the interfaces are up:
IPS(config)# service interface 
IPS(config-int)# physical-interfaces GigabitEthernet0/3
IPS(config-int-phy)# admin-state enabled
IPS(config-int)# exit
Apply Changes?[yes]: yes 
IPS(config)# exit
IPS# show interfaces brief
CC   Interface            Sensing State   Link   Inline Mode                                Pair Status   
     GigabitEthernet0/0   Disabled        Down   Unpaired                                   N/A           
     GigabitEthernet0/1   Enabled         Up     Paired with interface GigabitEthernet0/2   Up            
     GigabitEthernet0/2   Enabled         Up     Paired with interface GigabitEthernet0/1   Up            
     GigabitEthernet0/3   Enabled         Up     Inline-vlan-pair                           N/A           
*    Management0/0        Disabled        Up                                                              
IPS# 
Back to the virtual sensor:
IPS(config)# service analysis-engine
IPS(config-ana)# virtual-sensor VS-VS 
IPS(config-ana-vir)# signature-definition sig0

IPS(config-ana-vir-ano)# anomaly-detection-name ad0
IPS(config-ana-vir-ano)# exi
IPS(config-ana-vir)# event-action-rules rules0

IPS(config-ana-vir)# 
IPS(config-ana-vir)# logical-interface Inline-VS 
IPS(config-ana-vir)# 
IPS(config-ana-vir)# show setting
   name: VS-VS
   -----------------------------------------------
      description:  
      signature-definition: sig0 default: sig0
      event-action-rules: rules0 default: rules0
      anomaly-detection
      -----------------------------------------------
         anomaly-detection-name: ad0 default: ad0
         operational-mode: detect 
      -----------------------------------------------
      physical-interface (min: 0, max: 999999999, current: 0)
      -----------------------------------------------
      -----------------------------------------------
      logical-interface (min: 0, max: 999999999, current: 1)
      -----------------------------------------------
         name: Inline-VS
         subinterface-number: 0 
         -----------------------------------------------
      -----------------------------------------------
      inline-TCP-session-tracking-mode: virtual-sensor 
      inline-TCP-evasion-protection-mode: strict 
   -----------------------------------------------
IPS(config-ana-vir)# exit
IPS(config-ana)# exit
Apply Changes?[yes]: yes 
IPS(config)# 
Let's create the other one with the VLAN pair:
IPS(config)# service analysis-engine 
IPS(config-ana)# virtual-sensor VS-VP
IPS(config-ana-vir)# signature-definition sig0

IPS(config-ana-vir)# event-action-rules rules0
                                             
IPS(config-ana-vir)# 
IPS(config-ana-vir)# physical-interface GigabitEthernet0/3 subinterface-number 1
IPS(config-ana-vir)# exi 
IPS(config-ana-vir)# anomaly-detection 
IPS(config-ana-vir-ano)# anomaly-detection-name ad0
IPS(config-ana)# exit
IPS(config-ana-vir)# show settings 
   name: VS-VP
   -----------------------------------------------
      description:  
      signature-definition: sig0 default: sig0
      event-action-rules: rules0 default: rules0
      anomaly-detection
      -----------------------------------------------
         anomaly-detection-name: ad0 default: ad0
         operational-mode: detect 
      -----------------------------------------------
      physical-interface (min: 0, max: 999999999, current: 1)
      -----------------------------------------------
         name: GigabitEthernet0/3
         subinterface-number: 1 default: 0
         -----------------------------------------------
      -----------------------------------------------
      logical-interface (min: 0, max: 999999999, current: 0)
      -----------------------------------------------
      -----------------------------------------------
      inline-TCP-session-tracking-mode: virtual-sensor 
      inline-TCP-evasion-protection-mode: strict 
   -----------------------------------------------
IPS(config-ana-vir)# 
Apply Changes?[yes]: yes 
IPS(config)# 
Now let's create a custom signature, which is intended to produce a high-severity alert if it sees a telnet connection coming from the 192.168.90.0/24 subnet:
IPS(config)# service signature-definition sig0

IPS(config-sig)# signatures ?
     
IPS(config-sig)# signatures 60101 ?
     
IPS(config-sig)# signatures 60101 0           
IPS(config-sig-sig)# alert-severity high                        
IPS(config-sig-sig)# engine atomic-ip              
IPS(config-sig-sig-ato)# event-action produce-verbose-alert  
IPS(config-sig-sig-ato)# specify-l4-protocol yes                
IPS(config-sig-sig-ato-yes)# l4-protocol tcp                 
IPS(config-sig-sig-ato-yes-tcp)# no tcp-flags
IPS(config-sig-sig-ato-yes-tcp)# no tcp-mask
IPS(config-sig-sig-ato-yes-tcp)# specify-dst-port yes   
IPS(config-sig-sig-ato-yes-tcp-yes)# dst-port 23 
IPS(config-sig-sig-ato-yes-tcp-yes)# exi
IPS(config-sig-sig-ato-yes-tcp)# specify-src-port no
IPS(config-sig-sig-ato-yes-tcp)# exit
IPS(config-sig-sig-ato-yes)# exit           
IPS(config-sig-sig-ato)# specify-ip-addr-options yes     
IPS(config-sig-sig-ato-yes)# ip-addr-options ip-addr   
IPS(config-sig-sig-ato-yes-ip)# specify-src-ip-addr yes   
IPS(config-sig-sig-ato-yes-ip-yes)# src-ip-addr 192.168.90.1-192.168.90.254
IPS(config-sig-sig-ato-yes-ip-yes)# 
IPS(config-sig-sig-ato-yes-ip-yes)# exit
IPS(config-sig-sig-ato-yes-ip)# exit
IPS(config-sig-sig-ato-yes)# exit
IPS(config-sig-sig-ato)# exit
IPS(config-sig-sig)# exit
IPS(config-sig)# exit
Apply Changes?[yes]: yes 
IPS(config)#   
This shows in the config as follows:
service signature-definition sig0
signatures 60101 0 
alert-severity high
engine atomic-ip
event-action produce-verbose-alert
specify-l4-protocol yes
l4-protocol tcp
no tcp-flags
no tcp-mask
specify-dst-port yes
dst-port 23
exit
specify-src-port no
exit
exit
specify-ip-addr-options yes
ip-addr-options ip-addr
specify-src-ip-addr yes
src-ip-addr 192.168.90.1-192.168.90.254
This is all well and good, but we need to turn it on for it to be effective:
IPS(config)# service signature-definition sig0
IPS(config-sig)# signatures 60101 0
IPS(config-sig-sig)# status
IPS(config-sig-sig-sta)# enabled true
IPS(config-sig-sig-sta)# exit
IPS(config-sig-sig)# exit
IPS(config-sig)# exit
Apply Changes?[yes]: yes 
IPS(config)#  
Looks good, but we need the IPS to get the traffic. At the moment there is no reason why it should get the traffic, and this is partly a bad design choice on my part, and having moved my switches over to Arista, I lose the remote-span functionality, but we are not totally out of luck:
SW2(config)#monitor session trunky source e10
SW2(config)#monitor session trunky destination e18
SW2(config)#exi
SW2#sh mon sess

Session trunky
------------------------

Source Ports:

  Both:        Et10

Destination Ports:

    Et18 :  active


SW2#sh int e18 sta
Port       Name              Status       Vlan        Duplex  Speed Type        
Et18       IPS               connected    monitoring    full unconf EbraTestPhyP

SW2#
With this in place, we do get the telnet traffic (from MGMT-PC to 10.1.4.101) mirrored towards the IPS:

Wireshark session mirroring

Not getting anything on the IPS though:
IPS# sh events alert high


The lack of output isn't to say that it's not working. I look after a handful of IPS modules for work, and they are slow, not as slow as this one is, but still very slow. Thankfully, although IDM access is a little hit and miss, it does show that this works:

IPS alert severity IDM

The console does seem to take an extraordinarily long time, though, so it looks like its waiting for a response, but this does work, and, at nearly 10 pm, that's the goal. Thankfully I managed to pull the results out of IDM before Java shit the bed (for the ten billionth time).

I will be saving WLC integration for another day.

CCIE Security Lab: ISE WebAuth

After setting up ACS command authentication yesterday, and cleaning it up today so that it's using a new Access Service, it's time to return to ISE and look at Web Authentication. I might try and throw in some profiling as well, depending how well it goes.

We start by creating an identity group, which I have called Web-Guest:

Creating ISE identity group

Next, we create a user, which I will also call "Web-Guest", and give it the password of "Cisco123".

Create ISE local user

They get assigned to the group Web-Guest which we just created.

As we don't want our guests having full network access, we'll create a simple dACL, allowing ICMP to the AP-DNS router:

Create ISE dACL

We then create an Authorization policy, also called Web-Guest, that calls the dACL, and places the user into VLAN 99:

Create ISE AuthZ policy

We also need Web Auth, so scroll down and make sure that is ticked:
ISE local web auth

Before we can set up the rule, we need to set up a compound condition, for the service-type (Framed, which equals 2) and NAS-port (15):

ISE compound conditions

NAS-Port 15 equates to Ethernet (http://www.iana.org/assignments/radius-types/radius-types.xhtml#radius-types-13), and Service-Type Framed means that we will carry the authentication within the packets (https://en.wikipedia.org/wiki/RADIUS).

Then we add the Authorization profile:

ISE AuthZ profile

And an Authentication profile:

ISE AuthC profile

Now, once we have saved this, we need to configure the switch. Some commands are there from previous, others are new:
aaa new-model
!
aaa group server radius ISE
 server name ISE20
 deadtime 15
!
aaa authentication login default group ISE
aaa authentication login CON none
aaa authentication dot1x default group radius
aaa authorization network default group radius 
aaa authorization auth-proxy default group ISE local 
aaa accounting update periodic 5
aaa accounting auth-proxy default start-stop group ISE
aaa accounting dot1x default start-stop group radius
!
aaa server radius dynamic-author
 client 192.168.90.205 server-key Radius123
!
aaa session-id common
!
ip device tracking
!
ip admission name Web-Guest proxy http inactivity-time 5
!
dot1x system-auth-control
!
fallback profile Web-Guest-Fallback
 ip access-group Web-Auth-ACL in
 ip admission Web-Guest
!
interface GigabitEthernet3/0/19
 switchport access vlan 99
 switchport mode access
 switchport block unicast
 authentication event fail action next-method
 authentication host-mode multi-auth
 authentication open
 authentication order webauth
 authentication priority webauth
 authentication port-control auto
 authentication fallback Web-Guest-Fallback
 mab
 dot1x pae authenticator
 dot1x timeout tx-period 5
 spanning-tree portfast
!
interface Vlan99
 ip address 10.1.99.50 255.255.255.0
 ip helper-address 10.1.4.100
!
ip access-list extended Web-Auth-ACL
 permit udp any any eq bootps
 permit udp any any eq domain
!
ip radius source-interface Vlan4 
radius-server attribute 6 on-for-login-auth
radius-server attribute 6 support-multiple
radius-server attribute 8 include-in-access-req
radius-server attribute 25 access-request include
radius-server dead-criteria tries 3
radius-server deadtime 30
radius-server vsa send accounting
radius-server vsa send authentication
! 
radius server ISE20
 address ipv4 192.168.90.205 auth-port 1812 acct-port 1813
 key Radius123
!
line con 0
 login authentication CON
line vty 0 4
 login authentication CON
 width 255
line vty 5 15
!
mac address-table notification change interval 0
mac address-table notification change
The results are:
3750X#sh auth sess int gi 3/0/19
  Interface: GigabitEthernet3/0/19
  MAC Address: 685b.35cc.3a6a
  IP Address: 10.1.99.12
  Status: Authz Success
  Domain: DATA
  Security Policy: Should Secure
  Security Status: Unsecure
  Oper host mode: multi-auth
  Oper control dir: both
  Authorized By: Authentication Server
  Vlan Policy: N/A
  Session timeout: N/A
  Idle timeout: N/A
  Common Session ID: 0A01013200000013008953E7
  Acct Session ID: 0x00000037
  Handle: 0xA2000014

Runnable methods list:
  Method State
  webauth Authc Success

3750X#
We can see the webauth success. As well as getting the success message on the client.

ISE Web-Auth success


This did take a few attempts to get right. I found this URL to be really useful, and it stopped me getting locked out of the switch:

It is important to note that the current implementation of WebAuth requires the use of the default login authentication group as RADIUS. As soon as it is configured, the default login group applies to all login attempts for the switch, including virtual teletype terminal (VTY) and console access. Everyone attempting to use Telnet to access the switch or to access the console is required to authenticate through RADIUS. To prevent the default AAA login configuration from applying to the console and VTY sessions, define a nondefault login group and apply this to the VTYs and the console.

We are not getting the dACL though. We are not getting a username either. Let's change the authentication order and see what we get:
3750X(config-if)#authen order dot1x webauth
3750X(config-if)#auth pri dot web
3750X(config-if)#
Nope, still no username, so the ACL is not applied. But why are we not getting the username? Let's turn to the logs and try and find out.

ISE troubleshooting

Here is a clue, we are not hitting the right policy. Instead of getting to the Web-Auth authentication rule, we are hitting the Dot1x rule:

ISE policy order

Because of that being matched first, we go to the Basic_Authentication_Access policy:

ISE policy order default

So that is why!

Could it be as simple as just moving our authentication policy up?

ISE policy order web-auth

Let's try it now:

ISE Web-auth success logs

Better. We have the Web-Auth AuthC profile but are still getting the Basic_Authentication. I want to get the Web-Auth AuthZ rule instead.

Let's dissect the AuthC profile and see what we are not matching up with.

We match on the Web-Guest User Identity Group, but we also need to match in the Web-AuthZ-Condition:

ISE Radius Service type

These are being queried:

ISE log steps

Are we getting these back?

ISE PAP response

Looks like we are sending a service type of Outbound, and an NAS-Port type of Ethernet. So the Ethernet one is correct, so let's try changing the service type:

Fixing ISE compound condition

Still no dice, but notice that NAS-Port and NAS Port Type are not the same things, so I changed it again:


Boom!

ISE WebAuth success

We have the previous incorrect (but working) authentication at the bottom and our corrected Web-AuthZ-Condition (desired) at the top.
3750X#sh auth sess int gi 3/0/19
  Interface: GigabitEthernet3/0/19
  MAC Address: 685b.35cc.3a6a
  IP Address: 10.1.99.10
  Status: Authz Success
  Domain: DATA
  Security Policy: Should Secure
  Security Status: Unsecure
  Oper host mode: multi-auth
  Oper control dir: both
  Authorized By: Authentication Server
  Vlan Policy: N/A
  Session timeout: N/A
  Idle timeout: N/A
  Common Session ID: 0A0101320000004A1A0D46AA
  Acct Session ID: 0x0000007B
  Handle: 0x2900004B

Runnable methods list:
  Method State
  dot1x Failed over
  webauth Authc Success

3750X#
3750X#sh access-lists
Extended IP access list Auth-Default-ACL-OPEN
    10 permit ip any any (45 matches)
Extended IP access list Web-Auth-ACL
    10 permit udp any any eq bootps
    20 permit udp any any eq domain
Extended IP access list xACSACLx-IP-PERMIT_ALL_TRAFFIC-56161e32 (per-user)
    10 permit ip any any
3750X#
We still don't get the dACL though, even though the setup is looking correct:

ISE WebAuth dACL

So, I went into the AuthZ profile, clicked on the advanced attributes setting, did not change anything, but that was enough to allow me to save it again. This time, it looks like it's working:
3750X#sh auth sess int gi 3/0/19
            Interface:  GigabitEthernet3/0/19
          MAC Address:  685b.35cc.3a6a
           IP Address:  10.1.99.10
               Status:  Authz Success
               Domain:  DATA
      Security Policy:  Should Secure
      Security Status:  Unsecure
       Oper host mode:  multi-auth
     Oper control dir:  both
        Authorized By:  Authentication Server
          Vlan Policy:  N/A
              ACS ACL:  xACSACLx-IP-Web-Guest-5763fd31
      Session timeout:  N/A
         Idle timeout:  N/A
    Common Session ID:  0A0101320000004C1A3389CE
      Acct Session ID:  0x00000081
               Handle:  0x8D00004D

Runnable methods list:
       Method   State
       dot1x    Failed over
       webauth  Authc Success

3750X#
3750X#sh access-lists
Extended IP access list Auth-Default-ACL-OPEN
    10 permit ip any any (55 matches)
Extended IP access list Web-Auth-ACL
    10 permit udp any any eq bootps
    20 permit udp any any eq domain
Extended IP access list xACSACLx-IP-PERMIT_ALL_TRAFFIC-56161e32 (per-user)
    10 permit ip any any
Extended IP access list xACSACLx-IP-Web-Guest-5763fd31 (per-user)
    10 permit tcp any any eq www
    20 permit tcp any any eq 443
    30 permit tcp any any eq 8443
    40 permit udp any any eq domain
    50 permit icmp any host 10.1.4.101
    60 deny ip any any
3750X#
Finally, we have success!

We can test this from the client, and would expect to get an ICMP ping reply from 10.1.4.101, but not from 10.1.4.254 (as per the ACL above):

ISE working dACL with WebAuth

Troubleshooting ISE is actually pretty fun. It's just about knowing where to look, and the logs show exactly what is what, so issues like this can be picked up on quickly, though it is useful to triple-check and save work regularly, even if you haven't made any changes - hopefully these issues won't be in the lab and it will be a bit smoother, but we will see.

I can leave ISE and move on. I am also on track, down from triple digits away from the exam to double-digits.

Next, will be some more IPS, and we will link the WLC to this as well.