Showing posts with label CSR1000v. Show all posts

First steps with Unetlab

Unified Networking Labs

Andrea, the guy behind the great IOU-WEB, has released Unetlab (Unified Networking Lab). It's still in beta at the moment, but I thought I would have a look.

Even though I have not finished my CCIE R&S yet, I am looking towards the Service Provider CCIE, which I plan to do straight after the R&S. With the SP track (as it stands at the moment), you need to get your hands on the XRv. This will run, happily, on ESXi, and can be connected to IOU, or even into GNS3 (using VirtualBox). I had started to play around with this, but it's not exactly the easiest thing in the world. So I was very pleased when Unetlab came out, as everything can be within one environment.

So I decided to get my hands dirty and have a go.

I am using an ESXi server, with 32GB ram, but it'll run in VMWare player, workstation, Fusion, and VirtualBox as well.

Once I had downloaded it (its about 300Mb give or take), and imported it into ESXi, I followed the Unetlab install guide. It's a simple process, and you are guided through it. It's well worth doing an update as well to get the home page displayed below.

The interface is sparse (at the moment, remember this is a beta), but has everything that I need at the moment.

Unified Networking Labs

My first step was to import the IOU images. The caveat here is that you need to generate the IOU license, I won't go into details, but it's easy to google how to do this. The only gotcha I came across was that the images must have a .bin extension - so make sure that you add this first.

Following the install doc I copied the files, using FileZilla, to /opt/unetlab/addons/iol/bin, and fixed the permissions using the command "/opt/unetlab/wrappers/unl_wrapper -a fixpermissions". Then I went back into the gui and created my first lab.

From the Actions menu, I create a new lab, and call it IOL test

Adding a node in UNetLab

From the Actions menu, I then create a network:

Creating a networ in UNetLab

Then I add a Node, also from the Actions menu:

Adding a node in UNetLab

I add 2 nodes, and from the drop down select an IOL image (that I have already uploaded through FileZilla):
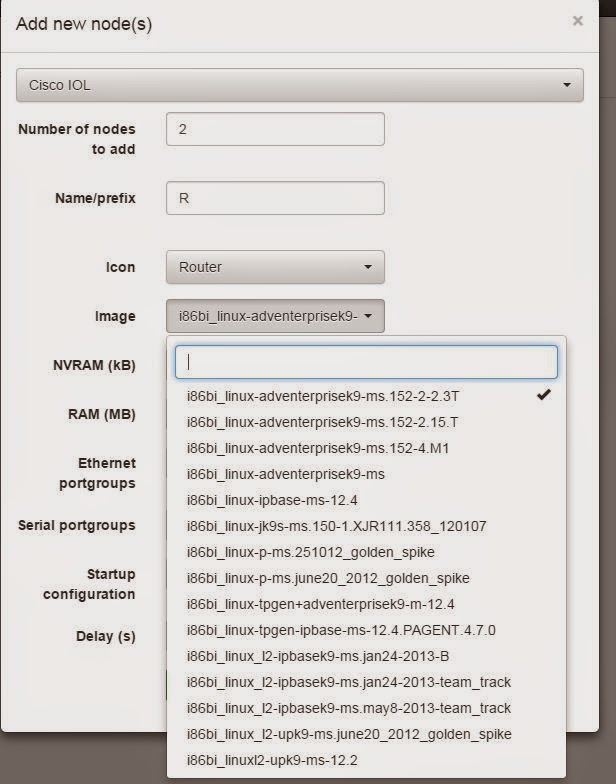
Adding a node in UNetLab

My two nodes appear on the screen:

Adding a node in UNetLab

I then right click on a node, and select "Interfaces", and point R1 to use the network I just created:

Connecting interfaces in UNetLab

My first node is added to the network

Connecting interfaces in UNetLab

I then repeat on R2, and my two nodes are connected:

Connecting interfaces in UNetLab

From the Actions menu I then select "Open this Lab", and now I can start my two routers:

Starting nodes in UNeLab
If you havn't followed the guide on the website, then you will find that the nodes do not start, so please do follow the guides to the letter.

Starting nodes in UNeLab

Give them a few minutes to fire up, assign an IP address, and all works well:

Starting nodes in UNeLab


So far memory usage is pretty good (remember that this is on a 4GB VirtualBox VM):

UNetLab system status

Let's add the XRv image.

This is slightly more complex, but again the documentation for importing XRv into Unetlab explains every step.

Now I can add multiple XRv routers, and connect them to the IOU images.

Cisco XRv in UNetLab

I am going to edit my original lab, so we need to go to the Actions menu, and select "Edit this lab":

Cisco XRv in UNetLab
I then add the XRv router:

Cisco XRv in UNetLab

Cisco XRv in UNetLab

Connect to interfaces to our network

Cisco XRv in UNetLab

Once we add the network to the new router, and also set another interface on both of the IOL routers, we get something like this:

Cisco XRv in UNetLab

Going back to the Actions menu, select Open this lab, and start the router. Here I did see an error, but after a few attempts, it did start:

UNetLab cannot call API

Memory usage has now pretty much hit the ceiling, as the XRv takes quite a chunk (3GB), but nonetheless, it serves to prove that the system works. Adding more memory is clearly required here if you want to run a decent sized topology with a range of devices.

It takes a long time for the XRv to fire up, again this is down to the memory I have available, it worked much better on my ESXi server, but it does work:

XRv CDP on ESXi

It's a little untidy at the moment, so let's do a bit of reconfiguration:

We'll add a new network, and set the XRv to use this, as well as moving the E0/1 interface of both the IOL routers to use this:

XRv on ESXi

adding networks UNetLab


adding networks UNetLab

adding networks UNetLab

Now the topology looks much cleaner!

adding networks UNetLab

 Still, let's clean it up even more, and add another network, and reconfigure it a bit:

adding networks UNetLab

Much cleaner!

CDP looks a bit funky, and pings don't work, but then I think I just need to play around with it a bit. It's only my first real go at playing with this, so there are bound to be teething troubles!

adding networks UNetLab

With this in mind, I shut everything down, and fired them all up again. Now things look much better:

RP/0/0/CPU0:XRv-1(config)#interface Gi0/0/0/0
RP/0/0/CPU0:XRv-1(config-if)#ipv4 address 10.1.1.1 255.255.255.0
RP/0/0/CPU0:XRv-1(config-if)#cdp
RP/0/0/CPU0:XRv-1(config-if)#no shut
RP/0/0/CPU0:XRv-1(config-if)#int gi 0/0/0/1
RP/0/0/CPU0:XRv-1(config-if)#ipv4 address 10.1.2.1 255.255.255.0
RP/0/0/CPU0:XRv-1(config-if)#cdp
RP/0/0/CPU0:XRv-1(config-if)#no shut
RP/0/0/CPU0:XRv-1(config-if)#exit
RP/0/0/CPU0:XRv-1(config)#cdp
RP/0/0/CPU0:XRv-1(config)#commit
RP/0/0/CPU0:XRv-1(config)#exit
RP/0/0/CPU0:XRv-1#sh ip int bri
Wed Feb 18 13:18:20.485 UTC

Interface                      IP-Address      Status         Protocol
MgmtEth0/0/CPU0/0              unassigned      Shutdown       Down
GigabitEthernet0/0/0/0         10.1.1.1        Up             Up
GigabitEthernet0/0/0/1         10.1.2.1        Up             Up
GigabitEthernet0/0/0/2         unassigned      Shutdown       Down
RP/0/0/CPU0:XRv-1#ping 10.1.1.2
Wed Feb 18 13:18:26.475 UTC
Type escape sequence to abort.
Sending 5, 100-byte ICMP Echos to 10.1.1.2, timeout is 2 seconds:
!!!!!
Success rate is 100 percent (5/5), round-trip min/avg/max = 1/61/279 ms
RP/0/0/CPU0:XRv-1#ping 10.1.2.2
Wed Feb 18 13:18:32.994 UTC
Type escape sequence to abort.
Sending 5, 100-byte ICMP Echos to 10.1.2.2, timeout is 2 seconds:
!!!!!
Success rate is 100 percent (5/5), round-trip min/avg/max = 1/9/29 ms
RP/0/0/CPU0:XRv-1#sh cdp neigh
Wed Feb 18 13:22:11.959 UTC
Capability Codes: R - Router, T - Trans Bridge, B - Source Route Bridge
                  S - Switch, H - Host, I - IGMP, r - Repeater

Device ID       Local Intrfce    Holdtme Capability Platform  Port ID
R1              Gi0/0/0/0        163     R          Linux Uni Et0/1
R2              Gi0/0/0/1        138     R          Linux Uni Et0/1
RP/0/0/CPU0:XRv-1#


R2#sh ip int bri | e unas
Interface                  IP-Address      OK? Method Status  Protocol
Ethernet0/0                192.168.1.2     YES NVRAM  up      up
Ethernet0/1                10.1.2.2        YES NVRAM  up      up

R2#ping 10.1.2.1
Type escape sequence to abort.
Sending 5, 100-byte ICMP Echos to 10.1.2.1, timeout is 2 seconds:
!!!!!
Success rate is 100 percent (5/5), round-trip min/avg/max = 4/7/14 ms
R2#ping 192.168.1.1
Type escape sequence to abort.
Sending 5, 100-byte ICMP Echos to 192.168.1.1, timeout is 2 seconds:
!!!!!
Success rate is 100 percent (5/5), round-trip min/avg/max = 1/1/2 ms
R2#

R1#sh ip int bri | e unas
Interface                  IP-Address      OK? Method Status  Protocol
Ethernet0/0                192.168.1.1     YES NVRAM  up      up
Ethernet0/1                10.1.1.2        YES NVRAM  up      up

R1#ping 192.168.1.2
Type escape sequence to abort.
Sending 5, 100-byte ICMP Echos to 192.168.1.2, timeout is 2 seconds:
!!!!!
Success rate is 100 percent (5/5), round-trip min/avg/max = 1/3/6 ms
R1#ping 10.1.1.1
Type escape sequence to abort.
Sending 5, 100-byte ICMP Echos to 10.1.1.1, timeout is 2 seconds:
!!!!!
Success rate is 100 percent (5/5), round-trip min/avg/max = 7/8/10 ms
R1#

There we have it, two IOL routers, one XRv router, all communicating happily, all contained within one environment.

Where Unetlab is superb, is that everything is within the same environment. There is no mucking about with creating multiple networks in VMWare. To be honest, some will probably find that easy, but I like to have it all contained, like Unetlab does.

Running two XRv routers did cause the default memory to top out, so I shut down the VM, and increased the memory to 20GB. Now I can run loads of routers, and the memory usage (as reported on the "Home" page remains within reasonable levels. Please note though that I am showing screenshots from a VirtualBox install, with a lower amount of memory.

So what's next?

The vendor support in Unetlab is very wide-ranging. I havn't tried all of them, but will add some dynamips images, CSR1000v and the vIOS images this week.

At the moment the supported images are:
  • Aruba ClearPass
  • Alcatel 7750 SR
  • Arista vEOS
  • CheckPoint Security Gateway VE
  • Cisco ASA (porting)
  • Cisco ASAv
  • Cisco CSR 1000V
  • Cisco IPS (porting)
  • Cisco IOS 1710 (dynamips, ethernet only)
  • Cisco IOS 3725 (dynamips, ethernet only)
  • Cisco IOS 7206VXR (dynamips, ethernet only)
  • Cisco IOL (for Cisco internal use only)
  • Cisco Titanium (for VIRL customers only)
  • Cisco vIOS (for VIRL customers only)
  • Cisco vIOS L2 (for VIRL customers only)
  • Cisco XRv
  • F5 BIG-IP LTM VE
  • Fortinet FortiGate (new)
  • HP VSR1000
  • Juniper Olive (porting)
  • Juniper vSRX
  • Palo Alto VM-100 Firewall
  • VyOS
The scope of Unetlab is immense. Clearly this will work well for when I do the SP track, as the IOL and XRv images are supported, and work nicely.

This also gives scope for the Security track as well. It will "natively" run the ASAs and the IPS, and you can connect clouds to run things like an Active Directory server, WSA (Web Security Appliance), ACS (Access Control Server), WLC (Wireless Lan Controller), ISE, and all the rest (there is a LOT of components in the Security track). I would probably need to invest in a second ESXi server in order to run all of the above, but then for the sum of £200, it's a worthwhile investment.

Unetlab is superb, already, and it is still very early days. While the interface can be a little slow to update  (such as moving objects around, but then this is less of a concern than the amazing functionality that it offers), Andrea has excelled himself again, he deserves a big thanks for all his hard work and dedication to the community. It's just a shame that he hasn't done a kickstarter, like GNS3 did as I am sure that people would support him. I'd certainly give him some money!

Cisco CSR1000v - Part 2: Connecting to GNS3

Following on from part one where we downloaded and installed the CSR1000v router in VirtualBox, it would be great if we can use it in GNS3. We can do thanks to GNS3s integration with VirtualBox.

 I have switched from my 4GB Windows laptop to my 32GB Mac now (we'll see why later on), but the steps are all the same.

Fire up GNS3 and head into the preferences. Firstly make sure that GNS3 can talk to VirtualBox, the details should already be configured for you, so click on "Test Settings", and hopefully you should get the green OK message as shown below:

CSR1000v and GNS3

If thats all good then head into the VirtualBox Guest tab. Click on "Refresh VM List", and then hopefully you'll be able to select your VirtualBox VM from the VM List above:

CSR1000v and GNS3
Give it a name and click on "Save"

CSR1000v and GNS3
Then click on OK to return to the main screen.

Click on the "End Devices" icon on the left hand side, it looks like a PC. In there will be a VirtualBox guest icon, which you can drag onto your topology, and you'll see a prompt to select a VirtualBox guest to use:

CSR1000v and GNS3

Once you select the CSR1000v VM and press OK you'll see it on the topology. Personally I like to change the icon to something more router looking. Before we fire it up we need to make a couple of minor edits. Firstly right click on the router and select "Configure", then select the router.

If "Reserve first NIC for VirtualBox NAT to host OS" is ticked, then untick it, and make sure that "Enable console support" is ticked:

CSR1000v and GNS3

Click ok, and now switch it on. The router light in the topology window should turn green. Give it a few moments and you should be ready to rock:

CSR1000v and GNS3

You can connect the CSR1000v to native GNS3 routers, and the two will communicate happily:

CSR1000v and GNS3
If you try an add another CSR1000v router though you will find that you cant. You can only have as many instances from VirtualBox running as there are instances, so in order to have two CSR1000v routers running in GNS3, we'll need to have two CSR1000v VMs in VirtualBox.

Shut down your existing router for the moment, and back over in VirtualBox, select the CSR1000v VM and right click on it, and then select "Clone".

A new window should pop up, and you can give it a new name, and reinitialize the MAC addresses of the cards (if you want).

CSR1000v and GNS3


Choose "Full Clone", and then click on "Clone".

Repeat this as many times as you want to have as many routers as you need. Remember though that each router takes about 2.5GB of memory, so memory can be used up pretty quickly running CSR1000v routers! This is why I switched to a more powerful machine!

Once you have created as many VMs as you need head back into GNS3. We'll need to rescan the VirtualBox VM list for it to be picked up, but this is just the same as following the first couple of steps we did to get the first CSR into GNS3. You can also choose to untick the "reserve" button here and tick the console button, then save the VM:

CSR1000v and GNS3


You can then add it to GNS3 and start connecting your topology up:

CSR1000v and GNS3
At the moment with a few normal apps running and the above routers memory and CPU usage is quite low:

CSR1000v memory usage

With enough memory you could run a whole stack of CSR1000v routers and have them play happily together. Fun, fun, fun!

Cisco CSR1000v - Part 1: Install and Licensing

Let's face it we can do so much with GNS3 out of the box, it's an amazing tool, especially with the way GNS3 1.0 is shaping up. However, Cisco is moving at a pretty big pace and there is a whole new line up of devices that we can use that are not supported in GNS3 (natively). Thankfully those wise people at GNS3 have leveraged VirtualBox to make our lives easier, and our topologies better and more up to date.

Today we will start having a look at the CSR1000v, we will cover downloaded and installing in VirtualBox, as well as changing our license level. Th4e CSR1000v is a free download if you have a CCO account, which is also free, so really you have no excuses.

The CSR1000v is a virtual router designed to run under VMWare or, as we will be doing here, under VirtualBox.

Getting the CSR1000v

You can download the CSR1000v straight from Cisco with a valid CCO account. The download link is here. Download the ISO image.

Installing the CSR1000v in VirtualBox

Fire up virtualbox and create a new 64-bit Linux VM (using "Other").

Installing CSR1000v in VirtualBox

Give the VM at least 2.5 GB of memory

Installing CSR1000v in VirtualBox

It will need an 8GB hard disk

Installing CSR1000v in VirtualBox

And a serial port

Installing CSR1000v in VirtualBox

Set the CD rom drive to point to the ISO file you downloaded in step 1.

Installing CSR1000v in VirtualBox

Fire it up!

Installing CSR1000v in VirtualBox

The CSR should install onto the hard disk.

Installing CSR1000v in VirtualBox

 Once it has installed and rebooted we can see that we are running IOS XE 15.4

Installing CSR1000v in VirtualBox

We are also running on the standard license, though even if we do change the license level (as we will do next) both still show "License level: limited".

Licensing

At first run the CSR1000v has loads of options for us to play with, but we can make these even better. If we drop into the configuration mode and do a "?" we can see what's available to us. I won't copy out everything here, it'll just waste your time and mine reading through everything. But there is loads of stuff. But we can have more.

We can change the license level and get loads of cool new stuff, and who doesn't like cool new stuff?

The license level is changed by doing the following:
Router(config)#license boot level premium
         Feature Name:prem_eval

(lots of EULA stuff - removed for brevity)


ACCEPT? (yes/[no]): yes

*Jul 22 12:49:06.561: %LICENSE-6-EULA_ACCEPTED: EULA for feature prem_eval 1.0 has been accepted. UDI=CSR1000V:96RG3ZZC37F; StoreIndex=0:Built-In License Storage% use 'write' command to make license boot config take effect on next boot

Router(config)#exit
Router#wr
Router#reload
I did try changing to the advanced level, but this crashed the router. Once we have reloaded our CSR router we now also get (and I am just showing the new options):
Router(config)#?
Configure commands:
  apollo                      Apollo global configuration commands
  appfw                       Configure the Application Firewall policy
  appletalk                   Appletalk global configuration commands
  arap                        Appletalk Remote Access Protocol
  auto                        Configure Automation
  bfd                         BFD configuration commands
  bfd-template                BFD template configuration
  collector                   Define a Collector
  decnet                      Global DECnet configuration subcommands
  gtp                         Enable GTP Gn'
  keymap                      Define a new keymap
  l2                          Layer 2 configuration
  l2vpn                       Layer2 VPN commands
  l3vpn                       l3vpn encapsulation ip commands
  lat                         DEC Local Area Transport (LAT) transmission protocol
  mcsa                        Configure mcsa
  mediatrace                  Mediatrace Application
  menu                        Define a user-interface menu
  metadata                    Metadata Application
  mop                         Configure the DEC MOP Server
  mpls                        Configure MPLS parameters
  mvr                         Enable/Disable MVR on the switch
  otv                         Configure OTV information
  parameter-map               parameter map
  performance                 Global Performance monitor configuration
  pfr                         Performance Routing configuration submodes
  pfr-map                     Create pfr-map and enter pfr-map command mode
  pppoe                       PPPoE global configuration
  pseudowire-class            Pseudowire-class configuration
  pseudowire-static-oam       Static PW OAM configuration
  pseudowire-tlv              Global PW TLV configuration
  service-insertion           Service Insertion mode
  sgbp                        SGBP Stack Group Bidding Protocol configuration
  sgcp                        Enable Simple Gateway Control Protocol
  sgi                         Configure SGI
  smrp                        Simple Multicast Routing Protocol configuration commands
  spanning-tree               Spanning Tree Subsystem
  tarp                        Global TARP configuration subcommands
  tn3270                      tn3270 configuration command
  translate                   Translate global configuration commands
  ttycap                      Define a new termcap
  vc-group                    Define a Frame Relay VC group
  vines                       VINES global configuration commands
  vty-async                   Enable virtual async line configuration
  vxlan                       Configure VxLAN information
  xconnect                    Xconnect config commands
  xremote                     Configure XRemote
  zone                        FW with zoning
  zone-pair                   Zone pair command
Look at all that cool stuff! We have the ability to do loads of old stuff like DECnet and Appletalk, but even better that old stuff, we have new stuff, like MPLS (and by extension, VPLS), spanning-tree, EoMPLS with xconnects, OTV, VxLANs, Layer 3 VPNs!

Impressed yet?

We will start to have some fun with this in another post when we get it connected to GNS3 and build something fun to play with.