Welcome back to part 4 of the big lab. So far we have covered some trunking and etherchannel technologies, PPP and OSPF.
Today we are going to extend our topology by adding RIP. The exam guide has RIPv2 under part 2.30 and does not have as much listed for is as say OSPF or EIGRP. So what can we do with RIP? Well apart from the obvious basic configuration we'll use it as the intermediate routing protocol for redistribution - with the end goal being that our OSPF network will be able to talk to our EIGRP network.
Out topology has evolved since the first part of this series, and will, in all probability, change again. But at the moment it looks like this:

About RIP
RIP is a Distance Vector protocol, it has a maximum of 15 hops so does not scale well in larger environments.RIP comes in two flavours - version 1 (RIPv1) and version 2 (RIPv2).
RIPv1 versus RIPv2
RIPv1 is classful so does not include the subnet mask in its routing updates, therefore it does not support VLSM. Version 2 is classful to overcome this and so does include the subnet mask in the updates, and also supports VLSM. RIPv2 also supports authentication and route tagging. Cisco IOS will default to version 1.Interoperability between RIPv1 and RIPv2
RIPv1 will only send version 1 packetsRIPv1 can receive V1 and V2 packets
RIPv2 will only send and receive V2 packets
Configuring RIPv2
At the moment we will concentrate on R4, R5, R6 and R7.I will be using the 10.20.X.X/24 networks in this post:
R4
s0/1 - 10.20.1.1/24
R5
s0/0 - 10.20.1.2/24
so/1 - 10.20.2.1/24
R6
s0/0 - 10.20.2.2/24
s0/1 - 10.20.3.1/24
R7
s0/1 - 10.20.3.2/24
lo0 - 10.60.1.1
Lets start by setting up R4:
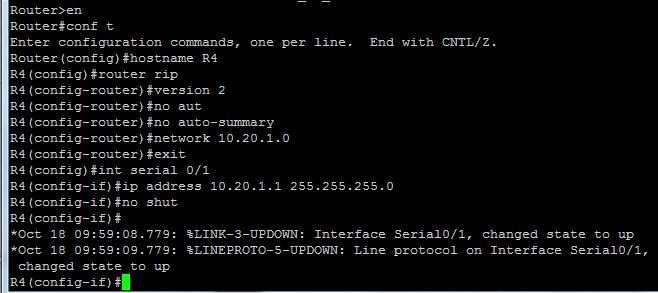
We start with creating the routing process using the command "router rip". We then specify the version to be v2 with the sub command "version 2"
RIP will by default summarize networks on classfull boundaries so we use the command "no auto-summary", and after that we can specify which of our local networks we want to participate in the RIP process using the command "network 10.20.1.0".
R5 is very similar:

Not at this stage would we expect R4 to see the 10.20.2.0/24 subnet in its routing table? R5 has an interface that is configured for that network, and we have advertised it into the RIP process, so it should be there, right? Well no. R5 does not even have the 10.20.2.0 network in its routed table. It's not until we fire up R6 that we can see the network advertised:

Its easier to see on R5 as we can see the interface coming up:

And on R4 we can now see:

R6 and R7 were started at around the same time so we get the 10.20.3.0 network advertised into our RIP process much quicker:

Although its not shown the command "no auto-summary" has been set, the routing table looks good:

R7 will have a loopback address and will be used to create the tunnel over to R9 in a different post.

Now if we head back over to R4 we can see that out routing table now looks like this:

And we have full reachability


Advanced RIPv2 configuration
So far our RIPv2 implementation is very straight forward, in fact this is the beauty of RIP in that it is very simple, doesn't scale well for larger environments, but its simple.So what can we do with it now that we have it in place? We can:
- Configure the timers
- Control participation in RIP through passive-interfaces
- Change the default behaviour from multicast to unicast
- Set authentication for RIPv2
Configuring RIP timers
RIP has four timers (default times are in brackets):
Update timer (30 seconds) - how often a router will send a routing table update
Invalid timer (180 seconds) - how long a route remains in the routing table before being declared invalid. A route declared invalid will be placed in the hold-down state and advertised with a metric of 16 (unreachable).
Hold-down timer (180 seconds) - RIP will not accept updates for routes in the hold-down state unti the hold-down timer expires.
Flush timer (240 seconds) - how long a route can remain in the routing table before being flushed. Runs at the same time as the Invalid timer - so a route marked as Invalid will be flushed after 60 seconds.
RIP timers must be identical on all routers in the RIP network, otherwise instability will occur.
We can adjust the timers using the command
Router(config)#router rip
Router(config-router)#timers basic 20 120 120 160
This would set the Update timer to 20 seconds, the Invalid and Hold-down timers to 120 seconds and the Flush timer to 160 seconds.
Passive-interfaces
A passive interface will allow a router to listen to updates from the neighbouring RIP routers, but will not send any updates back.
within the RIP process we use the command "passive-interface <interface>" command:

We can configure all interfaces to be passive using the command "passive-interface default" and then remove particular interfaces from this default behaviour by the command "no passive-interface <interface>"
If we want to have even tighter control we can use the passive-interface command and use unicast instead of multicast for our neighbors.
Controlling RIPv2 updates - from Multicast to Unicast
By default RIPv2 uses multicast to send out updates,with the IP address 224.0.0.9. We can change this to unicast by specifying the neighbor command (similar to BGP).
On R5 and R6 we will change from the default of multicast updates to unicast:

If we turn on debugging for rip we can see that on R5 its using multicast for one connection and unicast for another connection:

Above we can see that it it sending an update over serial 0/1 to R6 using the 10.20.2.2 unicast address but also via multicast. To force unicast only on the specific interfaces we need to include the "passive-interface" option, once we have done this we can look at the debug output on R5 and see:

Now we can see that updates to R4 over serial 0/0 are still using the multicast address, but all updates sent and received between R5 and R6 use the unicast address.
RIPv2 Authentication
The final thing we are going to cover today is RIPv2 authentication.RIPv2 authentication is very similar to other routing protocol authentication setups. We start by creating a keychain:

Next we go into our respective interfaces and specify that rip will be using a keychain and what mode we are to use (clear text or md5):

Its always worth checking back with another router (R4 in this case) to make sure that we don't lose any routes along the way. But we can also debug the rip database to see what's going on.
Here we can see that I have lost the 10.60.1.0 network:

If I remove the authentication between R6 and R7 the loopback is back:

If I try adding it back with text mode, it still loses the route. If I turn on debugging for rip we can see:
The configs look fine:

So once we remove and then re-add the keychain we can head back to R7 and finally see the authentication working correctly:

Chances are there was an space at the end of the keychain key-string, which although not visible in the config, would still be taken as part of the key-string passed between routers - a handy exam tip!
R4 can again see the 10.60.1.0 network:

RIPv2 debugging
So some useful debugging there! I used "debug ip rip" to see that the authentication was wrong and "debug ip rip database" to see what gets added and removed from the routing table, and I also used "debug ip rip events" to see the flow of updates.
That's it for today. In the next post we'll get EIGRP up and running before we move on to redistributing between the three protocols.